
 Welcome to WAPI!
Overview
The **Admin Settings** module is the centralized command center for your WAPI platform. It provides administrators with absolute control over global application behavior, ranging from front-end branding and identity to deep technical integrations like WhatsApp API credentials and SMTP mail servers.
By leveraging this module, you can fine-tune the platform's persona, enforce usage limits, manage system availability through maintenance modes, and ensure that every automated communication remains on-brand and deliverable.
Settings Navigation
The Settings interface is organized into nine functional zones:
General
App info & preferencesBranding
Logos & iconsChannel Platforms
Enable Omnichannel platformsFacebook & Instagram
Webhook integration for FB/IGAWS
AWS S3 configurationLimits
File & group limitsOTP Delivery
Configure OTP delivery methodsHeader Banner
Manage header announcement bannerMaintenance
Maintenance & error pagesSignup Customization
Configure signup agreement line & pageOTP Delivery
Configure how One-Time Passwords (OTPs) are delivered to new users during the registration process.

Delivery Methodology
Administrators can choose the primary channel for OTP verification. Selecting the right channel is crucial for user onboarding conversion.
Email Delivery
OTPs are sent via the configured SMTP server. Ensure your Email settings are correctly provisioned.
WhatsApp Delivery
OTPs are sent as WhatsApp messages. This requires an active WABA connection and a verified Authentication template.
To enable WhatsApp OTP delivery, you MUST first connect your WABA in the Self Tenant section. Once connected, you must create an Authentication Template within the Meta dashboard or Template Library before it can be selected here.
Variable Mapping & Authentication
When WhatsApp is selected, you must map the system variables to your template parameters to ensure the code is delivered correctly.
- Template Selection: Select your pre-approved authentication template from the dropdown menu.
- Variable Mapping: The system will open the variable mapping
interface. You must add the
otp_codevariable. - Strict Requirement: Ensure you set only the
otp_codemapping value. Do not select or map any other values for authentication templates.
System Note:
Whenever a new registration occurs, the WAPI platform will automatically generate the code and transmit it to the user's WhatsApp number using the mapped template.
General Settings
Manage core application identity and global functional behaviors.
Application Info
| Setting Field | Functional Description |
|---|---|
| App Name | The primary display name of the platform (e.g., "Wapi"). Appears in titles and emails. |
| App Email | The primary system email used for administrative notifications and status updates. |
| App Description | A concise summary of the platform's purpose (e.g., "WhatsApp Marketing Platform"). |
| Support Email | The customer-facing email address where users can report issues or request help. |
| Default Theme Mode | Sets the global visual preference (Light or Dark) for new users. |
| Session Expiration | Defines the duration (in days) that a user session remains active before requiring re-login. |
Global Preferences
When enabled, new users can register for accounts directly from the landing page.
Protects sensitive data by masking credentials and preventing critical system changes.

Logos & Icons
Set URLs or upload images for your application logos and icons.
The small icon appearing in browser tabs. Recommended size: 32x32px or 64x64px.
The primary logo displayed on light backgrounds (e.g., standard layout).
High-contrast logo for dark theme modes or dark navigation bars.
Specialized icon used when the sidebar is collapsed in light mode.
Specialized icon used when the sidebar is collapsed in dark mode.

WhatsApp API Credentials
Configure your Meta WhatsApp Business API credentials to enable messaging.
| Credential Field | Functional Description |
|---|---|
| App ID | The unique identifier for your Meta Application (found in Meta App Dashboard). |
| App Secret | The secret authentication key used to verify your app's identity with Meta. |
| Configuration ID | The specific WhatsApp Configuration ID assigned to your business account. |
| Webhook Verification Token | A custom secret string (e.g., `v3r1fY_T0k3n_9x8z7`) used by Meta to verify your webhook's authenticity. |
| WhatsApp Webhook URL | The server endpoint (e.g., `http://localhost:5000/whatsapp/webhook`) where Meta sends message updates. |

SMTP Configuration
Configure outgoing email via SMTP to enable system alerts and user notifications.
Server Settings
| SMTP Field | Functional Description |
|---|---|
| SMTP Host | The address of your mail server (e.g., `smtp.gmail.com` or `smtp.sendgrid.net`). |
| SMTP Port | The protocol port (usually `587` for TLS or `465` for SSL encryption). |
| SMTP Username | The account email or username used to authenticate with the mail server. |
| SMTP Password | The secret password or app-specific token for mail server authentication. |
Sender Details
The name recipients will see in their 'From' field (e.g., "My Application").
The email address used as the sender (e.g., "noreply@yourdomain.com").

Google Cloud Integration
Configure Google OAuth2 credentials to enable features like Google Calendar integration and Login with Google.
| Credential Field | Functional Description |
|---|---|
| Google Client ID | The unique public identifier for your Google Cloud project application. |
| Google Client Secret | The private secret key used to authenticate your application with Google services. |
| Google Redirect URI | The authorized callback URL (e.g., `https://yourdomain.com/api/google/callback`). |

Setup Instructions
Open https://console.cloud.google.com/ and sign in.
Click the project dropdown (top left) → New Project. Enter a name and click Create.

Go to APIs & Services → Credentials. Search for and enable Google OAuth API or Google People API.

Go to APIs & Services → Credentials. Click + Create Credentials → OAuth client ID. Choose Web Application.

Under Authorized Redirect URIs, add your callback URL (e.g.,
http://localhost:3000/auth/google/callback or your production domain).

After creating, copy the Client ID and Client Secret into your admin settings.

Go to APIs & Services → OAuth consent screen. Choose "External" and fill in the required app details.
Go to “Audience” or “Test Users”
While your app is in "Testing" status, only users added to the Test users list can log in. Click + Add users and enter the Gmail addresses you'll use for testing.

AWS Configuration
Configure your AWS S3 credentials for scalable media storage.
Purpose: After enable AWS, your data will be stored in AWS S3 bucket.
| Credential Field | Functional Description |
|---|---|
| AWS Access Key ID | Your unique identification key for AWS S3 access. Found in IAM Security Credentials. |
| AWS Secret Access Key | The primary authentication key. (Visible only once during creation). |
| AWS Region | The physical location of your bucket server (e.g., `us-east-1` or `ap-south-1`). |
| AWS S3 Bucket | The unique name of the bucket you created for storing application files. |

AWS S3 Setup Guide
Go to AWS Dashboard → Search Amazon S3 → Create bucket.
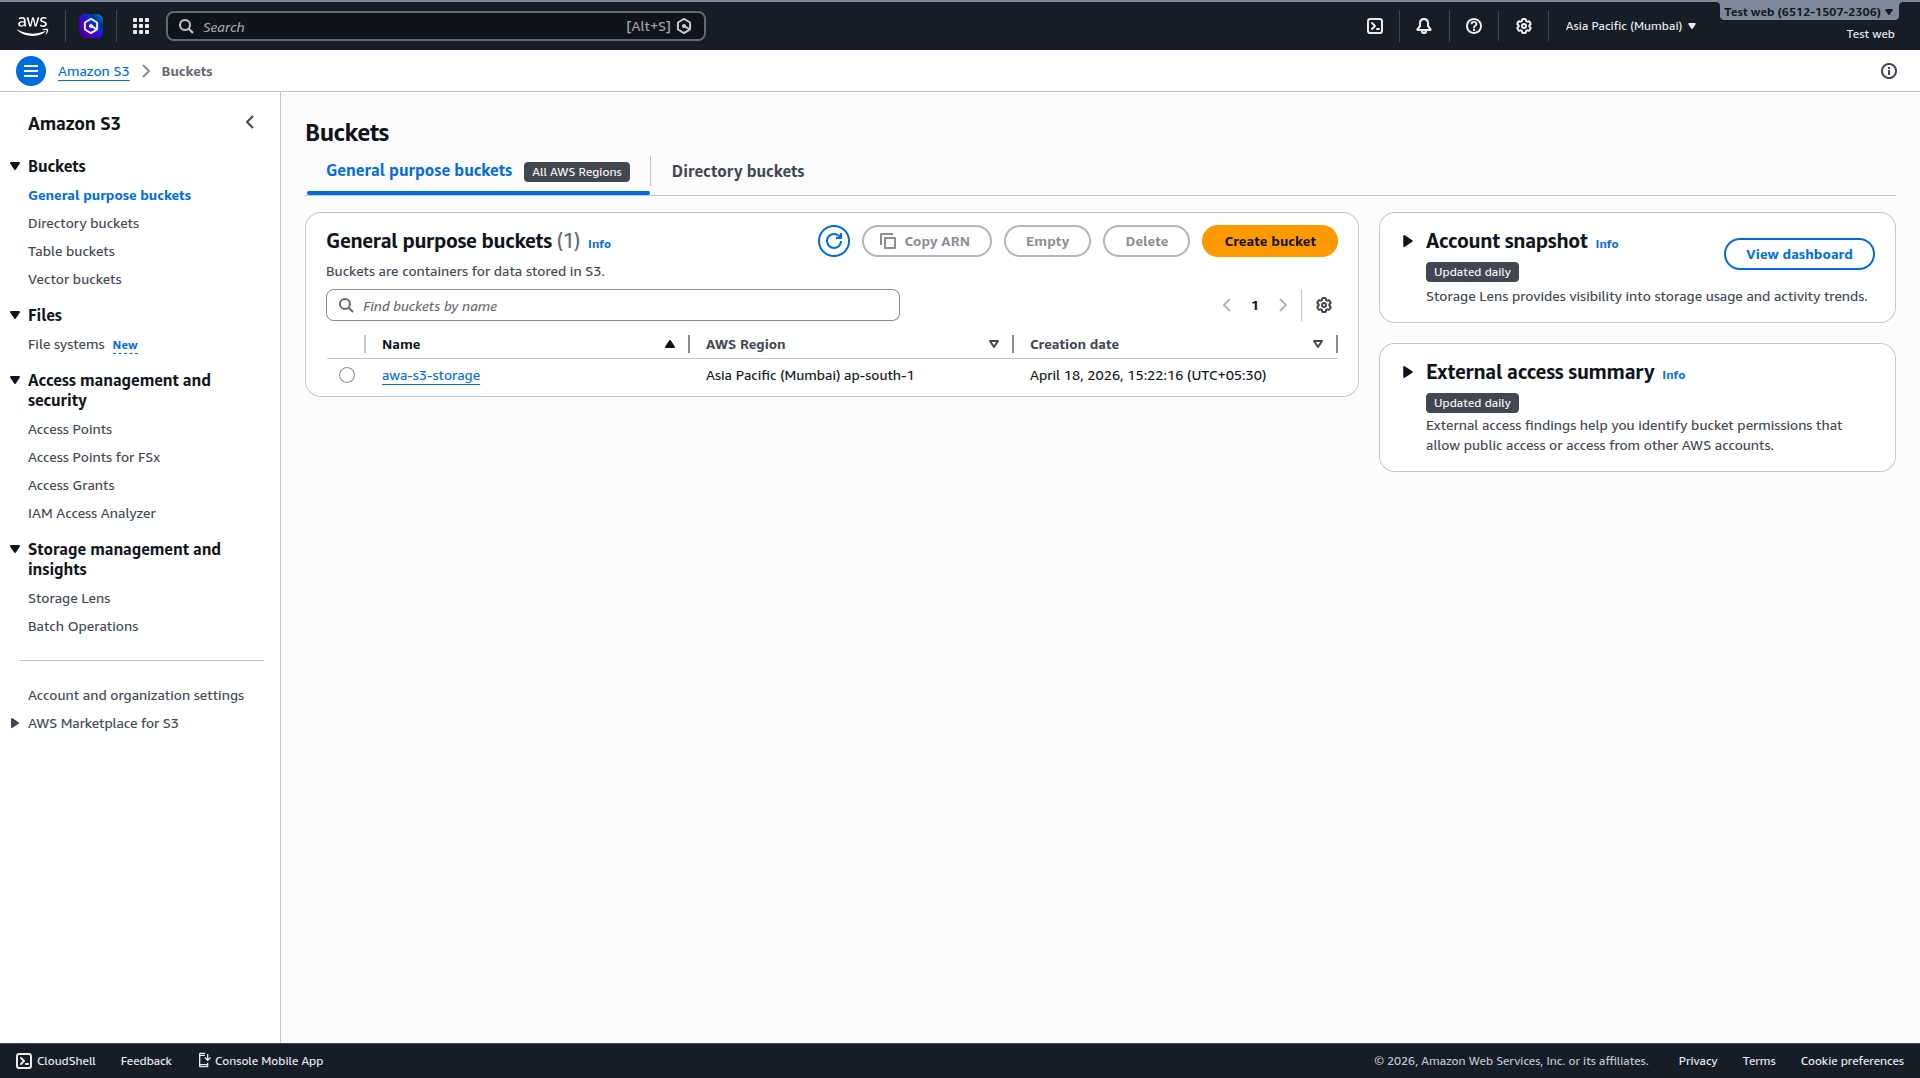
- Bucket Type: Select General purpose.
- Bucket name: Enter a unique name (e.g.,
wapi-storage-bucket). - AWS Region: Select your preferred server location (e.g.,
ap-south-1). - Object Ownership: Select ACLs enabled and Bucket owner preferred.
- Block Public Access: Uncheck Block all public access to allow external file retrieval.
- Encryption: Keep default SSE-S3 and Enable Bucket Key for optimized cost.


As per the given image, fill the details and click on Create bucket.
You will get the bucket name and bucket region. Copy them and save them somewhere safe.

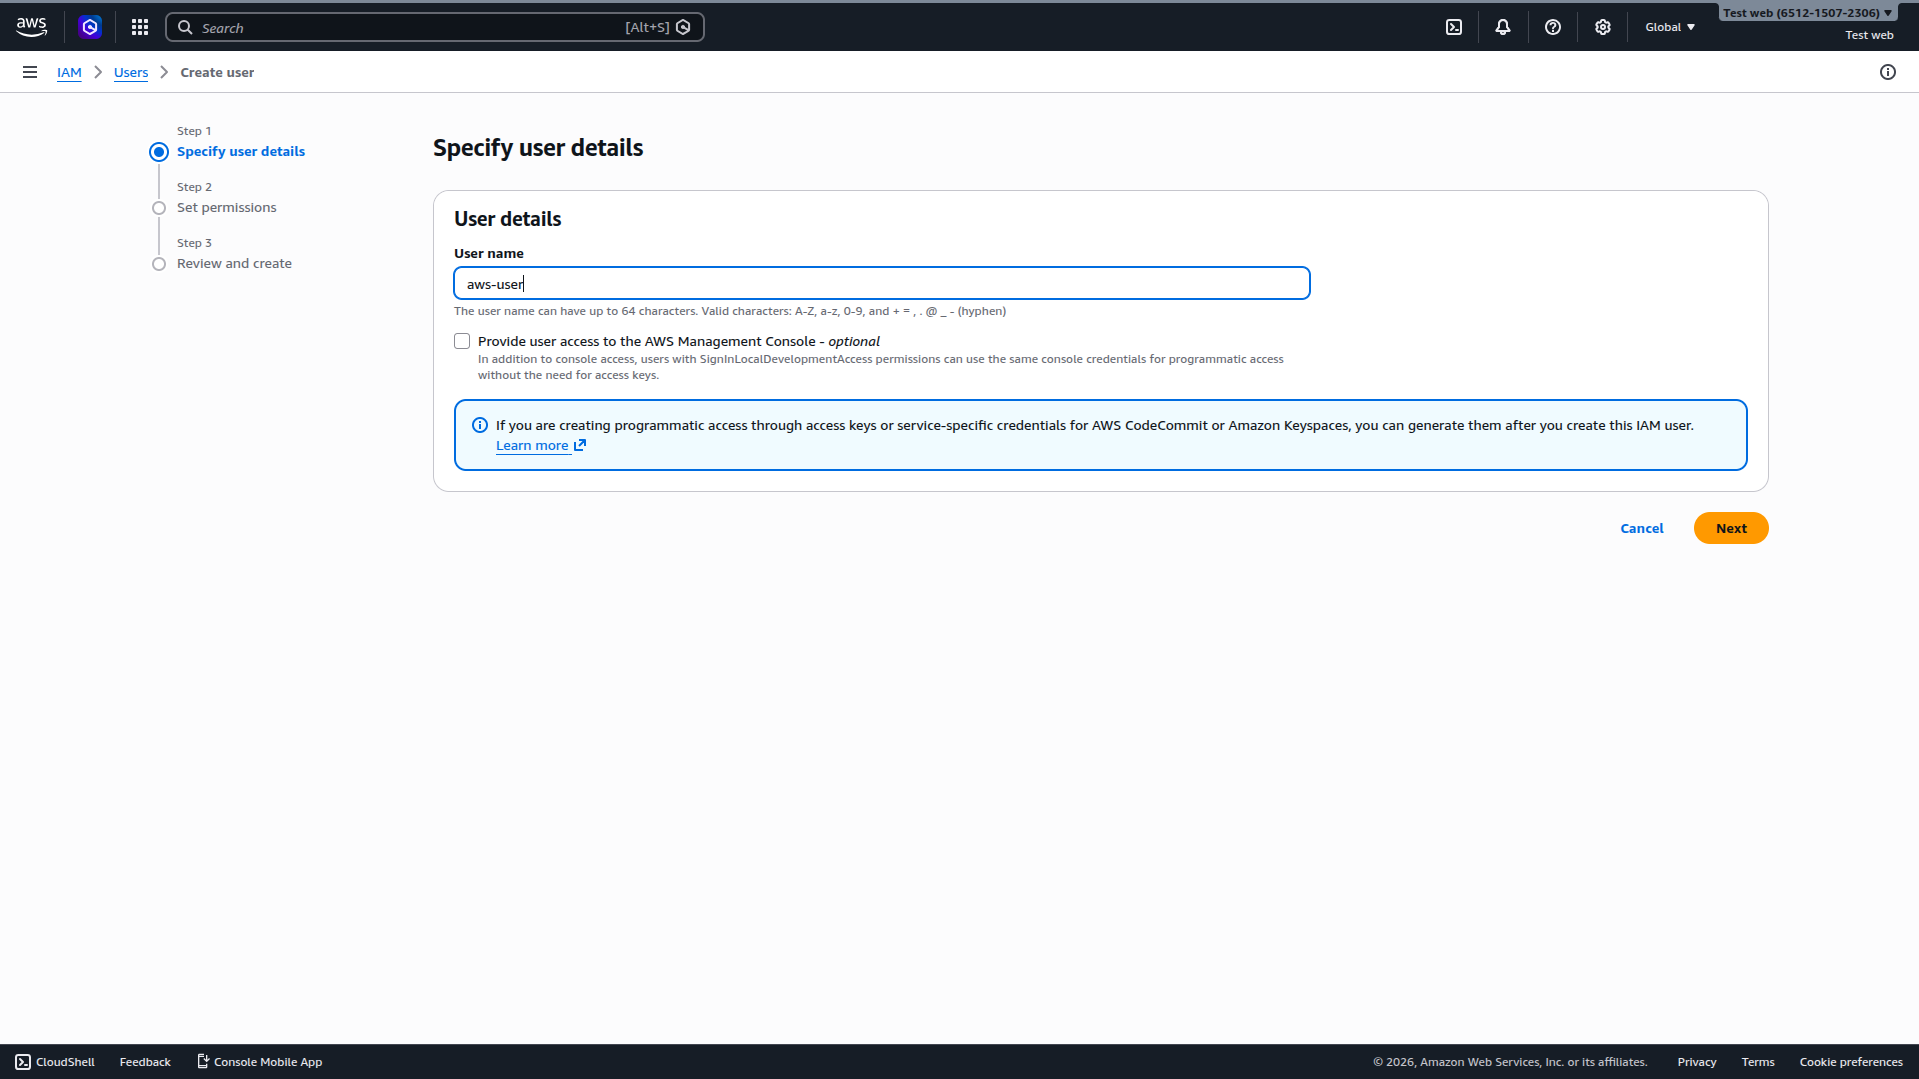
Search IAM in the AWS Management Console search bar and navigate to Users → Create user.
Step A: Specify User Details
- Enter a descriptive name (e.g.,
wapi-s3-user).
Step B: Set Permissions
- Select Attach policies directly.
- Search for AmazonS3FullAccess and ensure it is checked.

Step C: Review & Create
- Verify the details and click Create user.

Step D: Generate Access Keys
- Navigate to the newly created user and click on the Security credentials tab.
- Scroll down to the Access keys section and click Create access key.
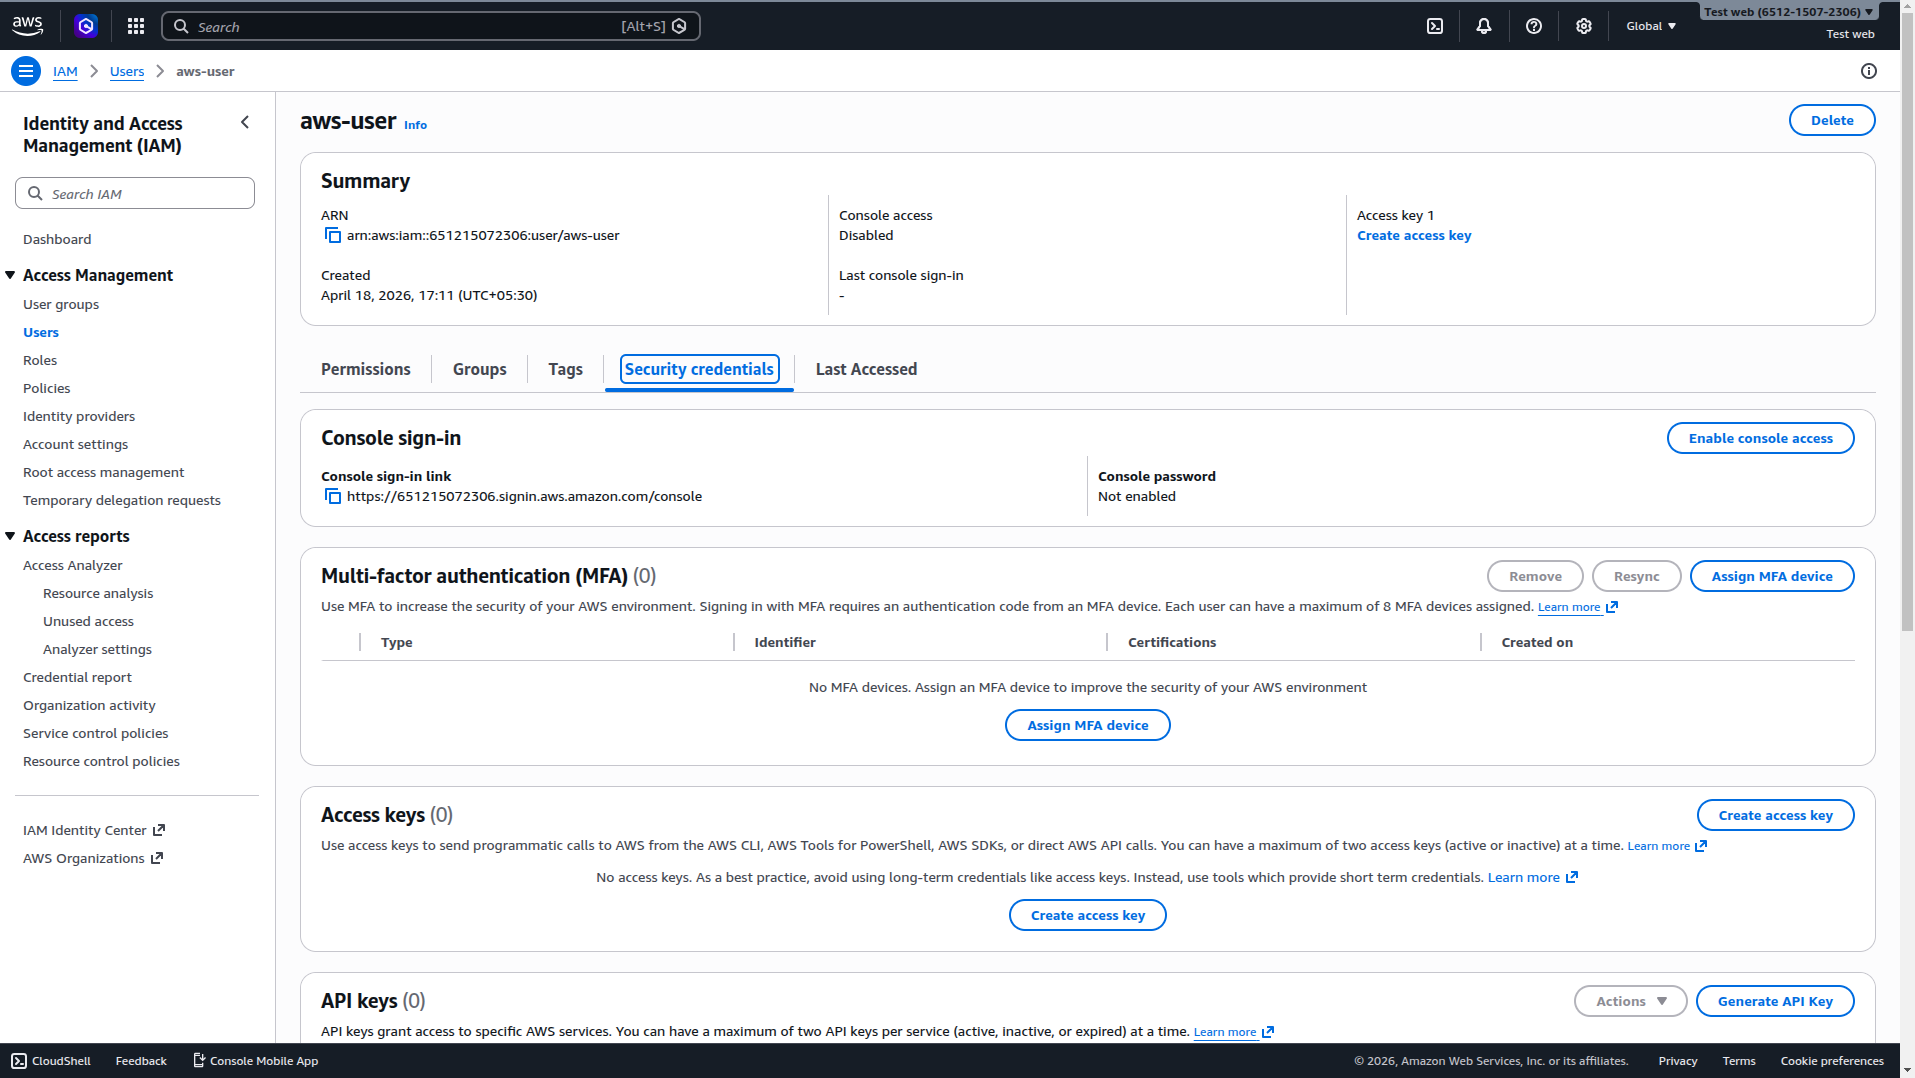
- Select Application running outside AWS from the best practices list and click Next.
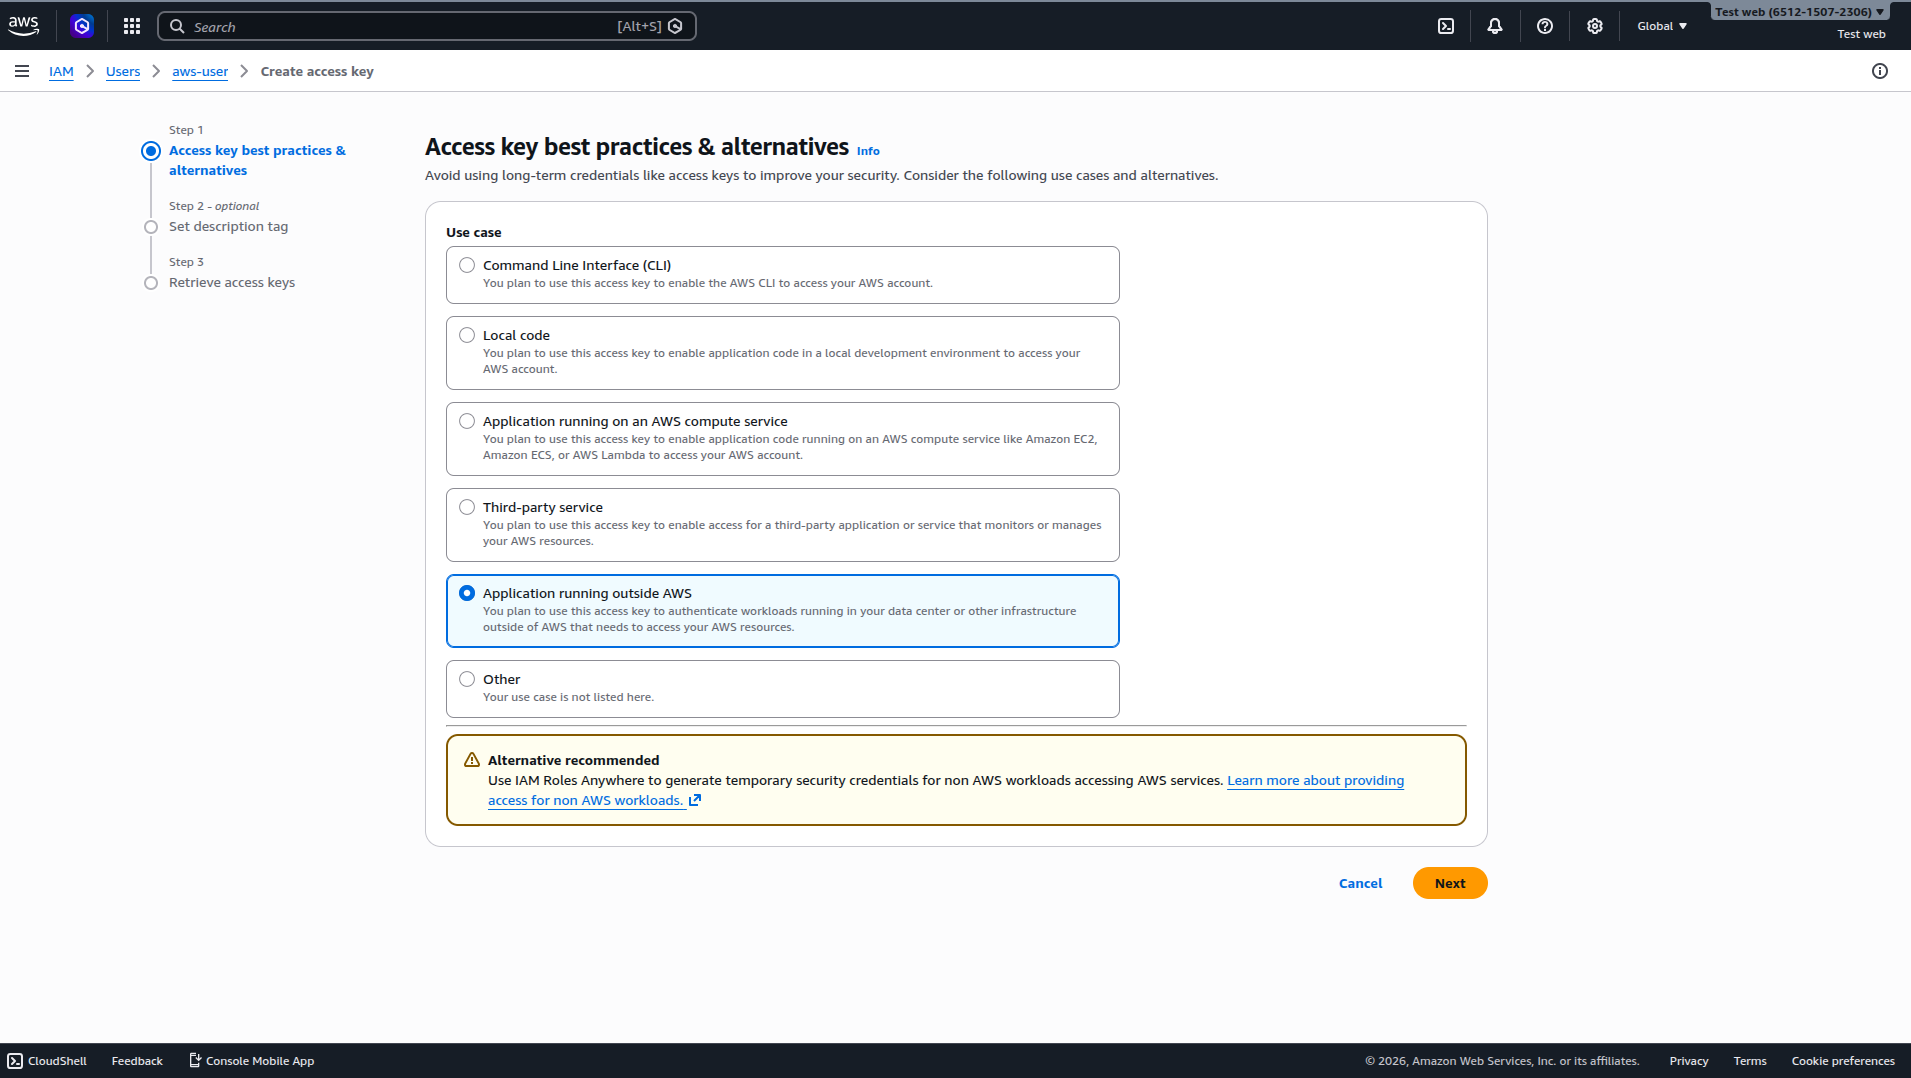
- (Optional) Set a description tag and click Create access key.

- Critical: Copy your Access Key ID and Secret Access Key immediately and save them securely.

You can track your storage usage and manage your uploaded files by navigating to the Buckets section in the Amazon S3 console.


click on bucket name to monitor your storage
Note:after collecting all the details, go to the Admin Settings page and click on the AWS tab and enter the details in the respective fields.
Infrastructure & Governance (Limits)
Communication Features
| Feature | Description | Default State |
|---|---|---|
| Media Sharing | Enable or disable the capability for users to send media files across the platform. | Enabled |
File Upload & Storage Limits
| Category | Field Name | Value (MB / Count) | Description |
|---|---|---|---|
| Documents | Document Limit | 15 MB |
Maximum size for PDF, DOC, etc. |
| Audio | Audio Limit | 15 MB |
Maximum size for MP3, WAV, etc. |
| Video | Video Limit | 20 MB |
Maximum size for MP4, MOV, etc. |
| Images | Image Limit | 10 MB |
Maximum size for JPG, PNG, etc. |
| Batching | Multi-file Share Limit | 10 |
Max number of files per single share operation. |
| Quota | Total Storage Limit | 100 MB |
Global storage cap per user/group. |
jpg, jpeg, png, gif, webp, svg, mp4, mpeg, mov, webm, mp3, wav, ogg, pdf, doc, docx, xls, xlsx, ppt, pptx, txt, json, csv
Storage Management
- Restore Storage on Delete: If enabled, deleted files will be subtracted from the user's total storage usage, freeing up quota.

Maintenance Protocols
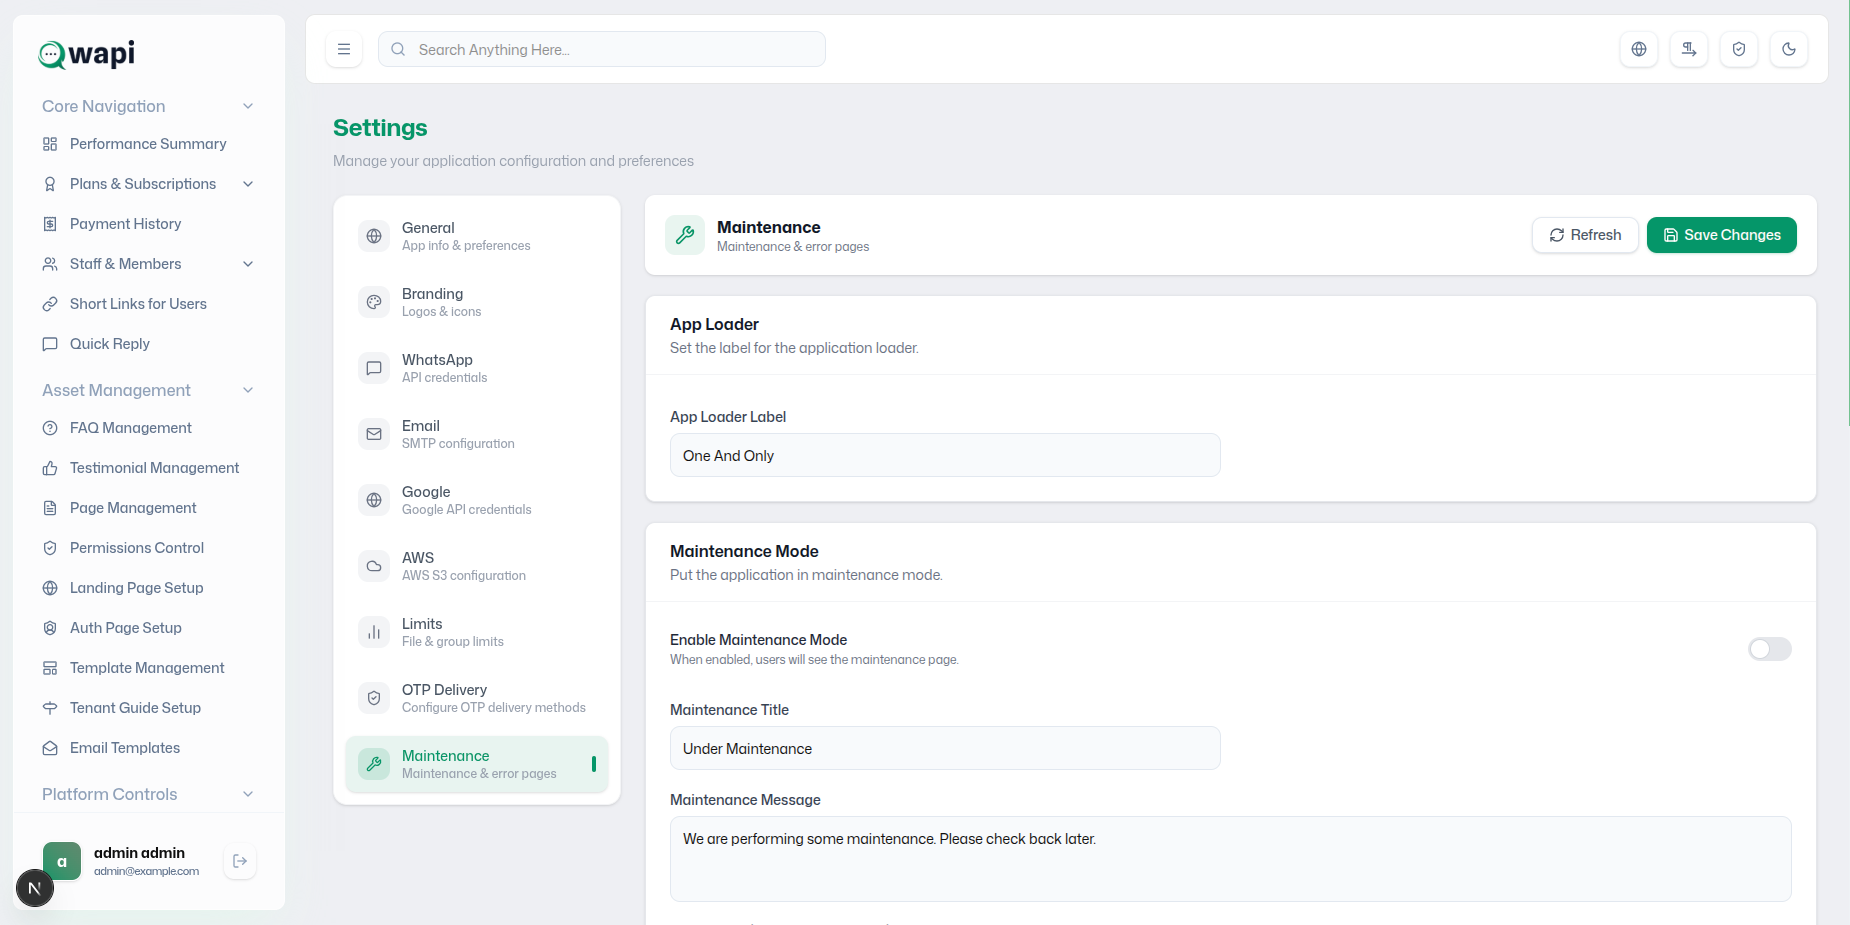
Maintenance Mode
| Setting | Field Name | Example / Default | Description |
|---|---|---|---|
| Status | Enable Maintenance Mode | Disabled | When enabled, users will see the maintenance page instead of the app. |
| Title | Maintenance Title | Under Maintenance |
Main heading displayed on the maintenance screen. |
| Message | Maintenance Message | We are performing some maintenance... |
Detailed information explaining the reason for downtime. |
| Whitelisting | Allowed IPs | eg. 192.168.1.1 |
IP addresses that can bypass maintenance mode to access the app. |
Maintenance Page Visuals
- Maintenance Page Image: Upload a custom graphic or provide a URL to style the maintenance experience.
Channel Platforms
Manage and toggle omnichannel integration platforms globally across the system.
Omnichannel Platforms
Choose which communication channels are enabled globally across the system. Disabled channels will not be accessible to workspaces, regardless of their subscription plan.
Telegram Bot
Enable Telegram Integration to allow customer support, broadcast messages, and automated chatbots.
Facebook Messenger
Enable Facebook integration to interact directly with clients via pages, comments, and automated workflows.
Instagram Direct
Enable Instagram integration to receive customer DMs, track media shares, and run promotional customer campaigns.
If a platform's status is Disabled globally here, it cannot be selected or offered when creating subscription plans. To make a channel available for workspaces, it must first be enabled in this section.
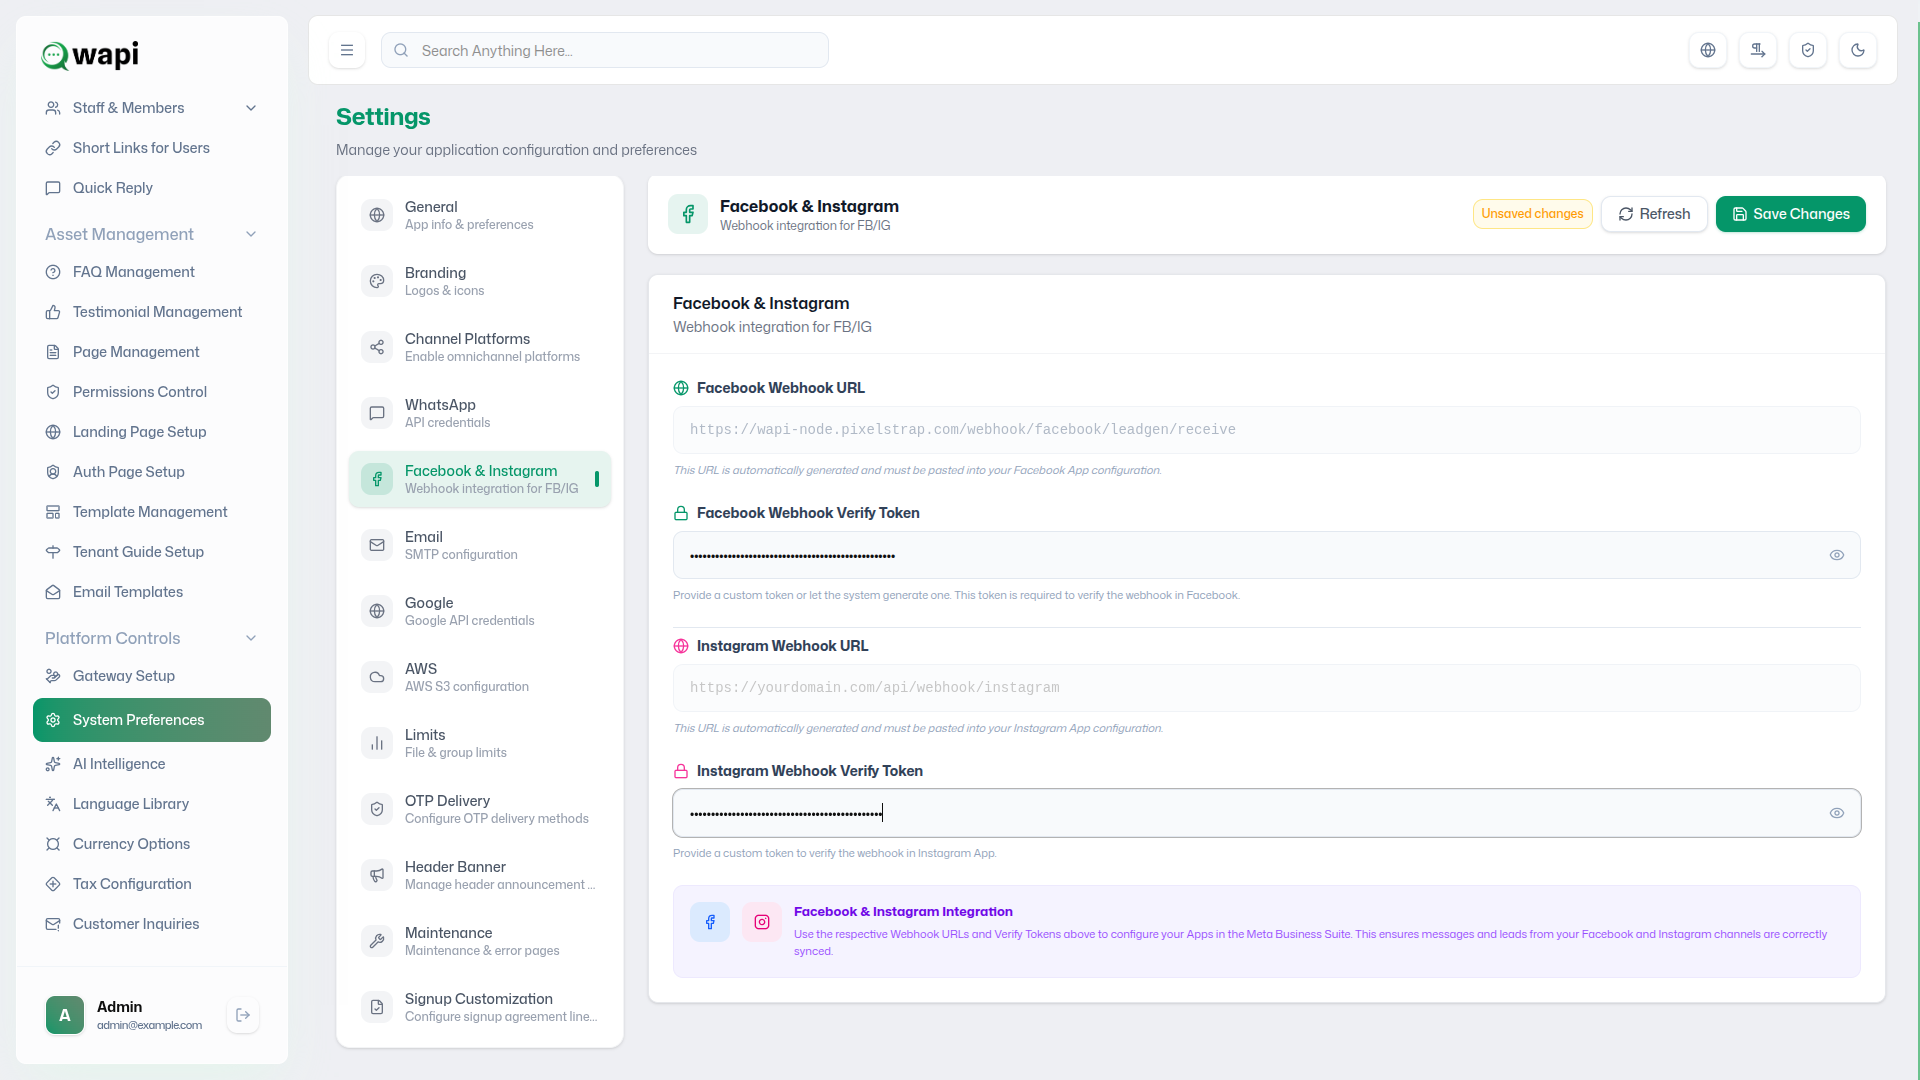
Facebook & Instagram
Webhook integration for FB/IG.
Webhook Configuration
| Credential Field | Functional Description |
|---|---|
| Facebook Webhook URL | This URL is automatically generated and must be pasted into your Facebook App configuration within the Meta Business Suite to route incoming messages and leads to your platform. |
| Facebook Webhook Verify Token | Provide a custom token or let the system generate one. This token is required to verify the webhook connection within your Facebook App. |
| Instagram Webhook URL | This URL is automatically generated and must be pasted into your Instagram App configuration to receive incoming DMs and customer interactions. |
| Instagram Webhook Verify Token | Provide a custom token to verify the webhook in your Instagram App setup. Once added here, it directly connects the channel token. |
Use the respective Webhook URLs and Verify Tokens above to configure your Apps in the Meta Business Suite. This ensures messages and leads from your Facebook and Instagram channels are correctly synced.
Header Banner
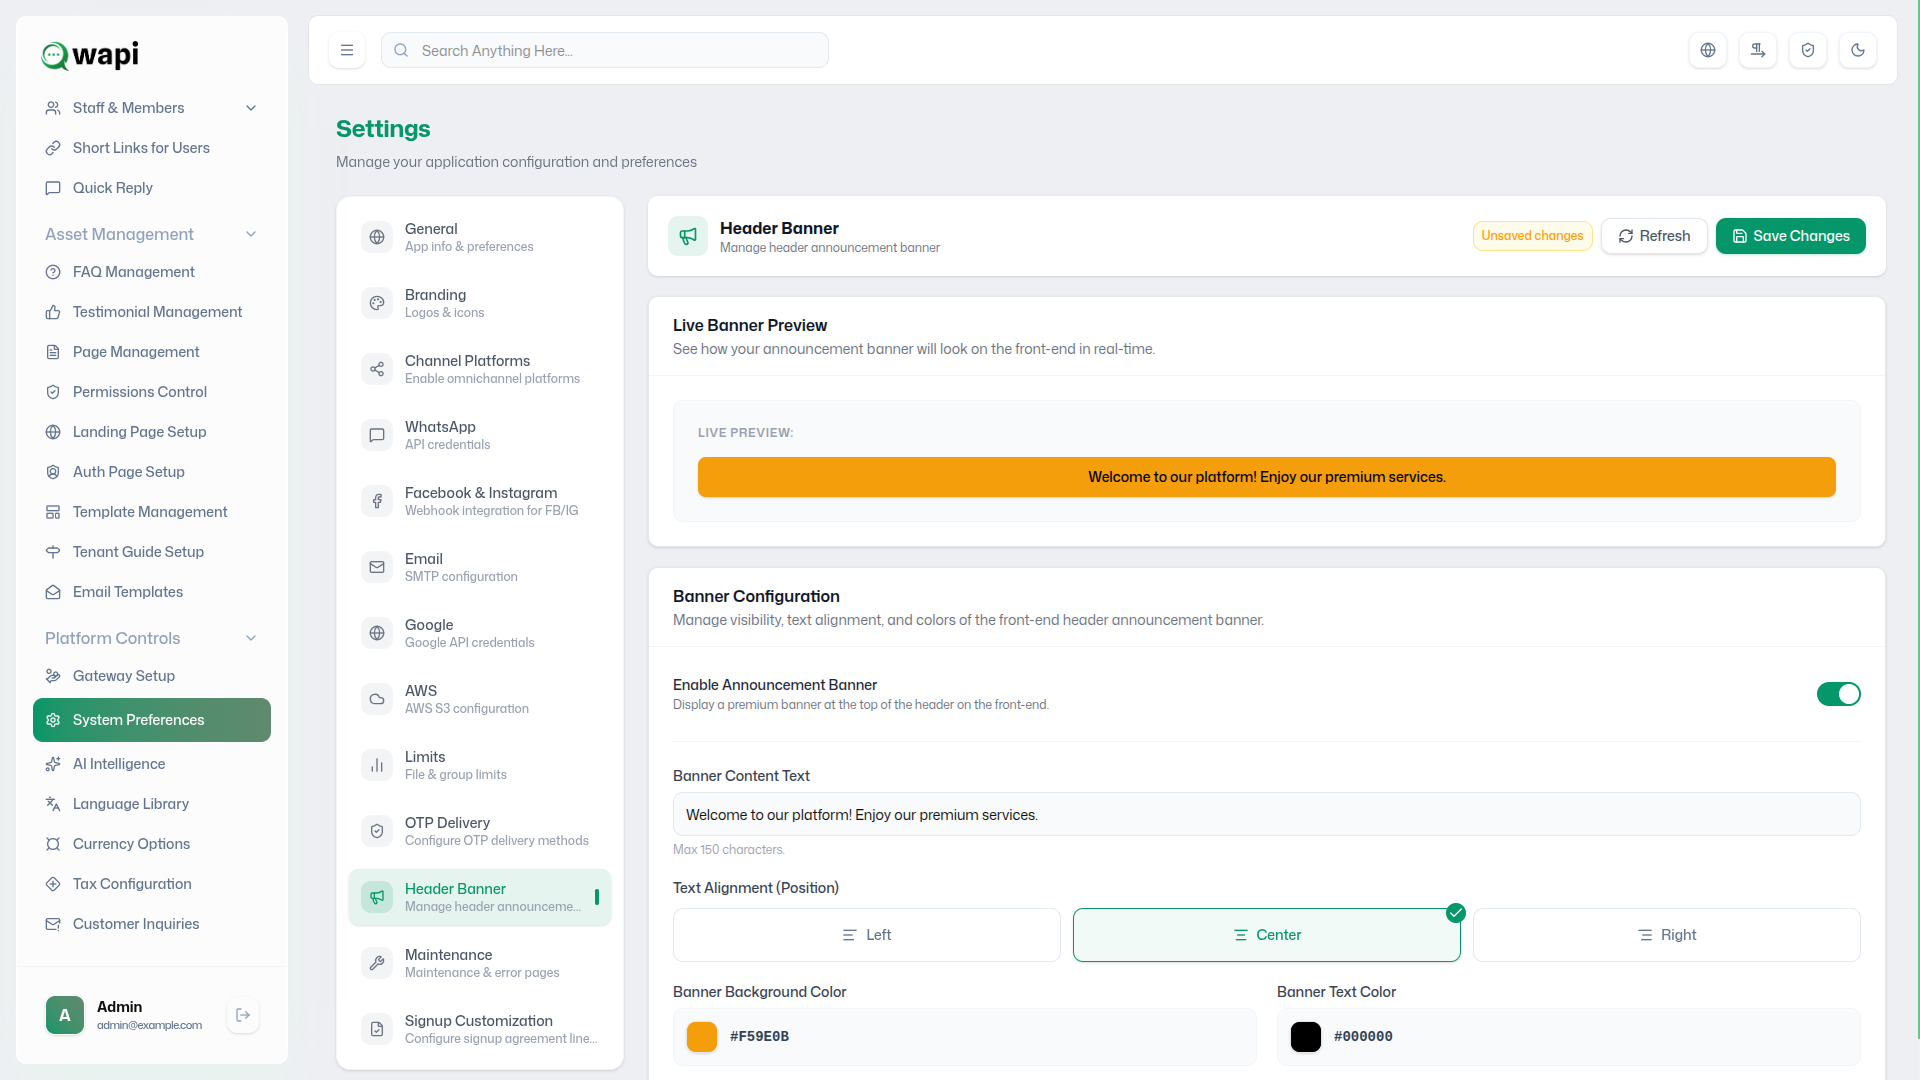
Manage visibility, text alignment, and colors of the front-end header announcement banner.
Banner Configuration Parameters
| Configuration Option | Description & Usage |
|---|---|
| Enable Announcement Banner | Toggle to display or hide a premium banner at the top of the header on the front-end user interface. |
| Banner Content Text | The primary message to display to your users (e.g., "Welcome to our platform!"). Limited to 150 characters to ensure responsive design integrity. |
| Text Alignment (Position) | Select the text alignment for the banner: Left, Center, or Right. Center alignment is recommended for maximum visibility. |
| Banner Background Color | Choose the background color of the banner using the color picker. Ensure there is sufficient contrast with the text color. |
| Banner Text Color | Choose the color of the text using the color picker to maintain optimal readability. |
Real-time Preview:
The Live Banner Preview section allows administrators to see exactly how their color selections and text copy will render on the front-end before saving changes.
Signup Customization
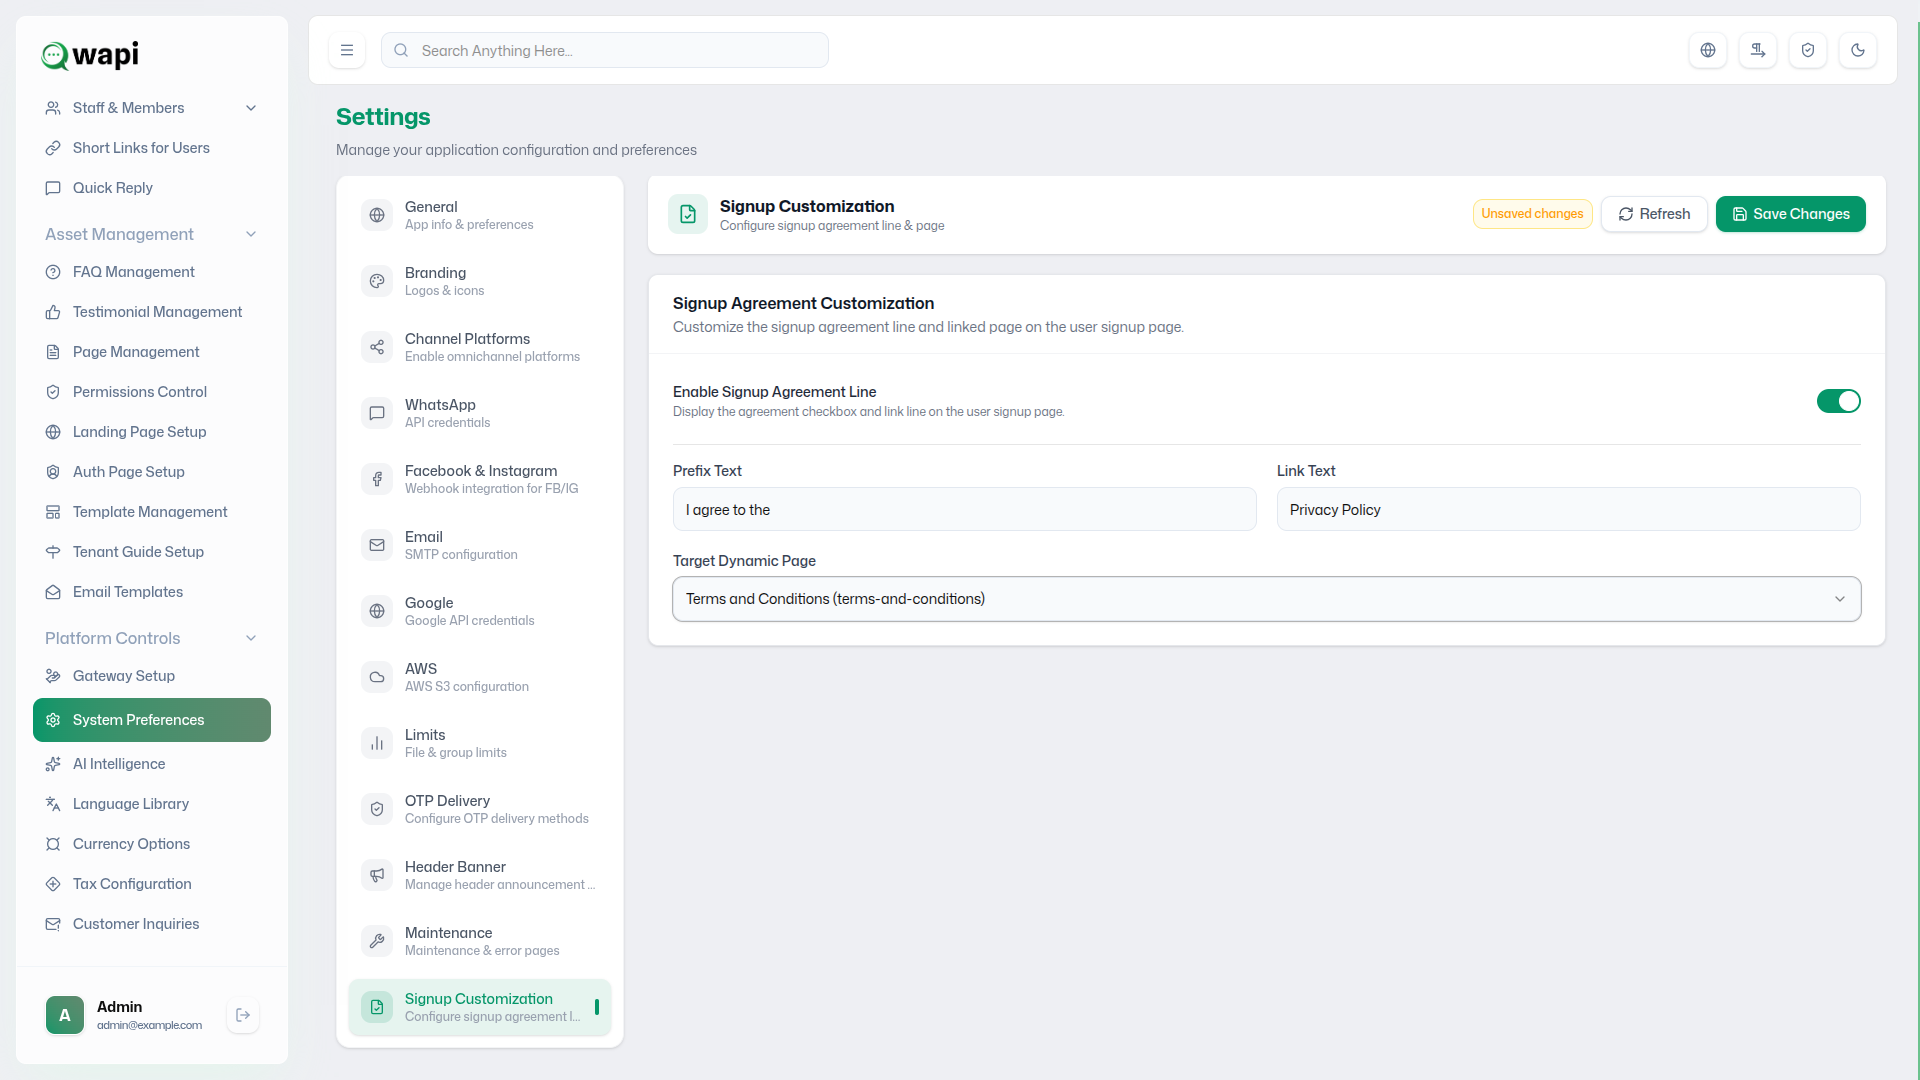
Signup Agreement Customization
Customize the signup agreement line and linked page on the user signup page.
| Configuration Option | Description & Usage |
|---|---|
| Enable Signup Agreement Line | Toggle to display the agreement checkbox and link line on the user signup page. If disabled, users can register without explicitly checking an agreement box. |
| Prefix Text | The unlinked text that appears before the link (e.g., "I agree to the "). |
| Link Text | The actual clickable text that directs the user to the policy page (e.g., "Privacy Policy" or "Terms of Service"). |
| Target Dynamic Page | Select the specific dynamic page from your platform that the link should route to when clicked by the user during registration. |
Configure signup agreement line & page.
Compliance Tip:
Enabling the Signup Agreement Line is highly recommended to ensure users explicitly agree to your Privacy Policy and Terms of Service before accessing the platform.
Operational Best Practices
- Incremental Saves: Each section (General, Branding, etc.) requires a separate Save Changes click.
- SMTP Verification: Always use the Test Configuration button after updating mail server details.
- Google Synchronization: Ensure your Google Cloud Project remains active and the Redirect URIs match your current environment.
- Meta Synchronization: Regularly review WhatsApp API credentials to ensure tokens haven't expired.
- Live Verification: After enabling Maintenance Mode, verify the appearance of your custom 503 error page.