Welcome to Katie
-
We are pleased that you have chosen Katie Shopify theme for your online store and we will not disappoint you with your choice. Katie is an excellent theme develop with a concise approach.The code written is a clean and well structured.
-
Katie is the most powerful & responsive theme with all the modules and functions involved with an attractive design.
-
Katie theme is build focusing on your business with endless features and works perfectly fine in all the browsers and we are making sure you get all your shopify stores features.
-
Katie theme includes total 4 pre-built home page layouts, 16 inner pages, 14 product pages, and 9 shop pages.
-
We request to have a look at our Katie manual to know brief about the theme! We have compromised each and every detail for you in the manual that you will need.
-
If we are unable to answer your queries beyond our documentation, you are free to contact us through the themeforest support page with your site. We will be happy to cater you and will get back to you in no time.
-
Read the manual before jumping to start!
Theme Features
- Language Switcher: Translate your shop into multiple languages.
- Responsive Design: Looks great on desktops, laptops, tablets, and mobiles. Give it a try on your iPhone or iPad now.
- Drag and Drop Sections: Option to change the home page layout order using the drag and drop option.
- Product Group: Group product images section, easy customization.
- Lazy Loading: Blur image on page loading for a smoother experience.
- Product Filtering Using App: Easily add filters for your products using the Search & Discovery app.
- Supports multi-currency: The currencies GBP, EUR, NZD, AUD, CAD, USD, INR, JPY are inbuilt with theme.
- Dynamic One-Click Checkout Button: Customers can use the dynamic checkout button to quickly buy the product they're viewing.
- Bundle Product: Option to buy multiple products together for added convenience.
- Product Infinite Scrolling: Products can be endlessly loaded on the collection page.
- Custom Lookbook Module: Create a custom lookbook module to easily buy products.
- Product Comparing: Compare product data with other products for better decision-making.
- Live Chat Supported: Live chat with your customers using shopify inbox.
Read shopify manual before you start
WHAT THINGS YOU GET WHEN YOU BUY THEME :
Once you buy our Katie Theme , you will find our theme in your ThemeForest Downloads page. Once you Download theme just unzip it , you will find :
- Documentation - This folder contains the documentation for the theme.
- Theme folder - Theme zip file for uploading to your shopify store.
Theme Installation
Install Theme
Step 1: Open your Shopify admin panel, navigate to Online Store > Themes, and click on Add Theme button and select Upload zip file.

Step 2: Select the ZIP file from your downloaded package and click Upload to upload the theme file.

Step 3: Once the theme is uploaded successfully, click Publish and proceed with the additional settings to customize your store.

Import Demo Layouts
Follow below step to setup Pre-made Demo.
- Download selected layout preset from here.
- Open this download file In any editor and Select all file code and copy it.(First press Ctrl+a and then Ctrl+c)
- Go to shopify admin > edit code > open
index.jsonfile - In this
index.jsonfile paste that copied code.(First press ctrl+a and then ctrl+v) - after replace this code save it.
- Demo Presets


Import Product
After Installing katie theme Successfully, you will be able to import products:
Step 1: From Home navigate to Products from the left-hand menu.

Step 2: Click on the Import button located at the top right of the Products page.
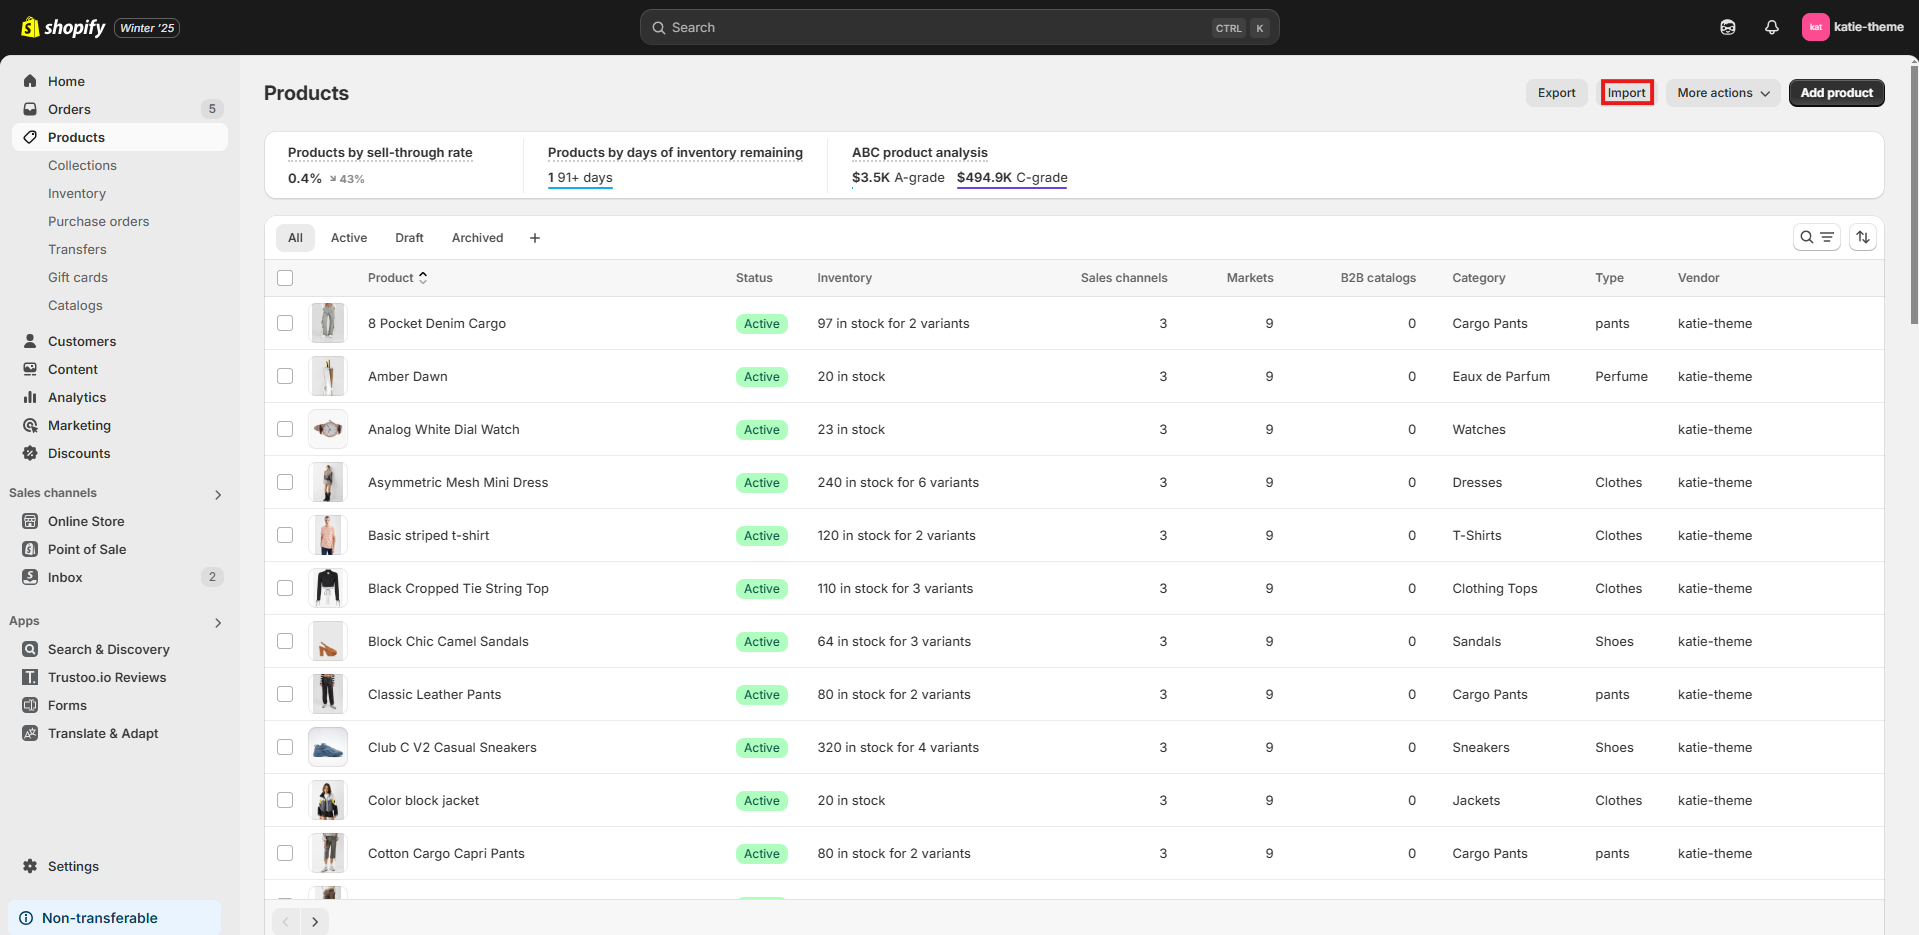
Step 3: In the Import Products window, click on Choose File and select your CSV file containing product details.
Step 4: Click on the Upload and Continue button after selecting your file.

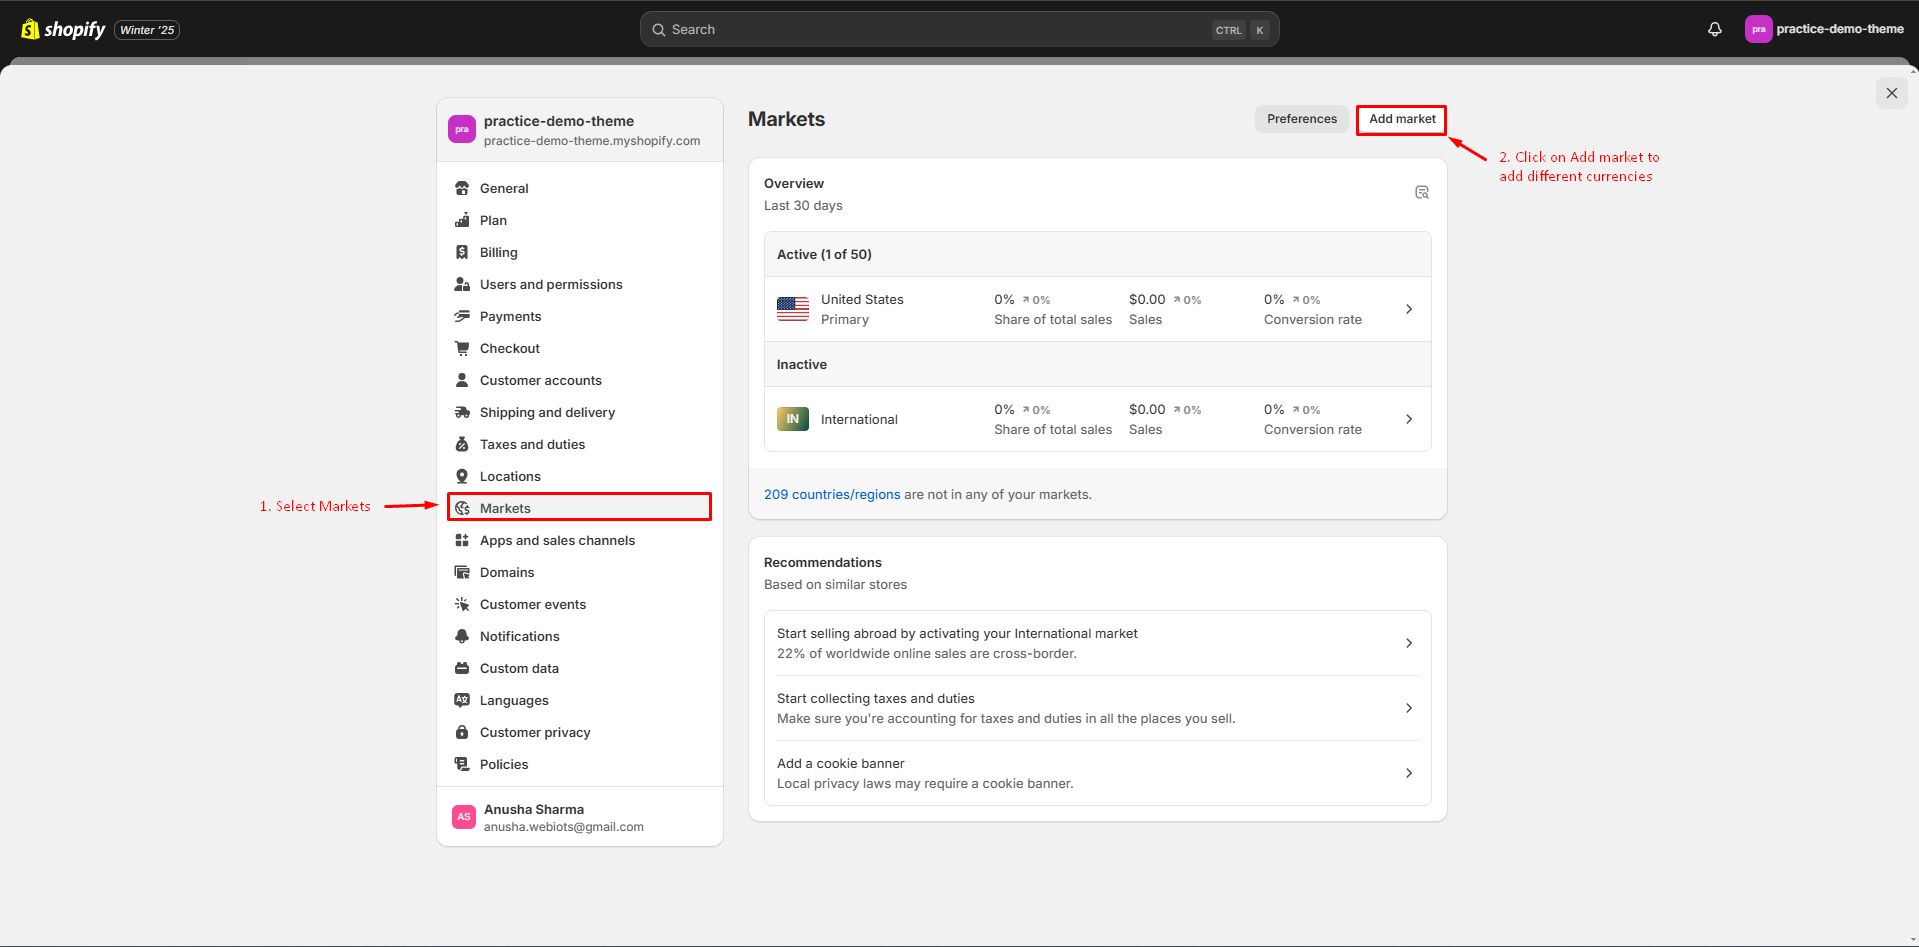
Configure Currency
- From Shopify Admin panel , please go to Settings > General
- From Shopify Admin panel -> then click on Settings -> then select Market
- Add markets according to currency requirement.


Note: If you want to enable Auto currency switcher based on user geo location, you must check mark currency setting on theme setting page.
Metaobjects
Metaobjects requires basic understanding of Shopify; if you're unfamiliar with them, consider learning about them or opting not to use them. Following are the steps to add metaobjects:
- Go to Shopify Admin -> Settings -> Custom Data.
- Under "Custom Data," select Metaobjects.
- Click Add Definition to create a new metaobject type.
- Define the fields for your metaobject (e.g., text, image, link, etc.).
- Save the metaobject definition.
- To add content, go back to Custom Data -> Metaobjects, and create an entry for your new metaobject type.
- Once created, link the metaobject to your theme or relevant pages using your theme editor or code customization.
Theme Metaobjects
-
Notifications:Experience realistic, lifelike notifications for a more engaging and dynamic user experience.
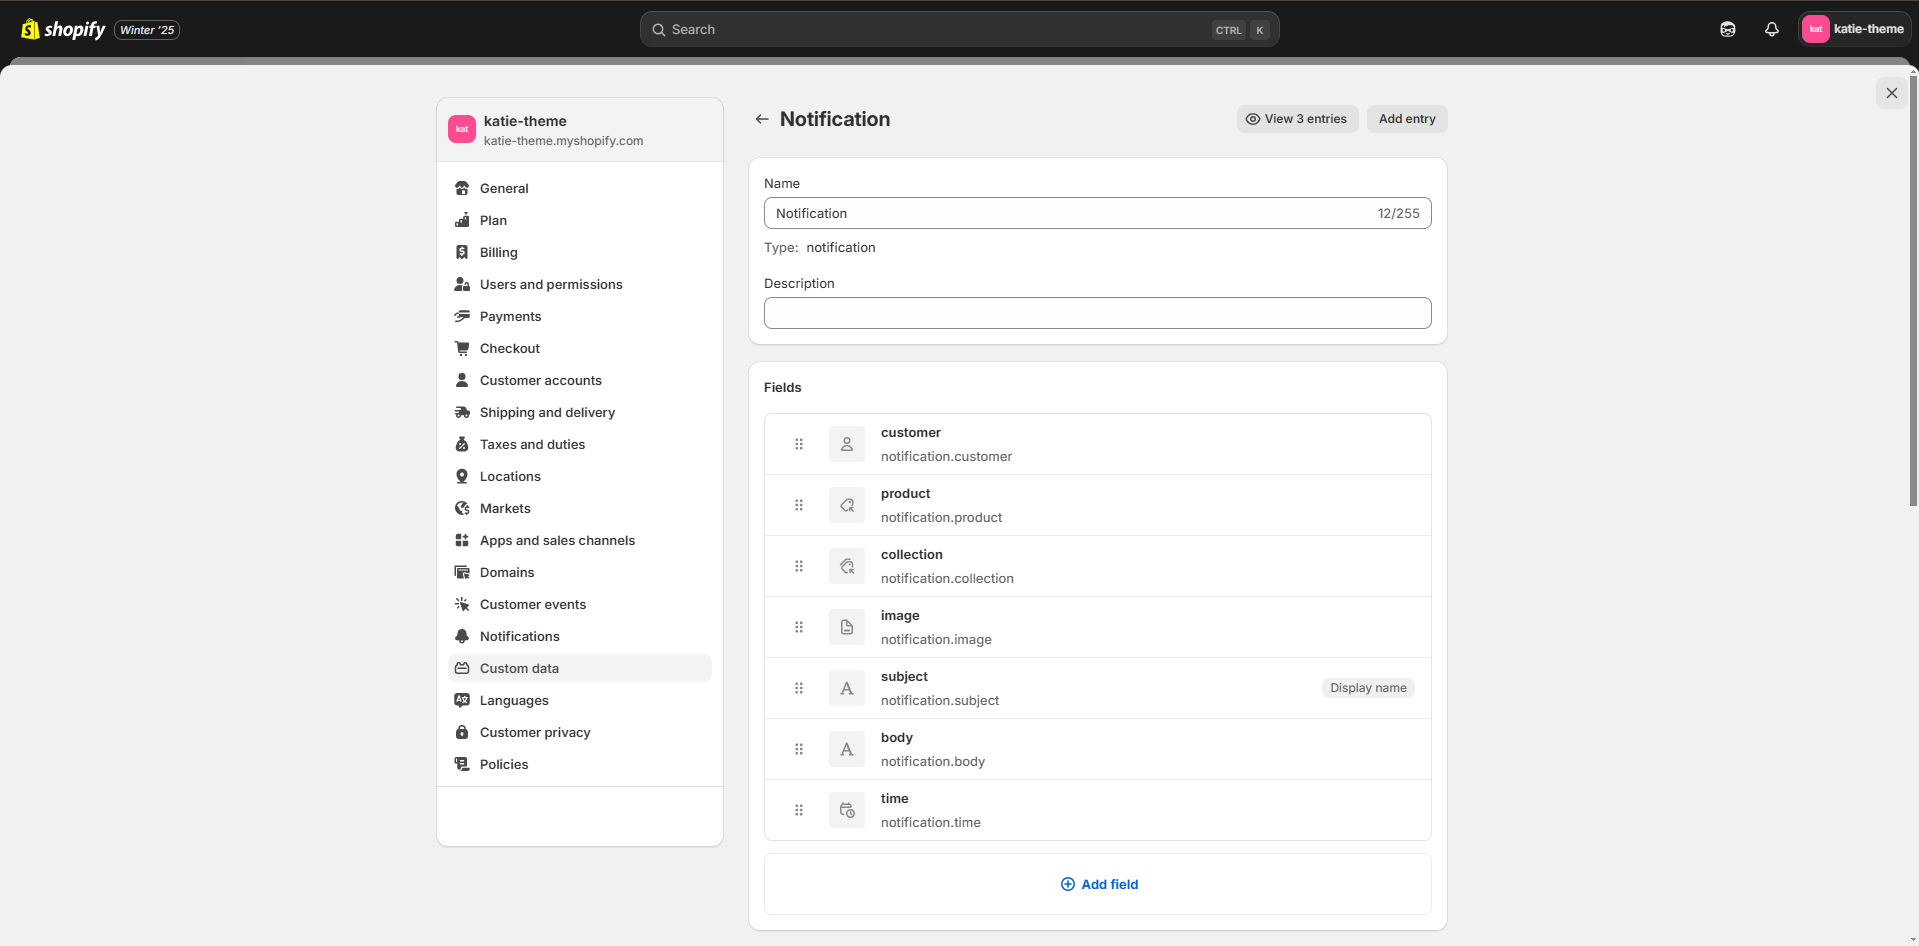
| Metaobject Field | Datatype |
|---|---|
| customer | Single line text [List of values] |
| product | Product |
| collection | Collection |
| image | File (only images) |
| subject | Single line text |
| body | Single line text |
| time | Date and time |
-
Product Questions: Get answers to your product-specific questions for a better shopping experience.
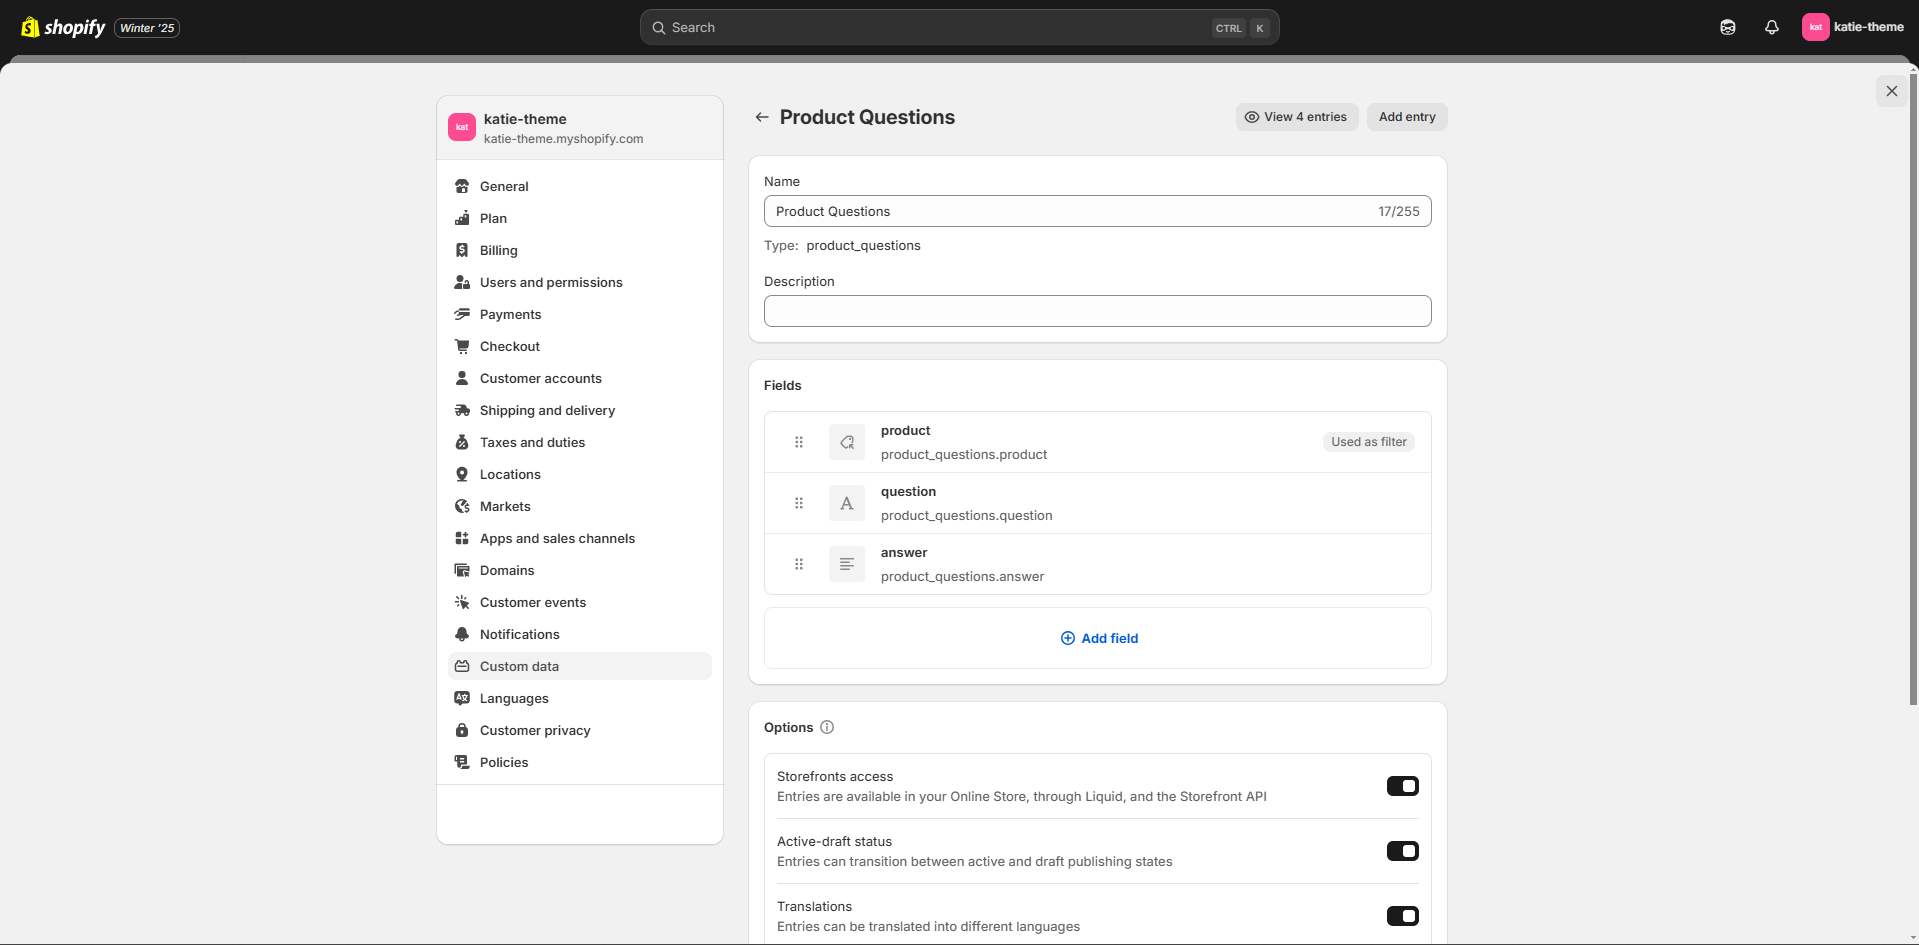
| Metaobject Field | Datatype |
|---|---|
| product | Product |
| Question | Single line text |
| Answer | Multi line text |
-
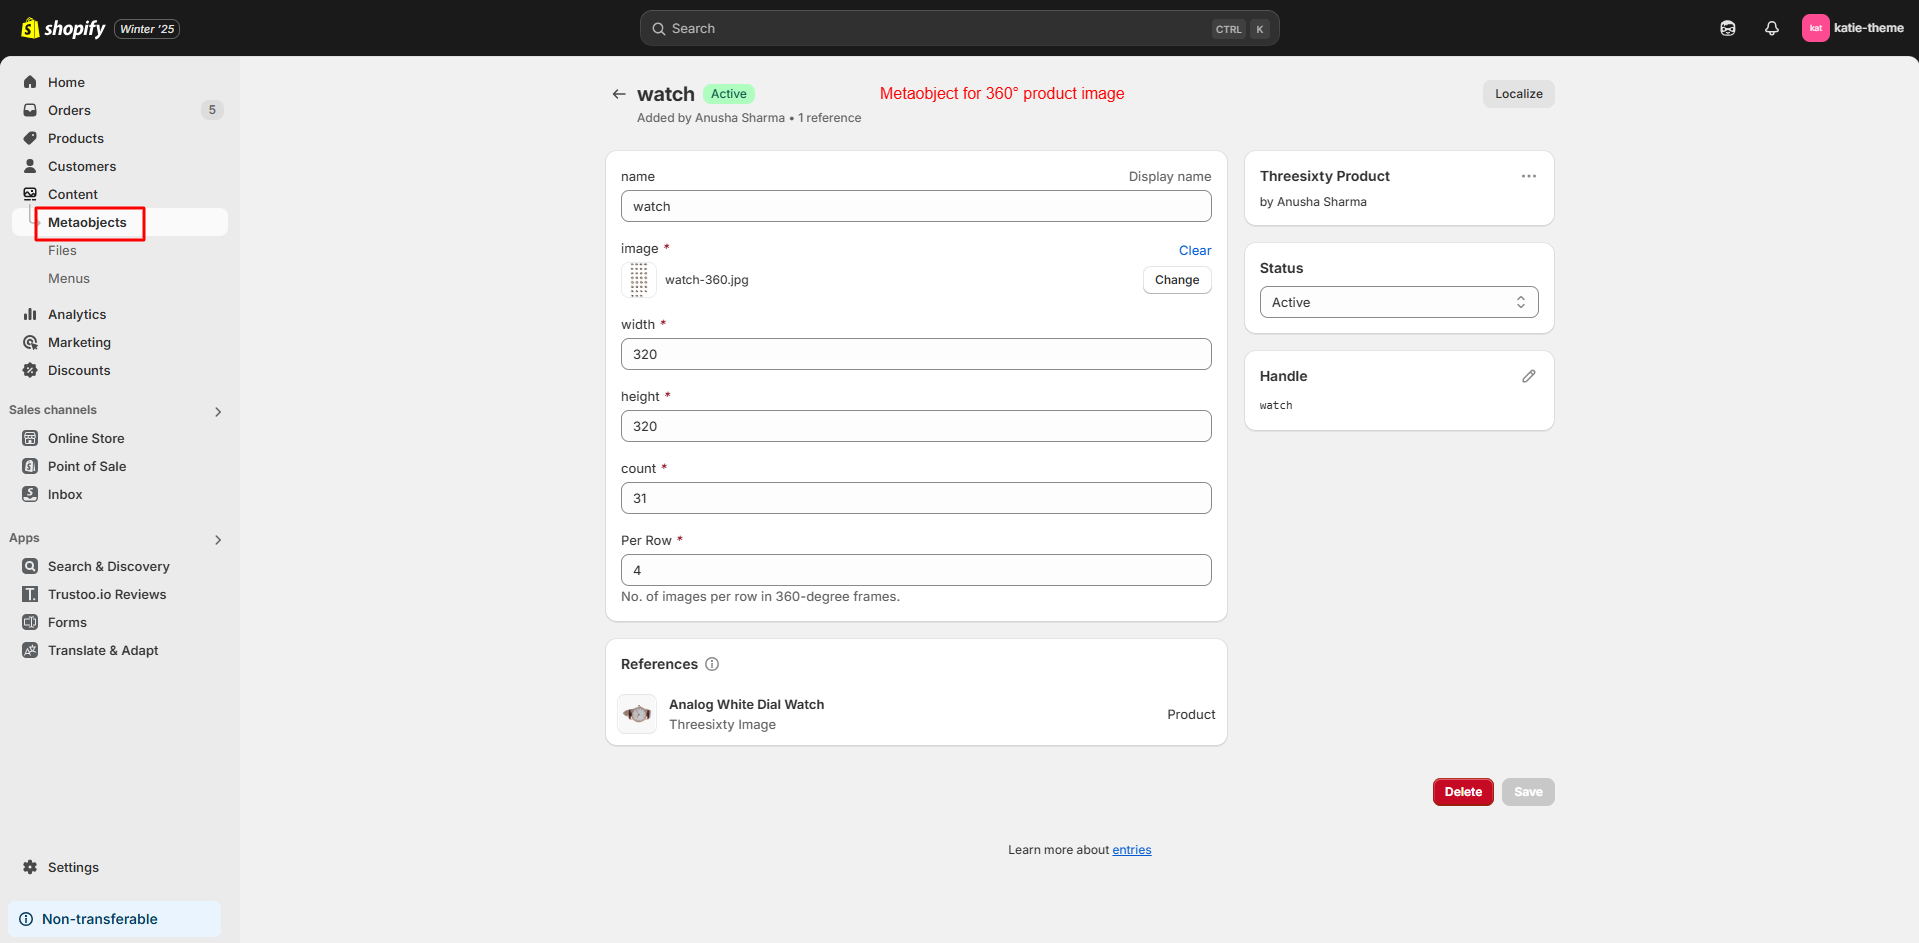
Threesixty Product: View your product from every angle with a 360-degree image, showcasing all details in high quality.
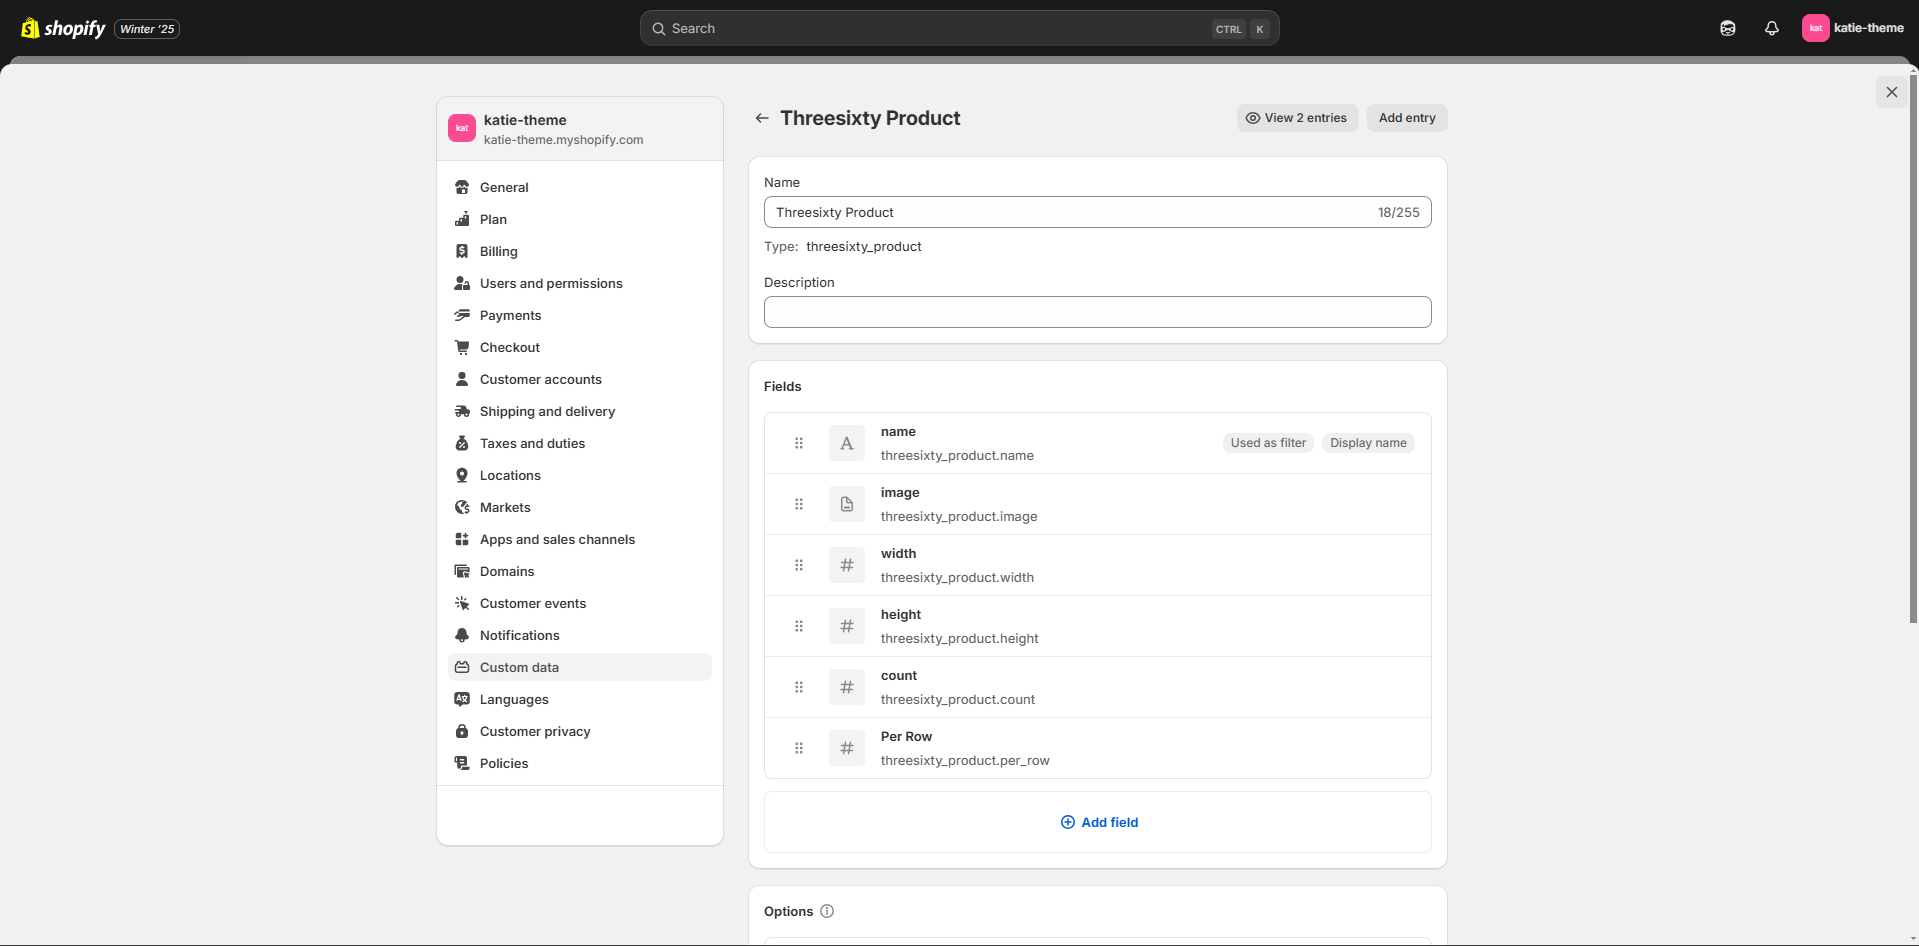
| Metaobject Field | Datatype |
|---|---|
| name | Single line text |
| image | File (only images) |
| width | Single line text |
| height | Single line text |
| count | Single line text |
| per Row | Single line text |
-
Pattern: View your product pattern variant with pattern image.
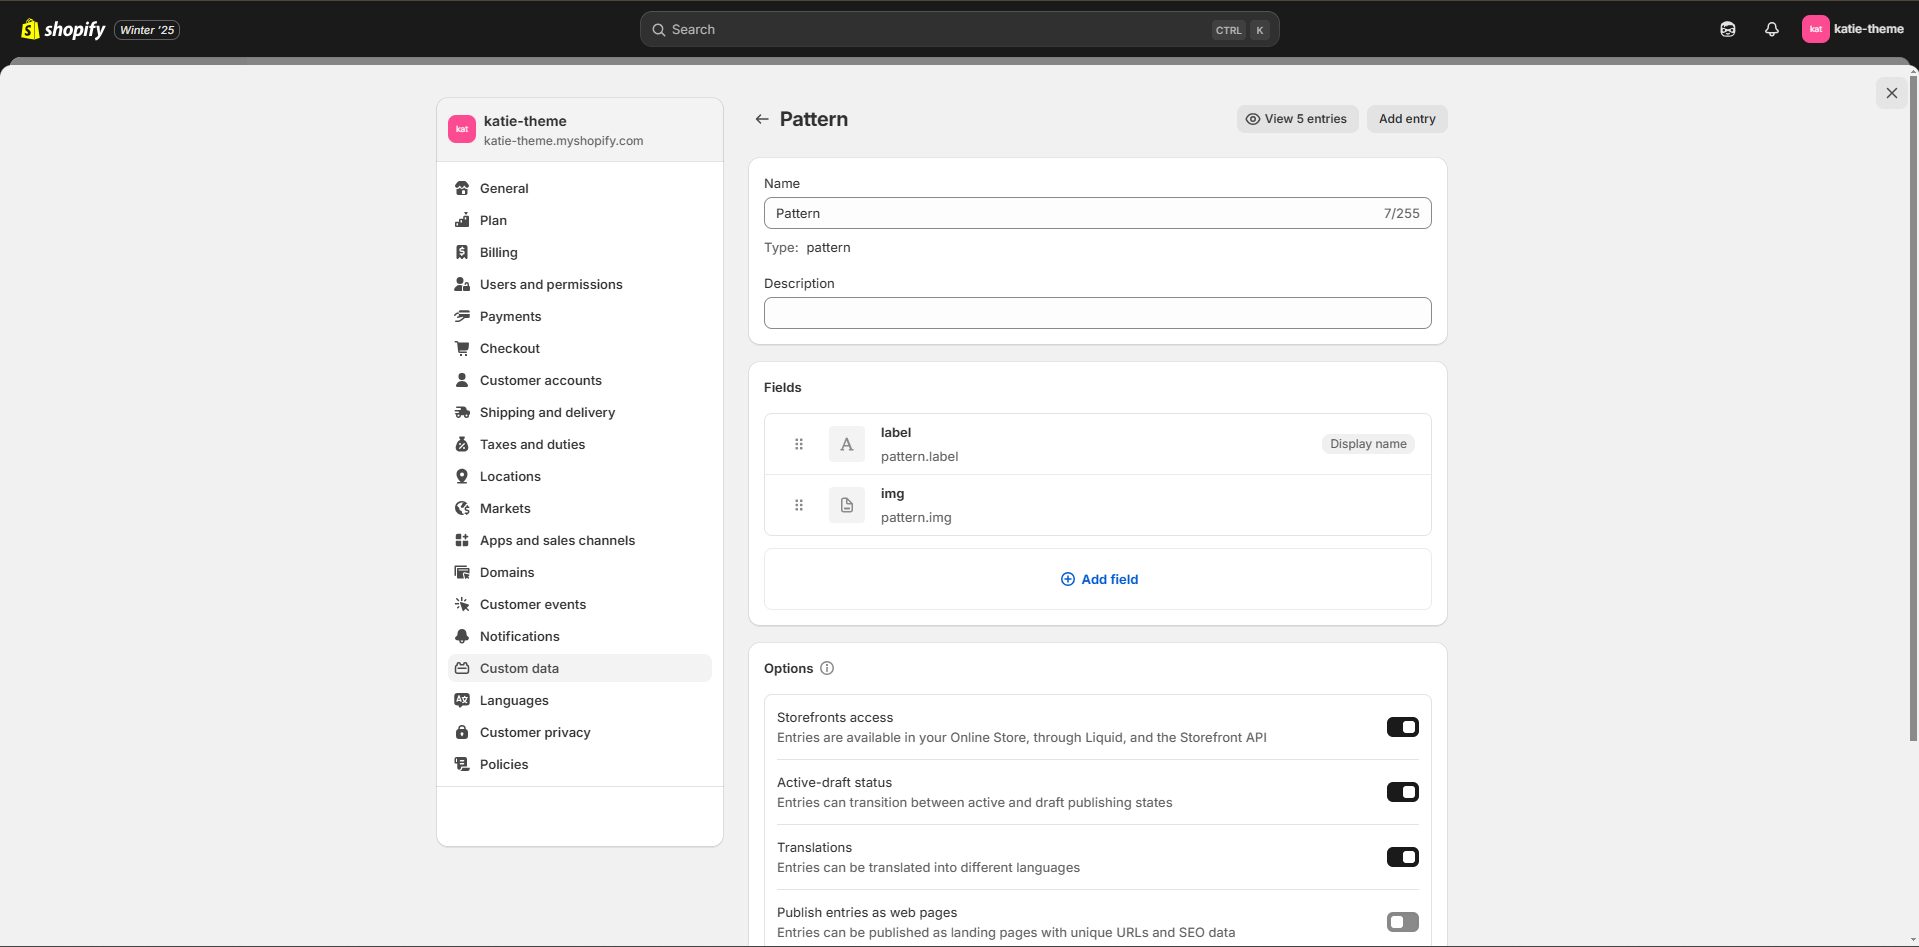
| Metaobject Field | Datatype |
|---|---|
| label | Single line text |
| image | File (only images) |
-
Timeline: Use this for order timeline use as many as required.
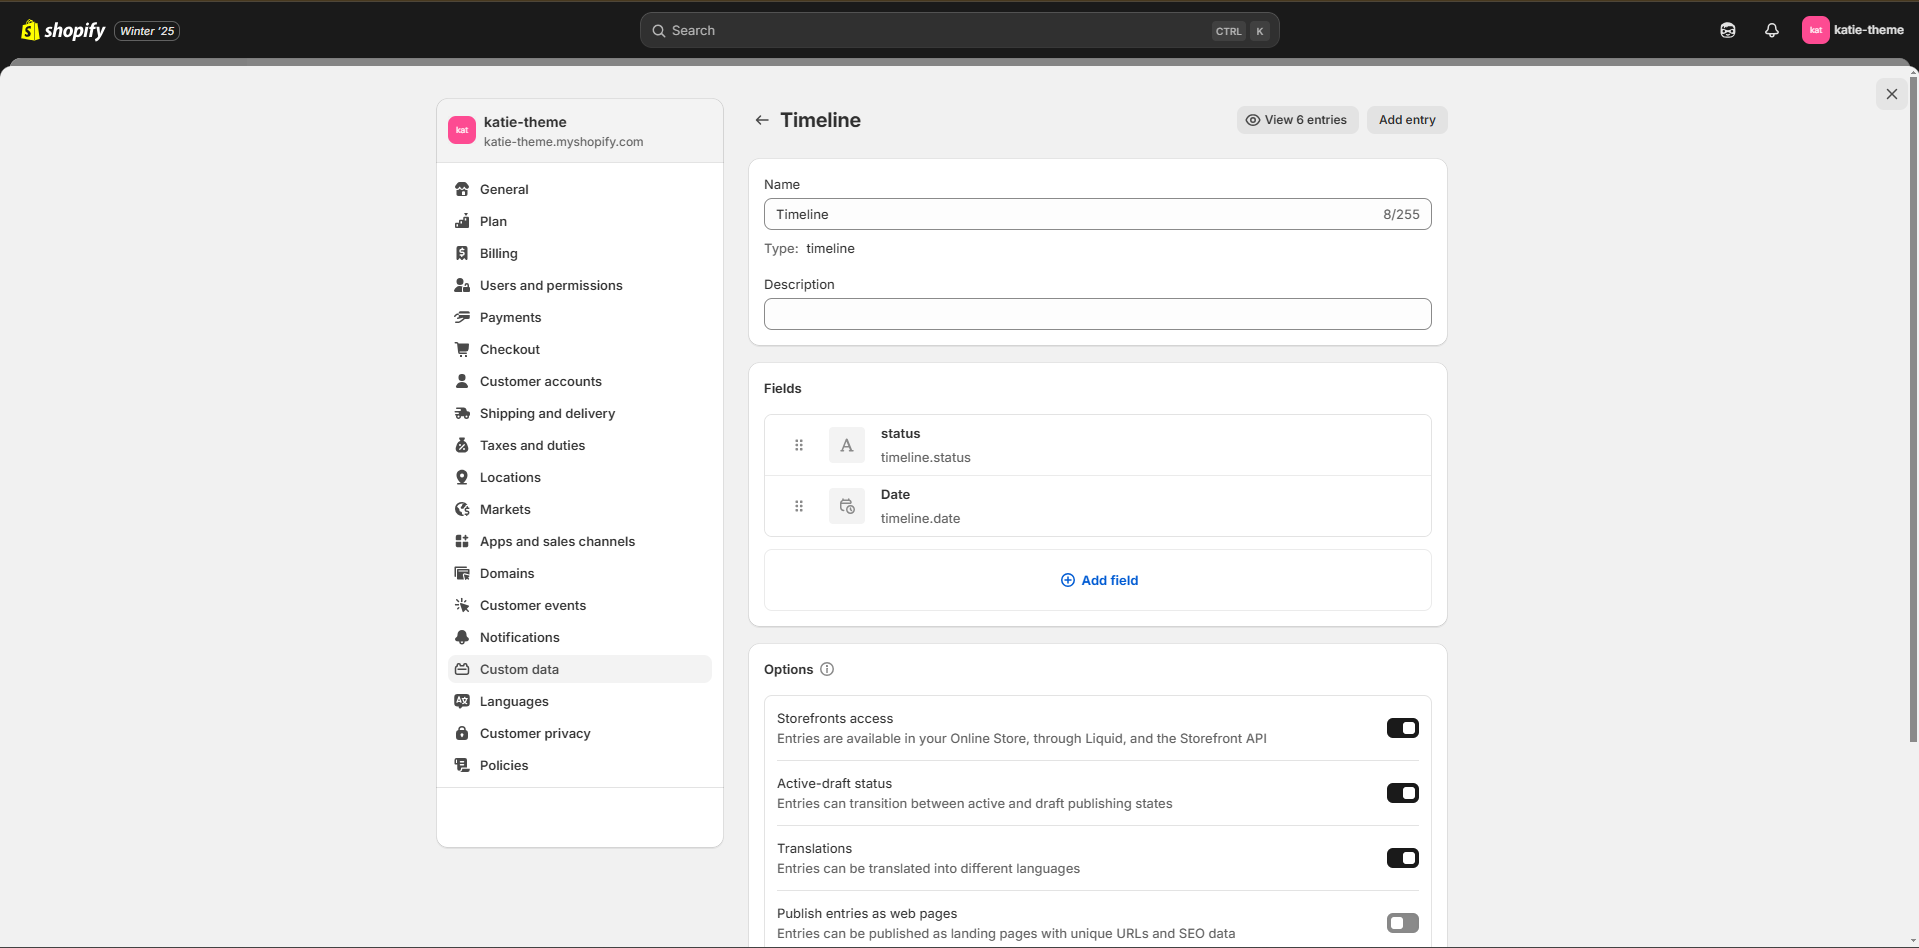
| Metaobject Field | Datatype |
|---|---|
| status | Single line text |
| date | Date and time |
Metafields
Metafields are simple and help make your store more interactive by adding extra details to your store’s content dynamically. Here’s how to add metafields:
- Go to Shopify Admin -> Settings -> Custom Data.
- Under "Custom Data," select Metafields.
- Choose the area where you want to add metafields, such as Products, Collections, or Orders.
- Click Add Definition to create a new metafield definition.
- Define the metafield type, name, and namespace (e.g., text, number, image, etc.).
- Save the metafield definition.
- To add values to the metafield, navigate to the specific resource (e.g., a product or collection), and enter data in the metafield fields.
- Display metafield data on your storefront using your theme editor or by customizing your theme code.
Theme Metafields
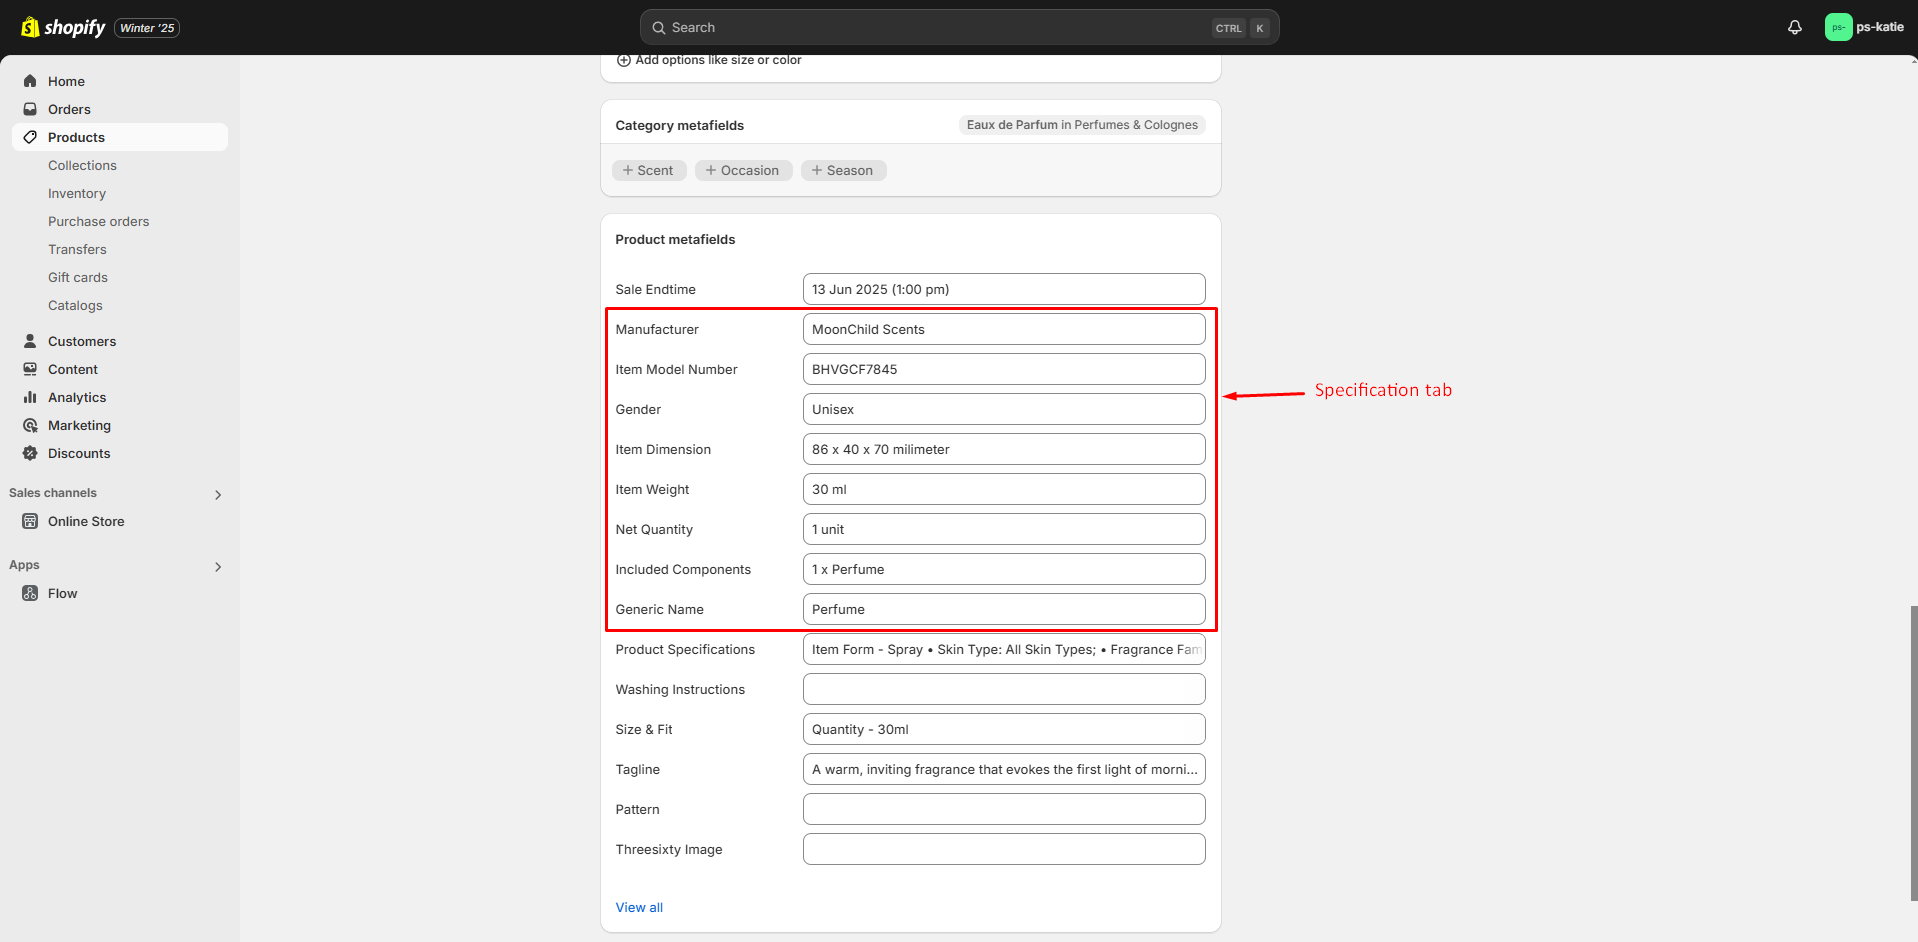
Product Metafields:
| Metafield | Datatype |
|---|---|
| Sale Endtime | date and time |
| Manufacturer | Single line text |
| Item Model Number | Single line text |
| Gender | Single line text |
| Item Dimension | Single line text |
| Item Weight | Single line text |
| Net Quantity | Single line text |
| Included Components | Single line text |
| Generic Name | Single line text |
| Product Specifications | Single line text [List of values] |
| Washing Instructions | Single line text [List of values] |
| Size & Fit | Single line text [List of values] |
| Tagline | Single line text |
| Pattern | Metaobject: Pattern |
| Threesixty Image | Metaobject: Threesixty Product |
Blog Posts Metafields:
| Metafield | Description |
|---|---|
| Category | Single line text |
Customers Metafields:
| Metafield | Description |
|---|---|
| Profile Image | File (only images) |
Orders Metafields:
| Metafield | Description |
|---|---|
| Timeline | Metaobject: Timeline |
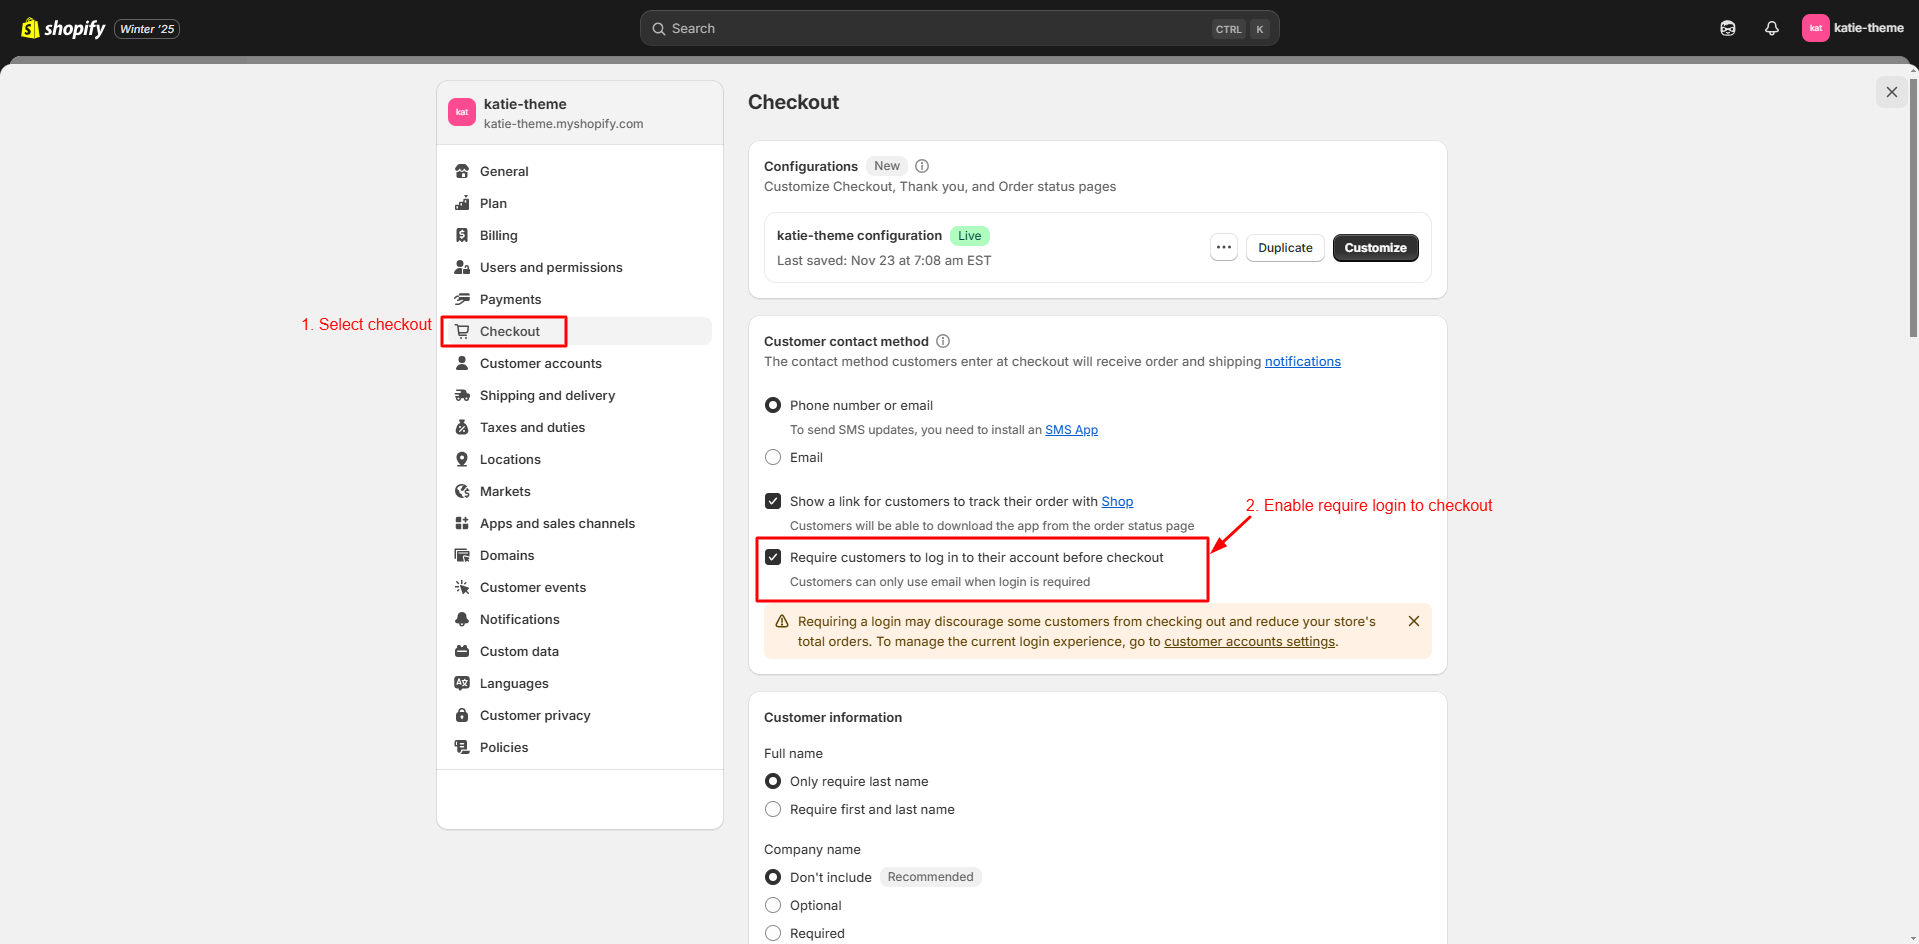
ENABLE ACCOUNTS
From Shopify Admin panel go to Settings / Checkout, In the Customer accounts select Accounts are required.
INSTALL APP
Step 1: Open your Shopify admin panel and go to Settings.

Step 2: In Settings go to App and sales channels -> click shopify app store.

Step 3: Search for mentioned app.

INSTALL SHOPIFY SEARCH & DISCOVERY APP
Search app is used to enhance product search functionality, helping customers find products more easily on a Shopify store.

INSTALL SHOPIFY TRANSLATE & ADAPT
The Translate & Adapt app helps to translate your store's content and adapt it for different languages and regions, improving the customer experience for a global audience.

INSTALL TRUSTOO.IO PRODUCT REVIEW APP
Review app is used to collect and display customer reviews to build trust and increase sales.

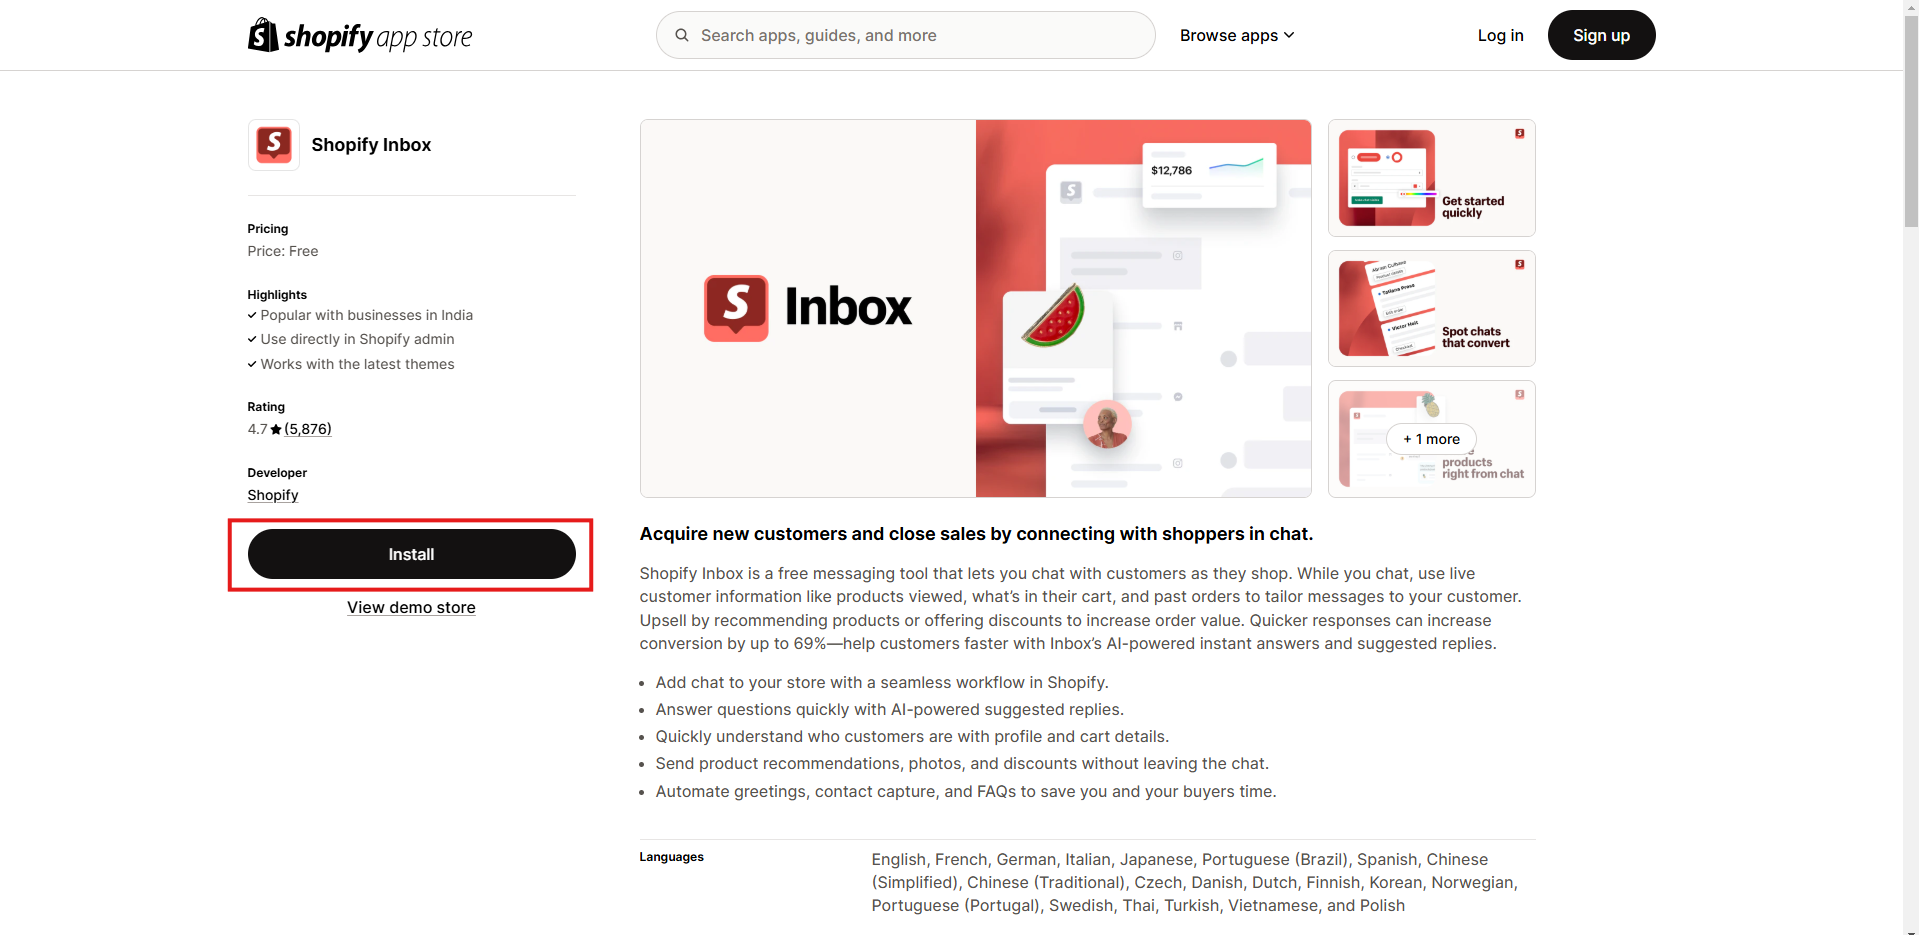
INSTALL SHOPIFY INBOX APP
Inbox App enable live chat and messaging for your store.
Update Your theme
General
When our developer and designer updates our shopify theme with bug fixes and more features , those are not automatically added to your own theme ( limited shopify restriction ) . There is no automatic or manual way to get updates on your installed themes.
- Just download the latest version of theme.
- Install the latest version of theme as unpublished theme.
- Go to your Theme Manager , On Themes page, you can customize the theme while it remains unpublished.
To customize new theme to look as older version , you will required to do :
- Use the theme settings to choose box layout , choose background images , tweak colors , etc.
- Replace any changes you made in liquid templates from your older theme to new theme
- Uninstall any apps that add code to a theme and re-install them from the Shopify App Store to re-add code in theme.
- Preview the changes that you have made to any theme by clicking Preview button
- When your customized theme is ready, publish it by clicking Publish them button
Any way to avoid Re-customizing my theme from scratch ?
As all other theme , Our theme has also Export / Import Theme Settings feature , which allow you to easy to export all theme settings from your current version and import to latest version.
Theme Settings
General
- To configure theme settings such as layout direction (RTL / LTR), theme mode, and other options, please go to Themes -> Customize Theme -> Theme Settings -> General.
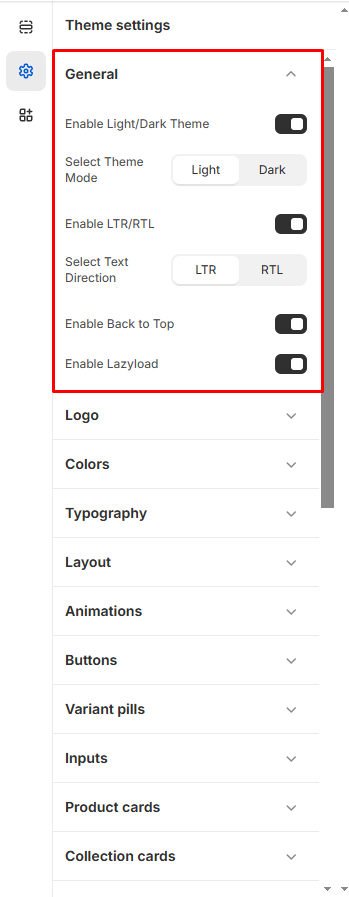
- Theme Mode: Choose an option for the theme mode.
- Text Direction: Choose an option for the text direction.
- Lazy Loading Blur: Check this option to enable image blur during lazy loading.
- Enable Back to Top: Check this option to display the "Back to Top" arrow.
Logo & Favicon
- Open your Shopify admin panel and go to Online Store -> Customize -> Theme settings -> Logo & Favicon.
Colors
To configure the theme color, please go to Themes -> Customize Theme -> Theme Settings -> Color.
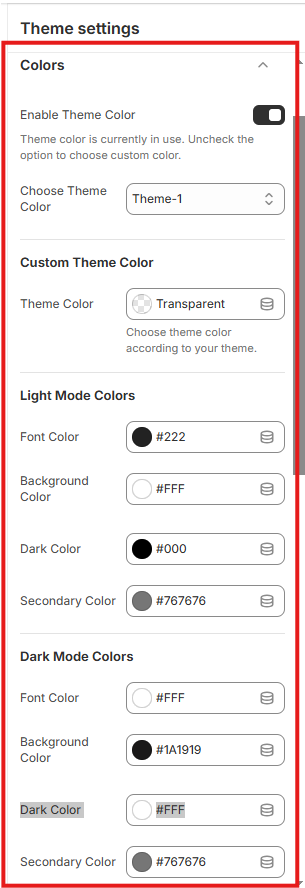
To Change theme color:

Typography
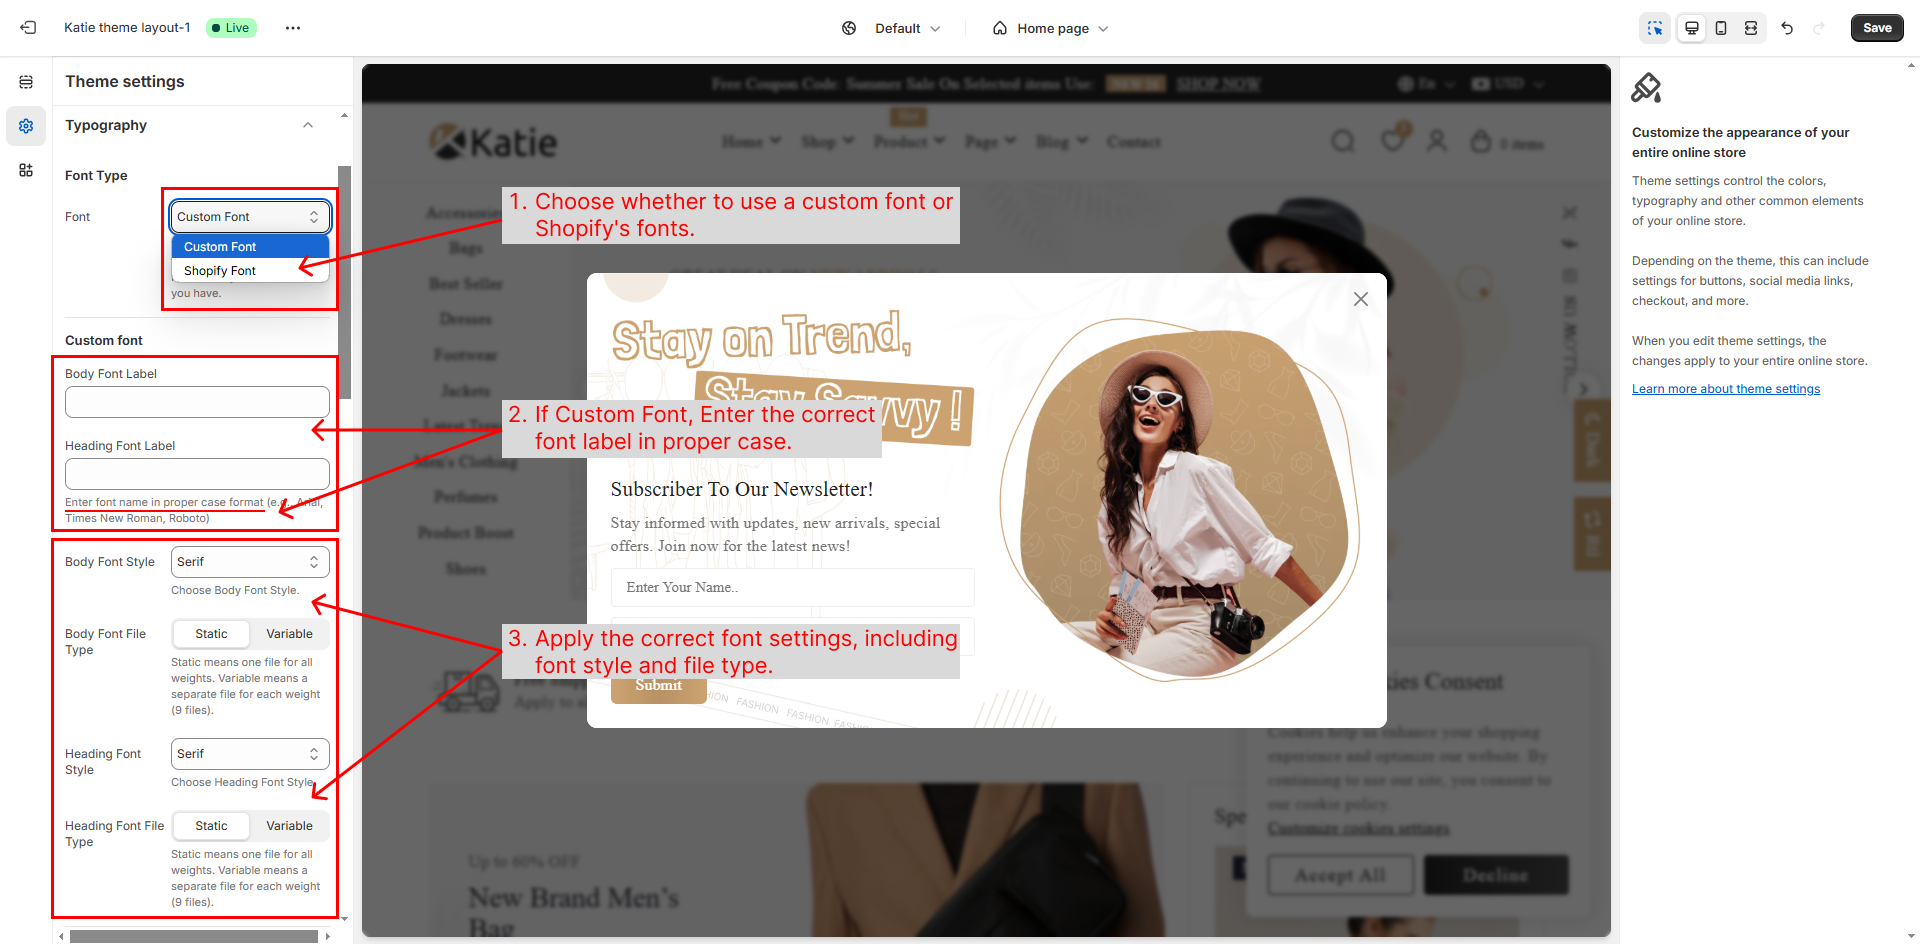
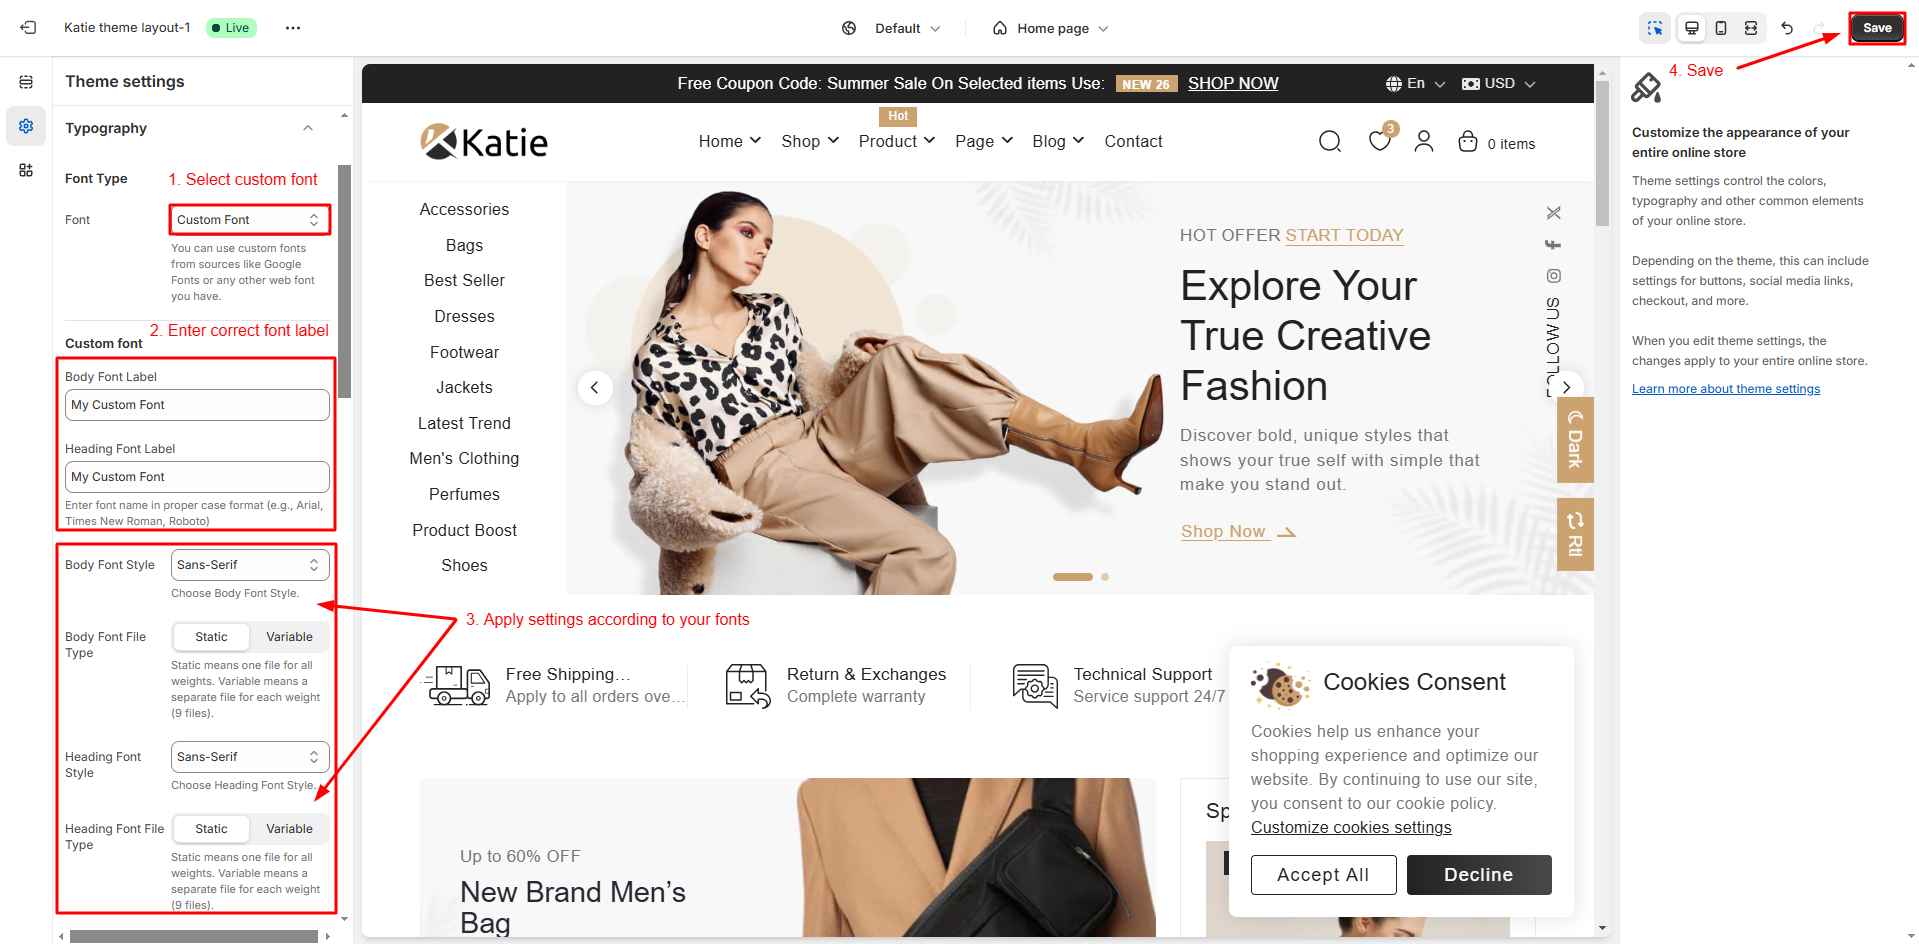
The Typography Settings section allows you to customize the fonts used across your Shopify theme. You can choose between custom fonts or Shopify's predefined fonts for both headings and body text, enabling you to maintain consistency and align your store's design with your brand identity.
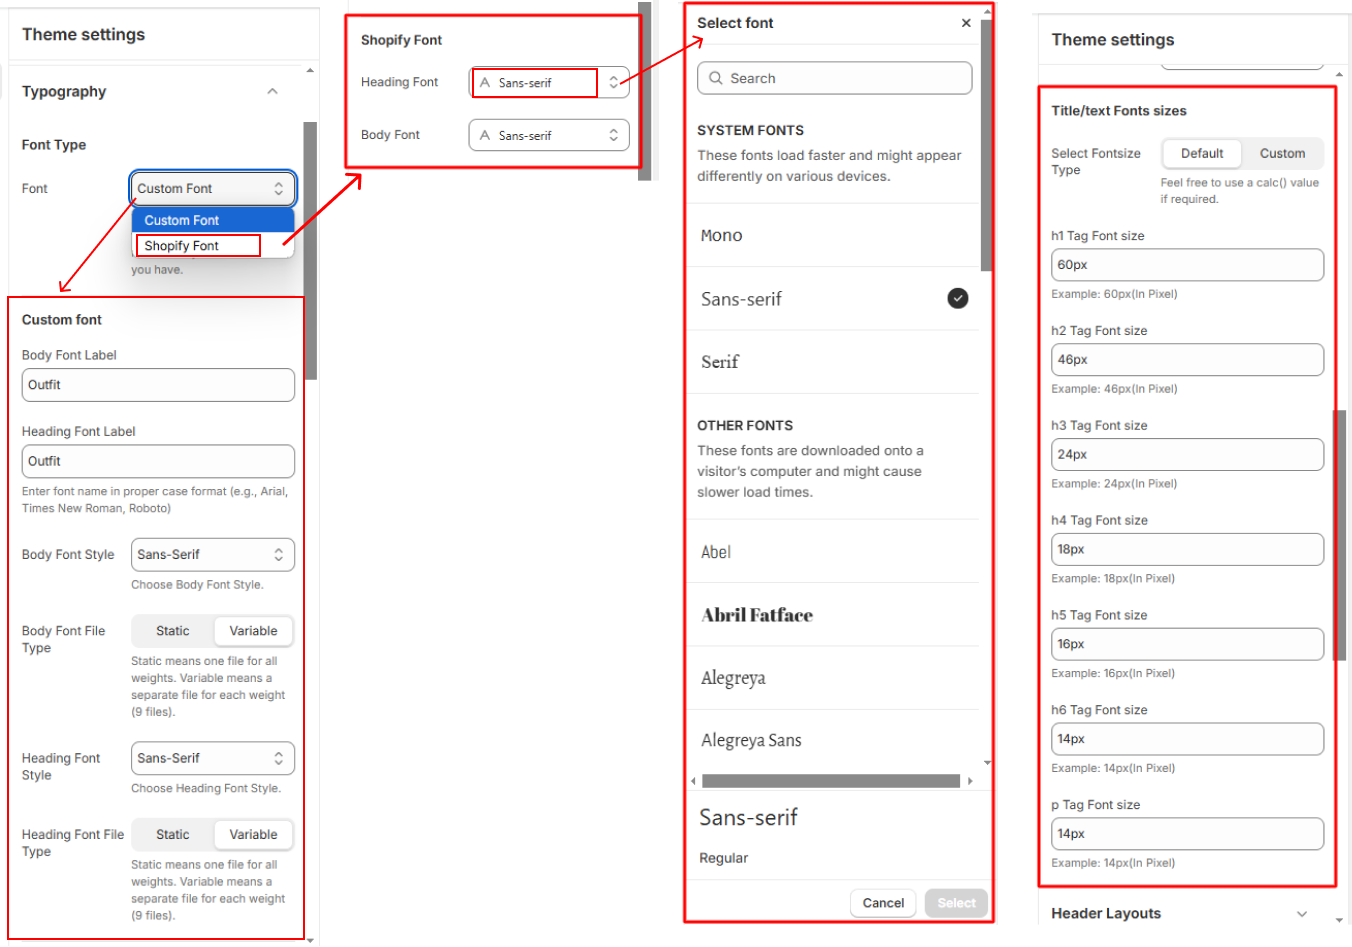
Katie allows you to use custom font, Here's a step-by-step guide to add a custom font to Shopify theme:
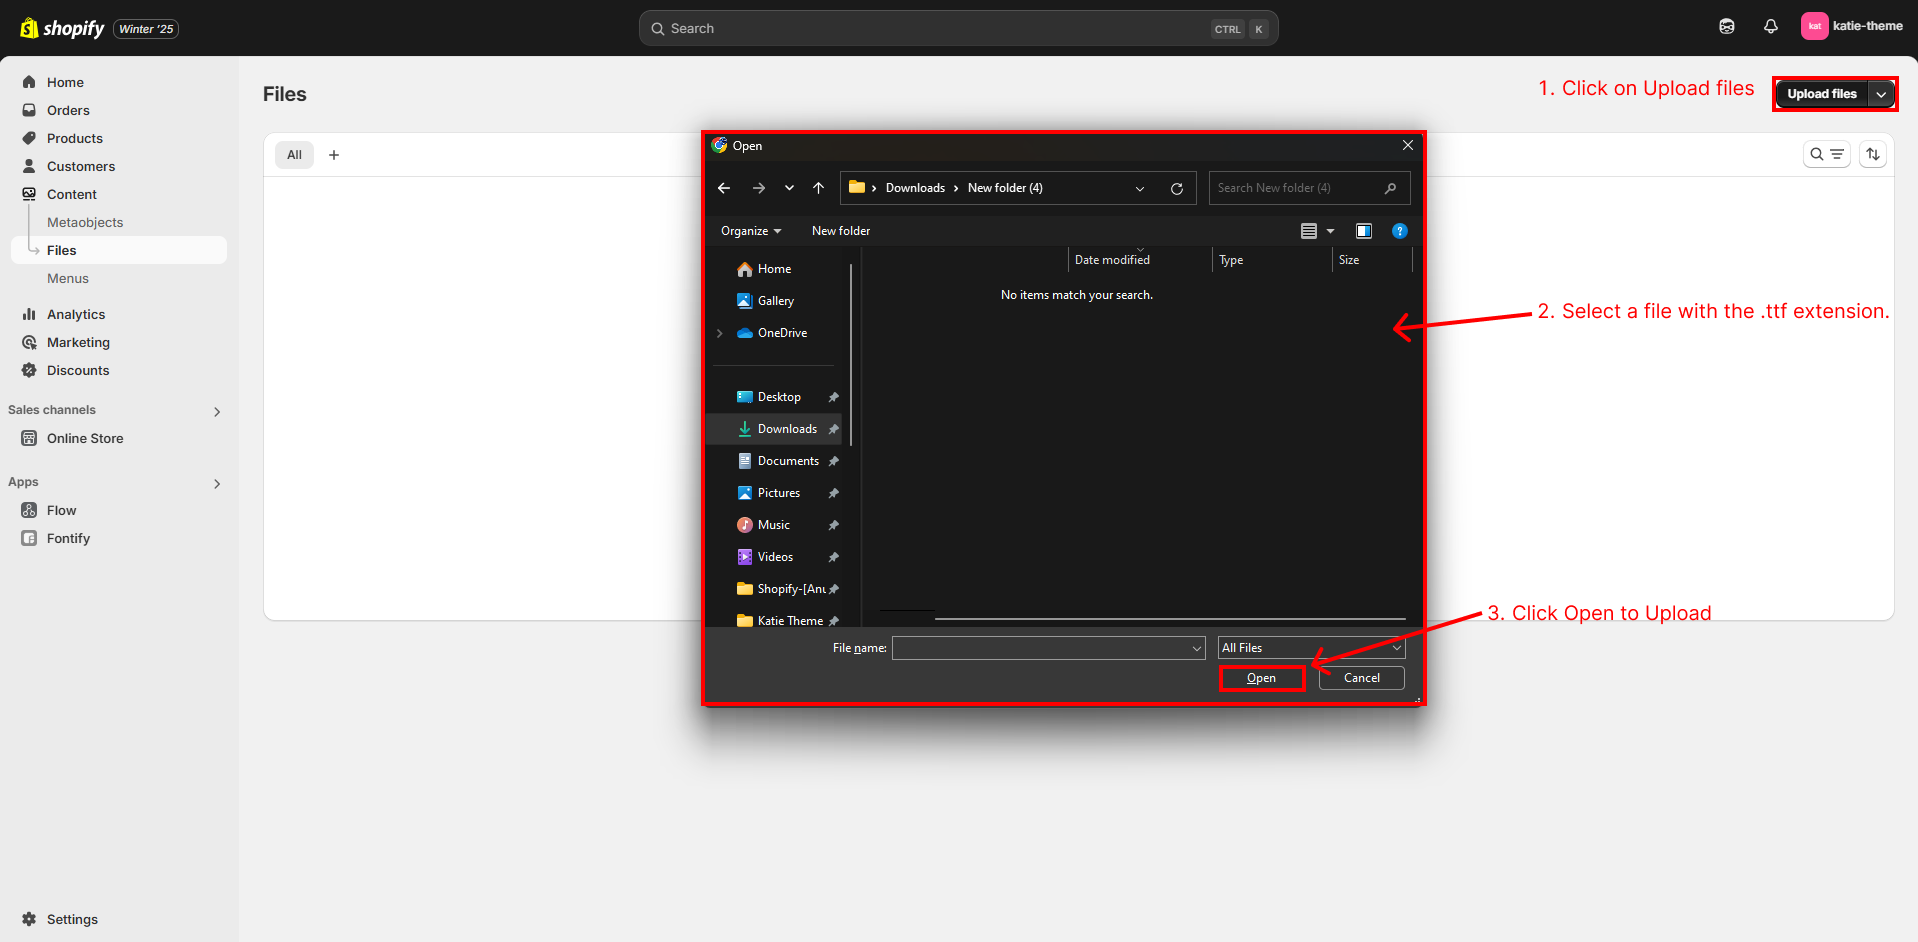
- Step 1: Ensure you have the font file, whether in a static format (e.g., one file for all weights) or variable weights (e.g., Regular, Bold, Black), in .ttf format. Use the font file in the format available.
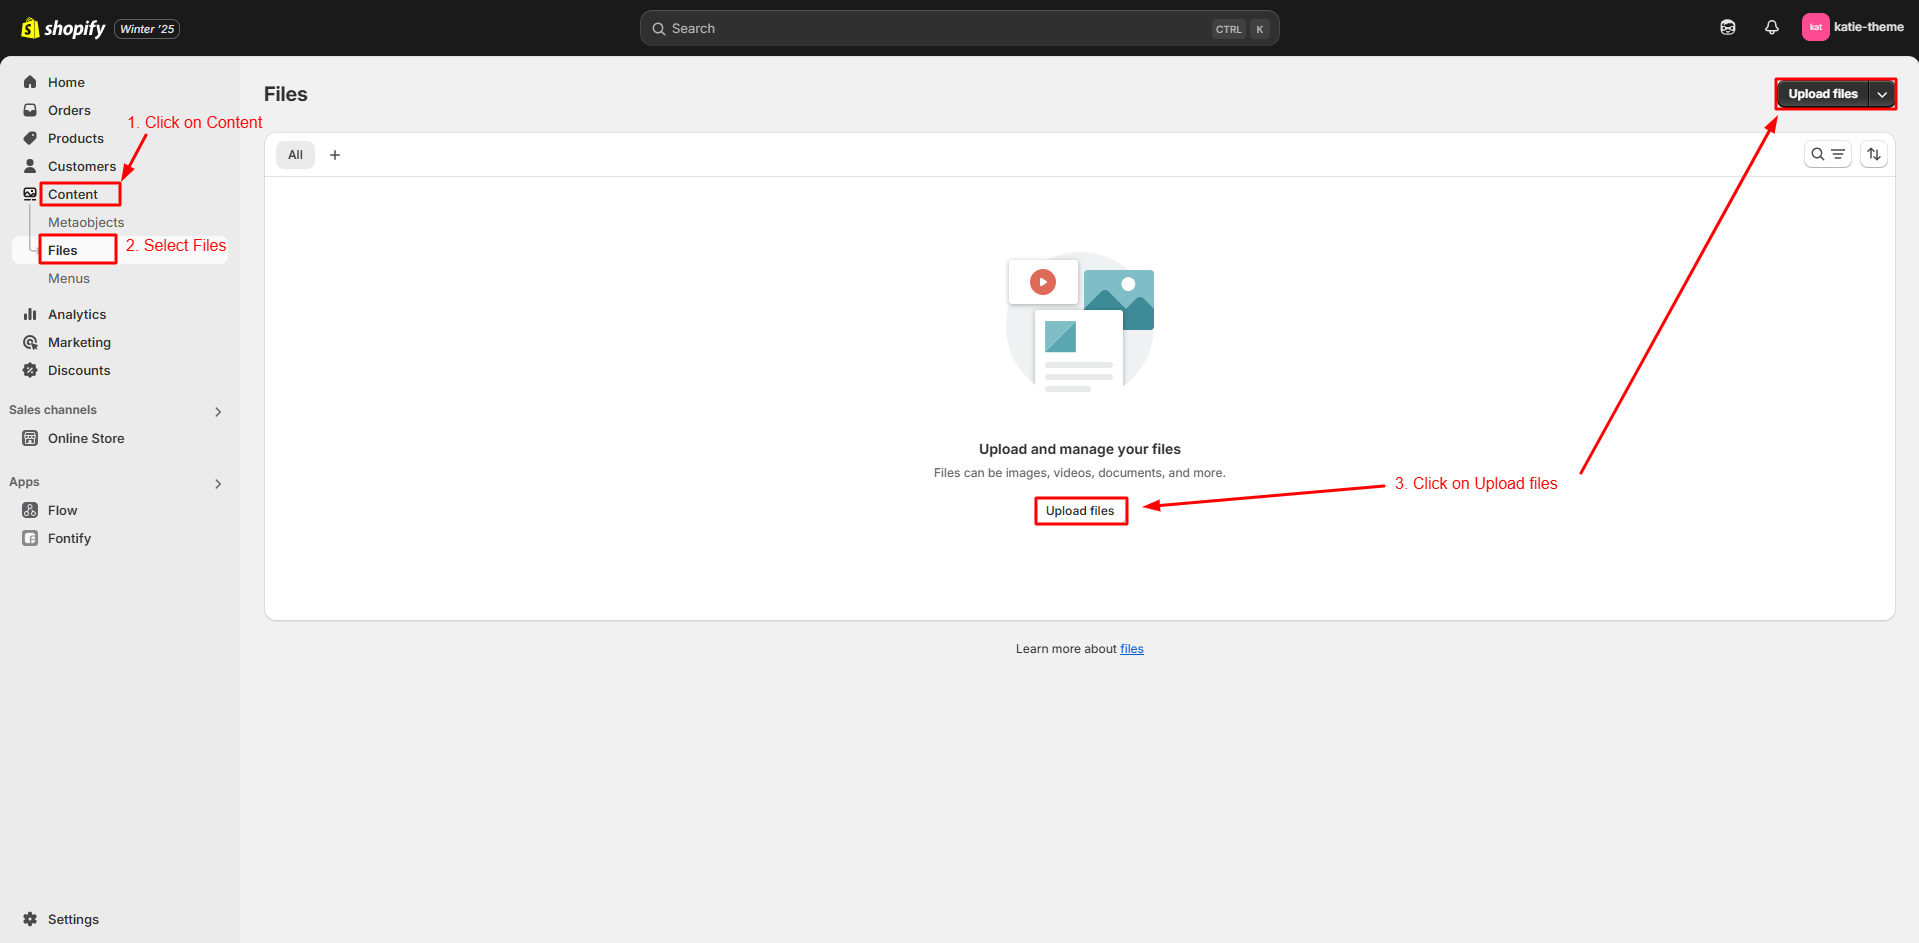
- Step-2: Go to Online Store -> Content -> Files.
-
Step-3: In Files, click on Upload files and Upload the font files (e.g.,
MyCustomFont-Regular.ttf, MyCustomFont-Bold.ttf).
- Step-4: After uploading the font files, go to Online Store -> Customize -> Theme Settings -> Typography.
-
Step-5: In font type select Custom Font. In the Font Label text box, type
the font name in proper case (e.g., My Custom Font) and Save.
How It Works:
Once you upload the font files with the correct naming convention (refer to the note) and
specify the font label in the typography settings (e.g., My Custom Font), our Katie theme will
automatically detect and apply the font. This removes the need for manual code editing. The font
will be applied to titles, menus, and other text across the theme.
Example:
Here, "My Custom Font" is used for both the body and headings, featuring a sans-serif font style
and a static font file type.


Naming Convention:
For Static Fonts: Save the file with the font name as the font label.
Example:
- Font Name:
My Custom Font
- File Name:
MyCustomFont.ttf
For Variable Fonts: Save the file with the font name and font weight as the
label. Refer below table:
| Font Weight | Font Weight Label | Font Label |
| 100 | Thin | FontLable-Thin.ttf |
| 200 | Extra Light | FontLable-ExtraLight.ttf |
| 300 | Light | FontLable-Light.ttf |
| 400 | Regular | FontLable-Regular.ttf |
| 500 | Medium | FontLable-Medium.ttf |
| 600 | Semi Bold | FontLable-SemiBold.ttf |
| 700 | Bold | FontLable-Bold.ttf |
| 800 | Extra Bold | FontLable-ExtraBold.ttf |
| 900 | Black | FontLable-Black.ttf |
Note: "My Custom Font" or "FontLabel" is just an example—please use your actual font name.
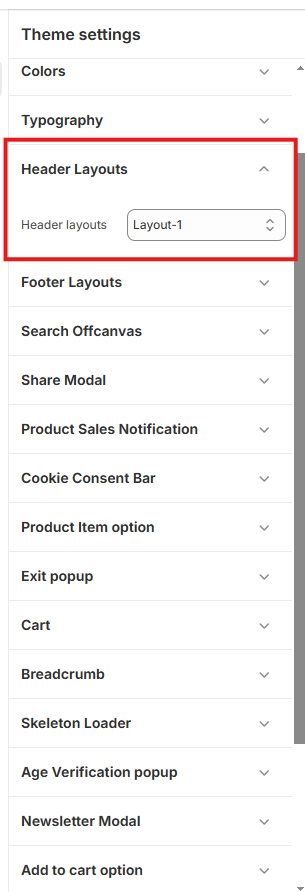
Header Layouts
- Open your Shopify admin panel and go to Online Store -> Customize -> Theme settings -> Header Layouts.
Footer Layouts
- Open your Shopify admin panel and go to Online Store -> Customize -> Theme settings -> Footer Layouts.

Search Offcanvas
- Open your Shopify admin panel and go to Online Store -> Customize -> Theme settings -> Search Offcanvas.

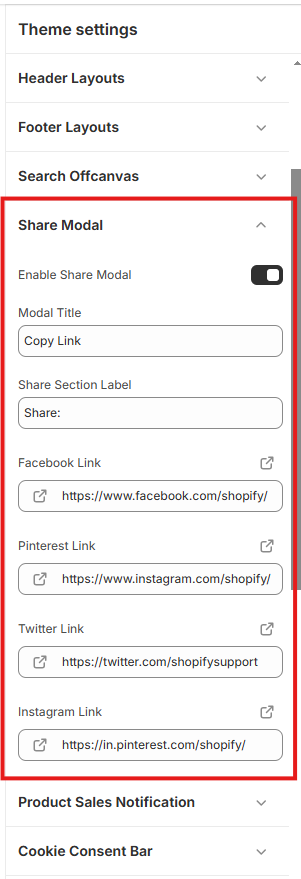
Share Modal
- Open your Shopify admin panel and go to Online Store -> Customize -> Theme settings -> Share Modal.
Product Sales Notification
- Open your Shopify admin panel and go to Online Store -> Customize -> Theme settings -> Product Sales Notification.

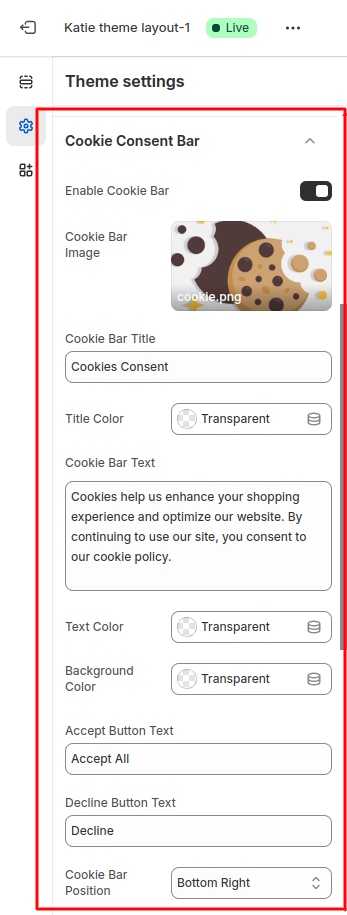
Cookie Consent Bar
Setting for Cookie bar
- To enable cookie bar, Go to theme customize -> general settings -> general theme settings -> cookie bar setting .
- you can enable/disable this bar and customize it according your site design.
Product Item Option
- Open your Shopify admin panel and go to Online Store -> Customize -> Theme settings -> Product Item Option.

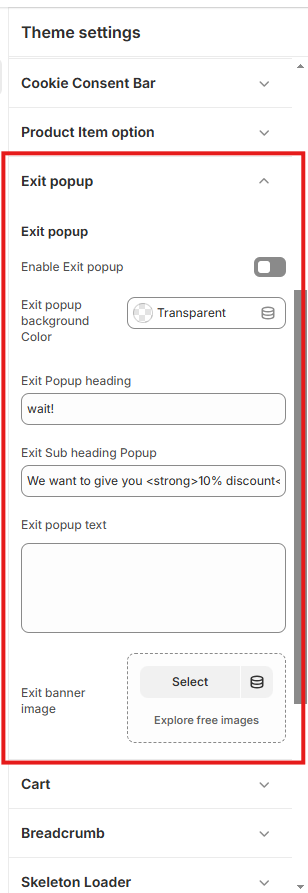
Exit popup
- Open your Shopify admin panel and go to Online Store -> Customize -> Theme settings -> Exit popup.
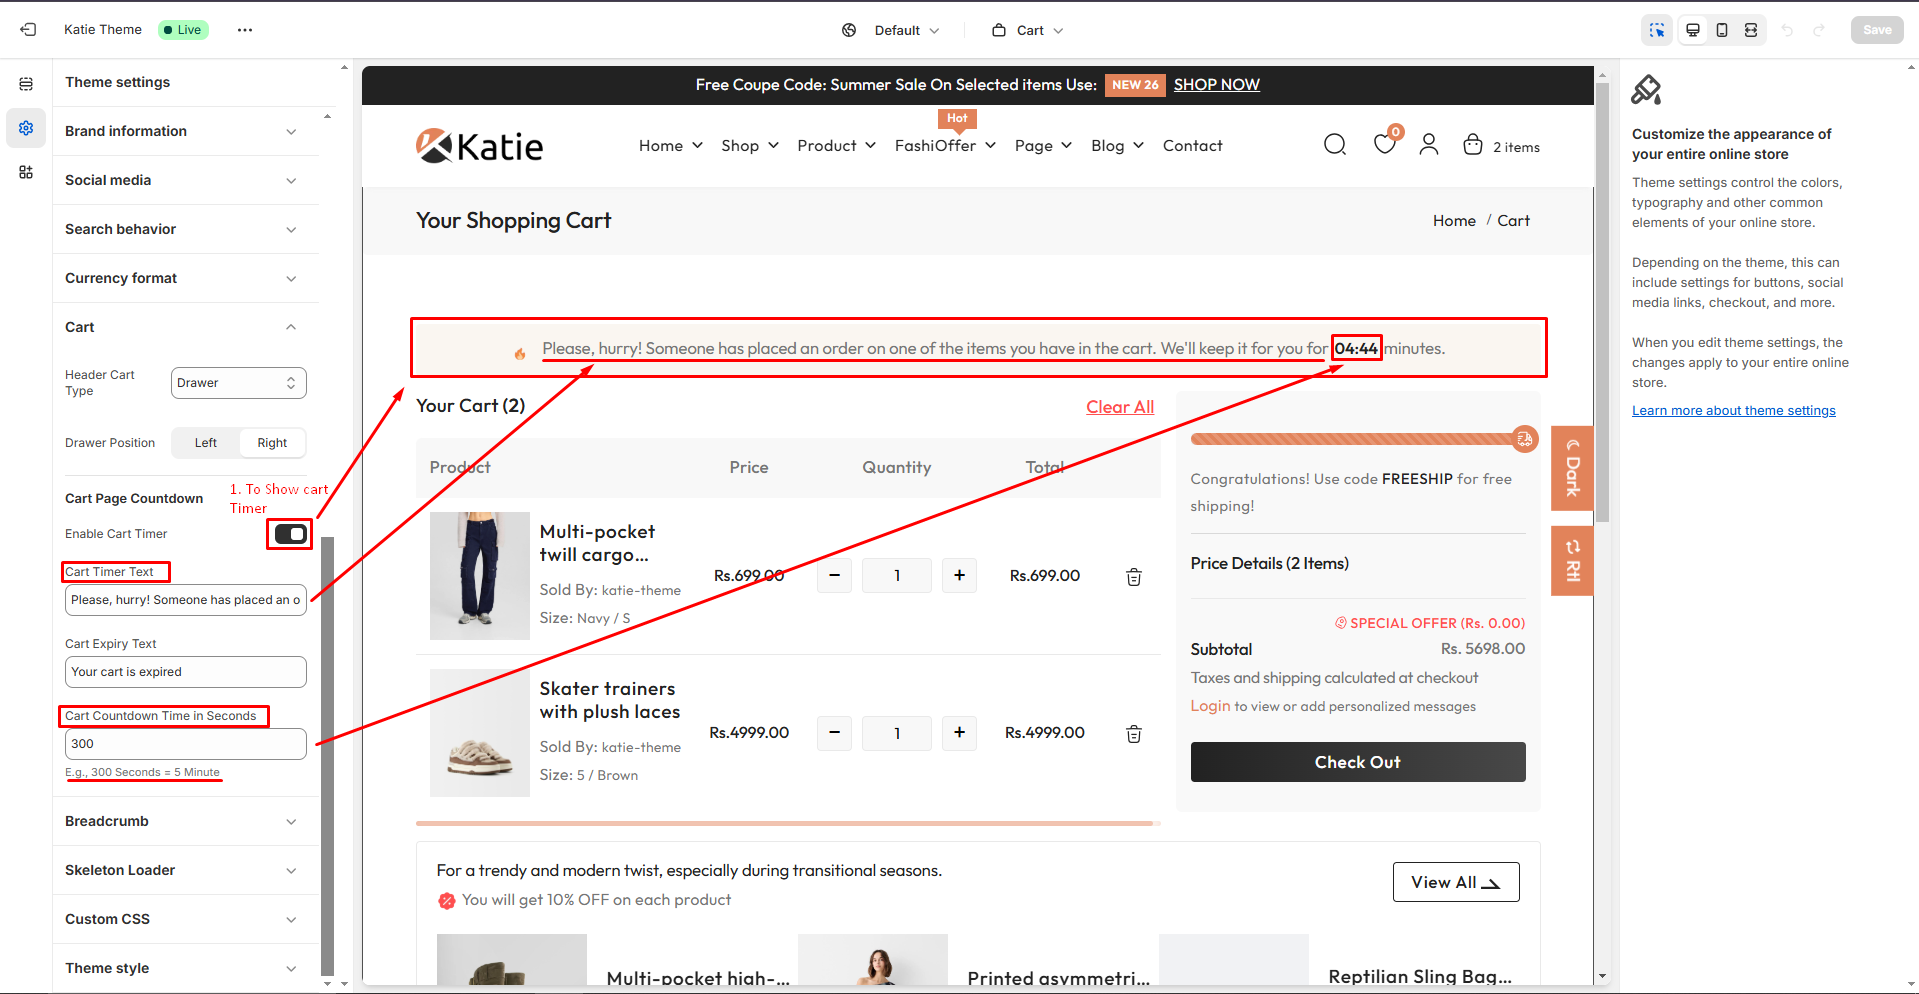
Cart
- Open your Shopify admin panel and go to Online Store -> Customize -> Theme settings -> Cart .
Breadcrumb option
- Open your Shopify admin panel and go to Online Store -> Customize -> Theme settings -> Breadcrumb option.

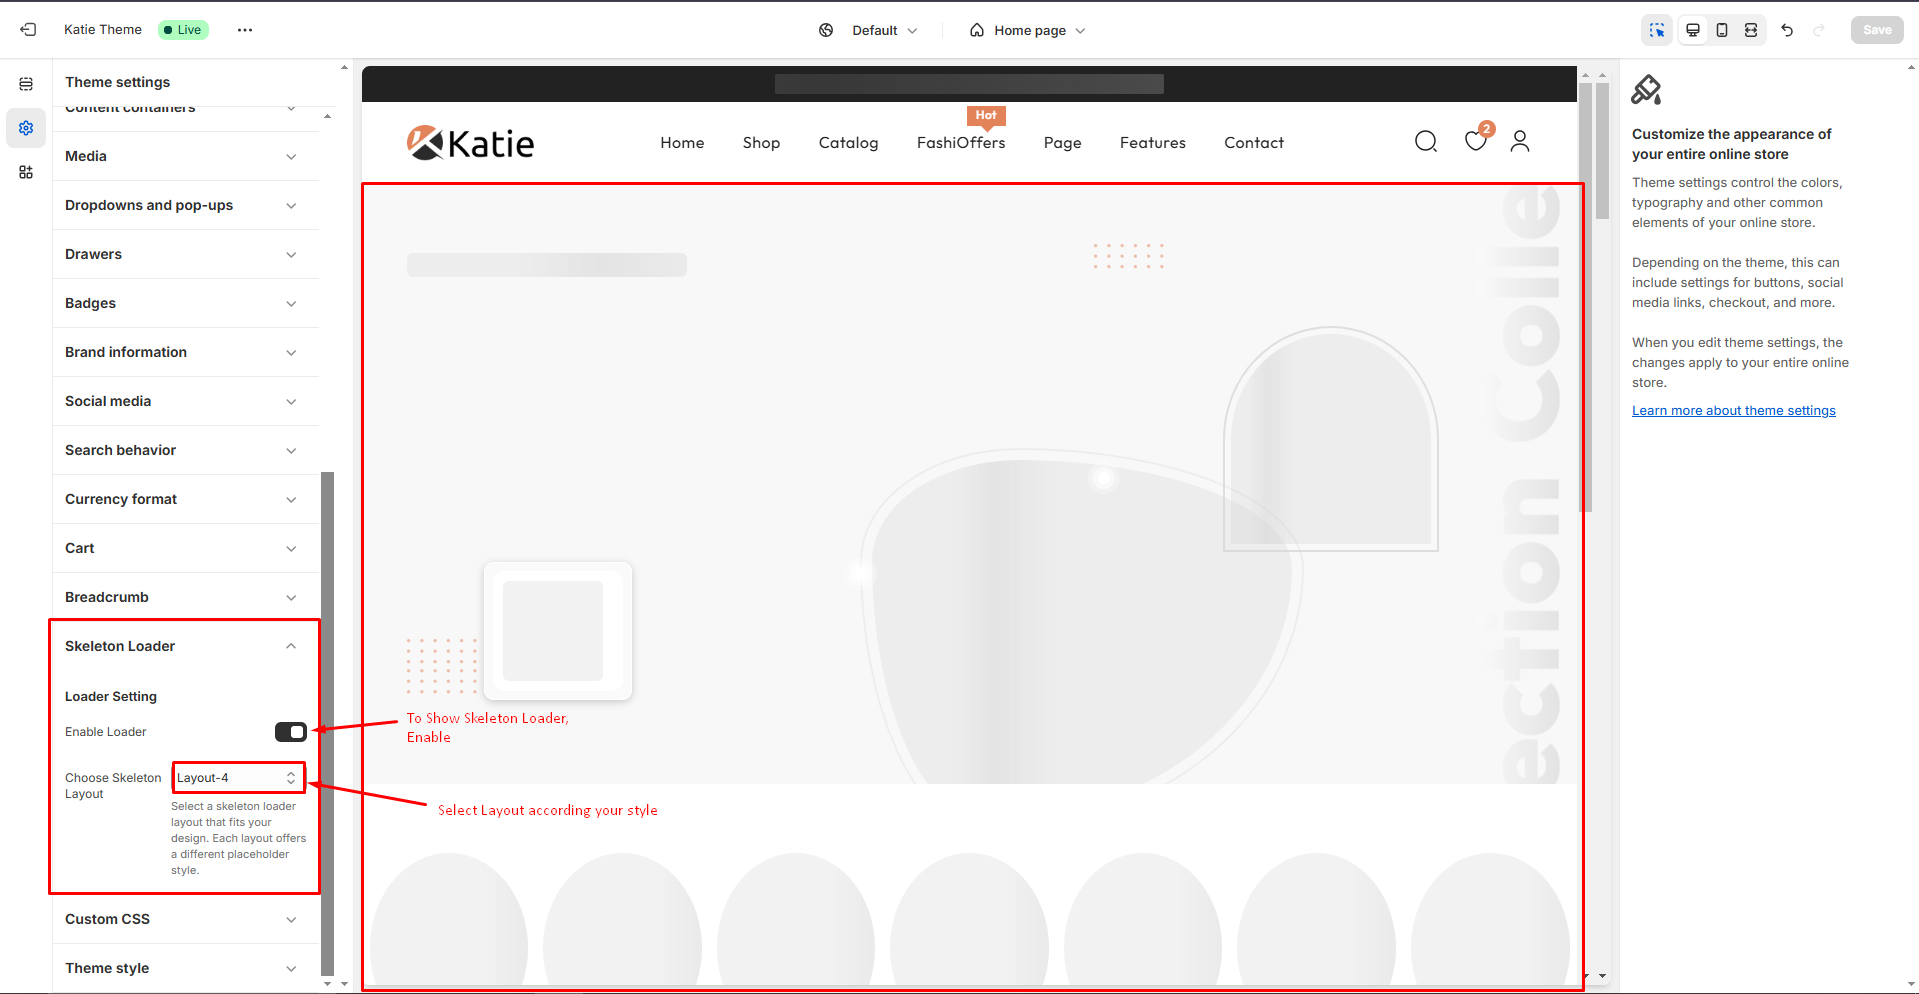
Skeleton Loader
- Skeleton screens use a loader of empty content placeholders to give users an idea of the page structure.
Age Verification popup
- To enable Age Verification popup and config it, Go to Online Store -> Customize -> Theme settings -> Age Verification Popup .

Newsletter Modal
- To Enable/disable Newsletter Popup and config newsletter image and text, Go to theme Online Store -> Customize -> Theme settings -> Newsletter Modal.

Currency
- To enable Age Verification popup and config it, Go to Online Store -> Customize -> Theme settings -> Currency .

Cart shipping Calculator
- To enable Age Verification popup and config it, Go to Online Store -> Customize -> Theme settings -> Cart Shipping Calculator .

Setup pages
Create A Custom Page
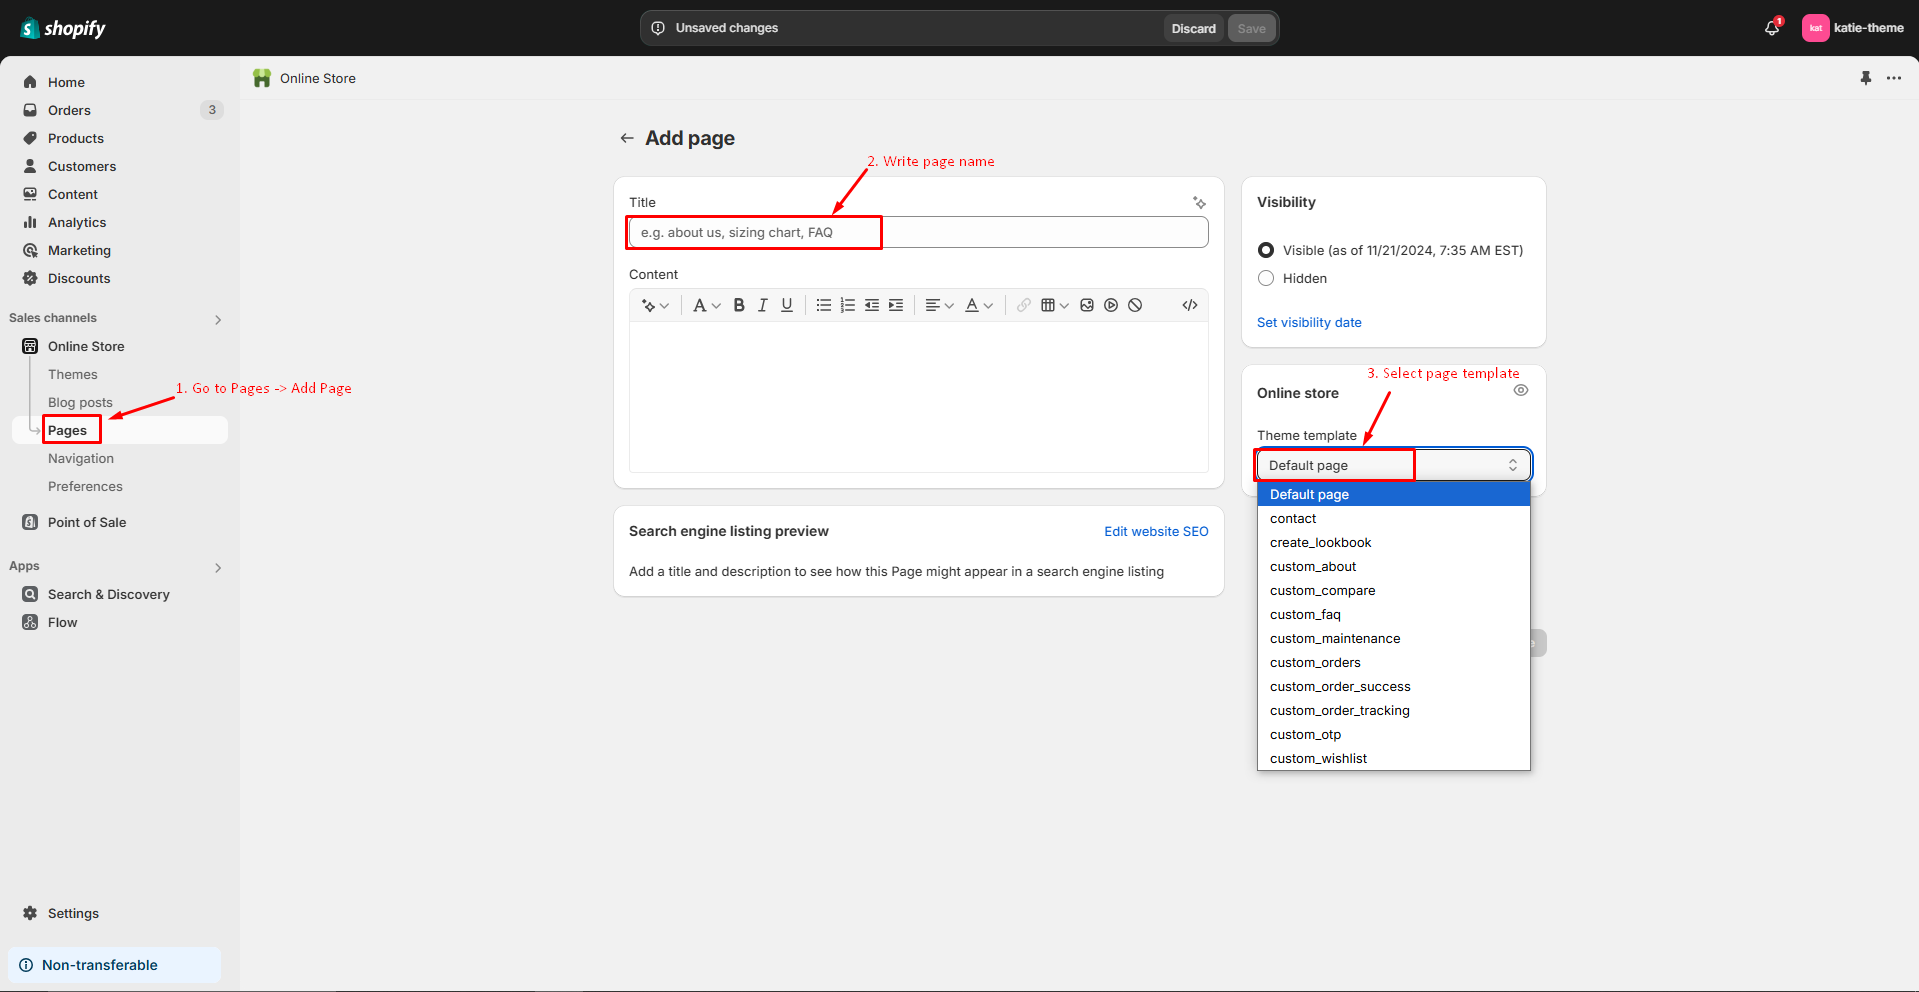
Pages Template Overview
| Page Template Name |
| page |
| page.custom_about |
| page.custom_contact |
| page.custom_faq |
| page.custom_lookbook |
| page.custom_order |
| page.custom_order_tracking |
| page.custom_order_success |
| page.custom_compare |
| page.custom_maintenance |
| page.custom_portfolio |
| page.custom_age_verify |
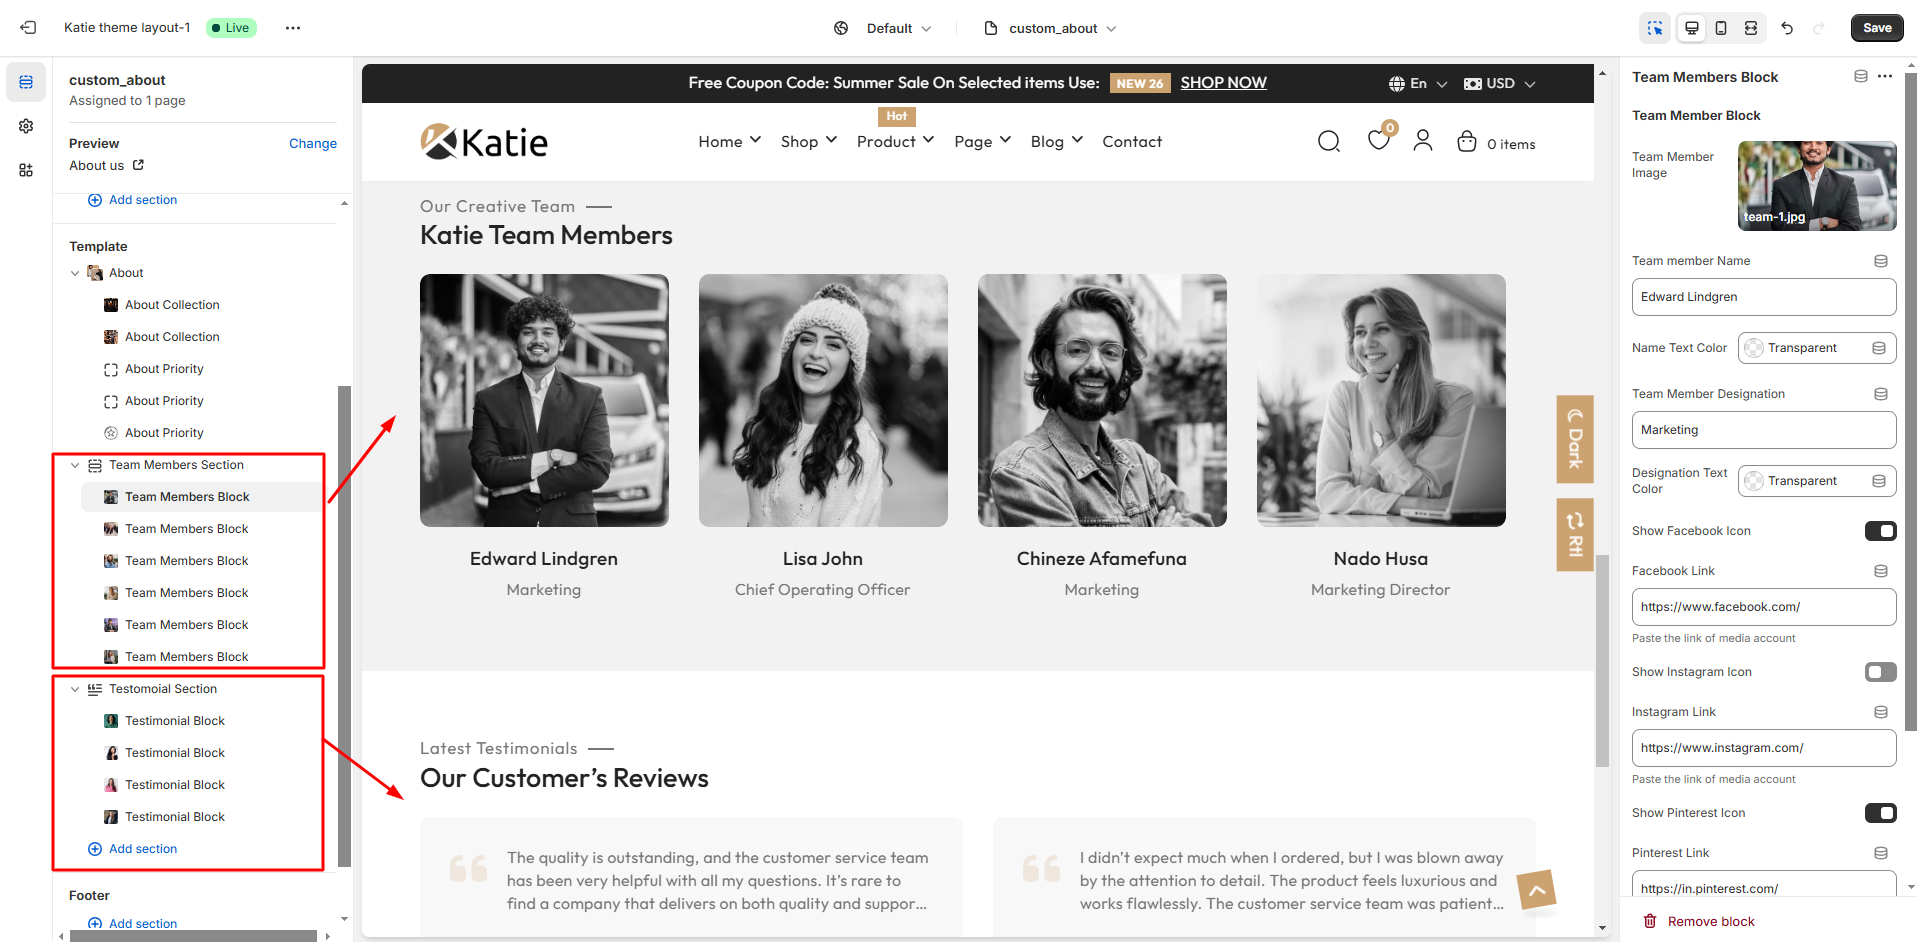
About Page
- About page must be assigned to the template page.custom_about while creating it.
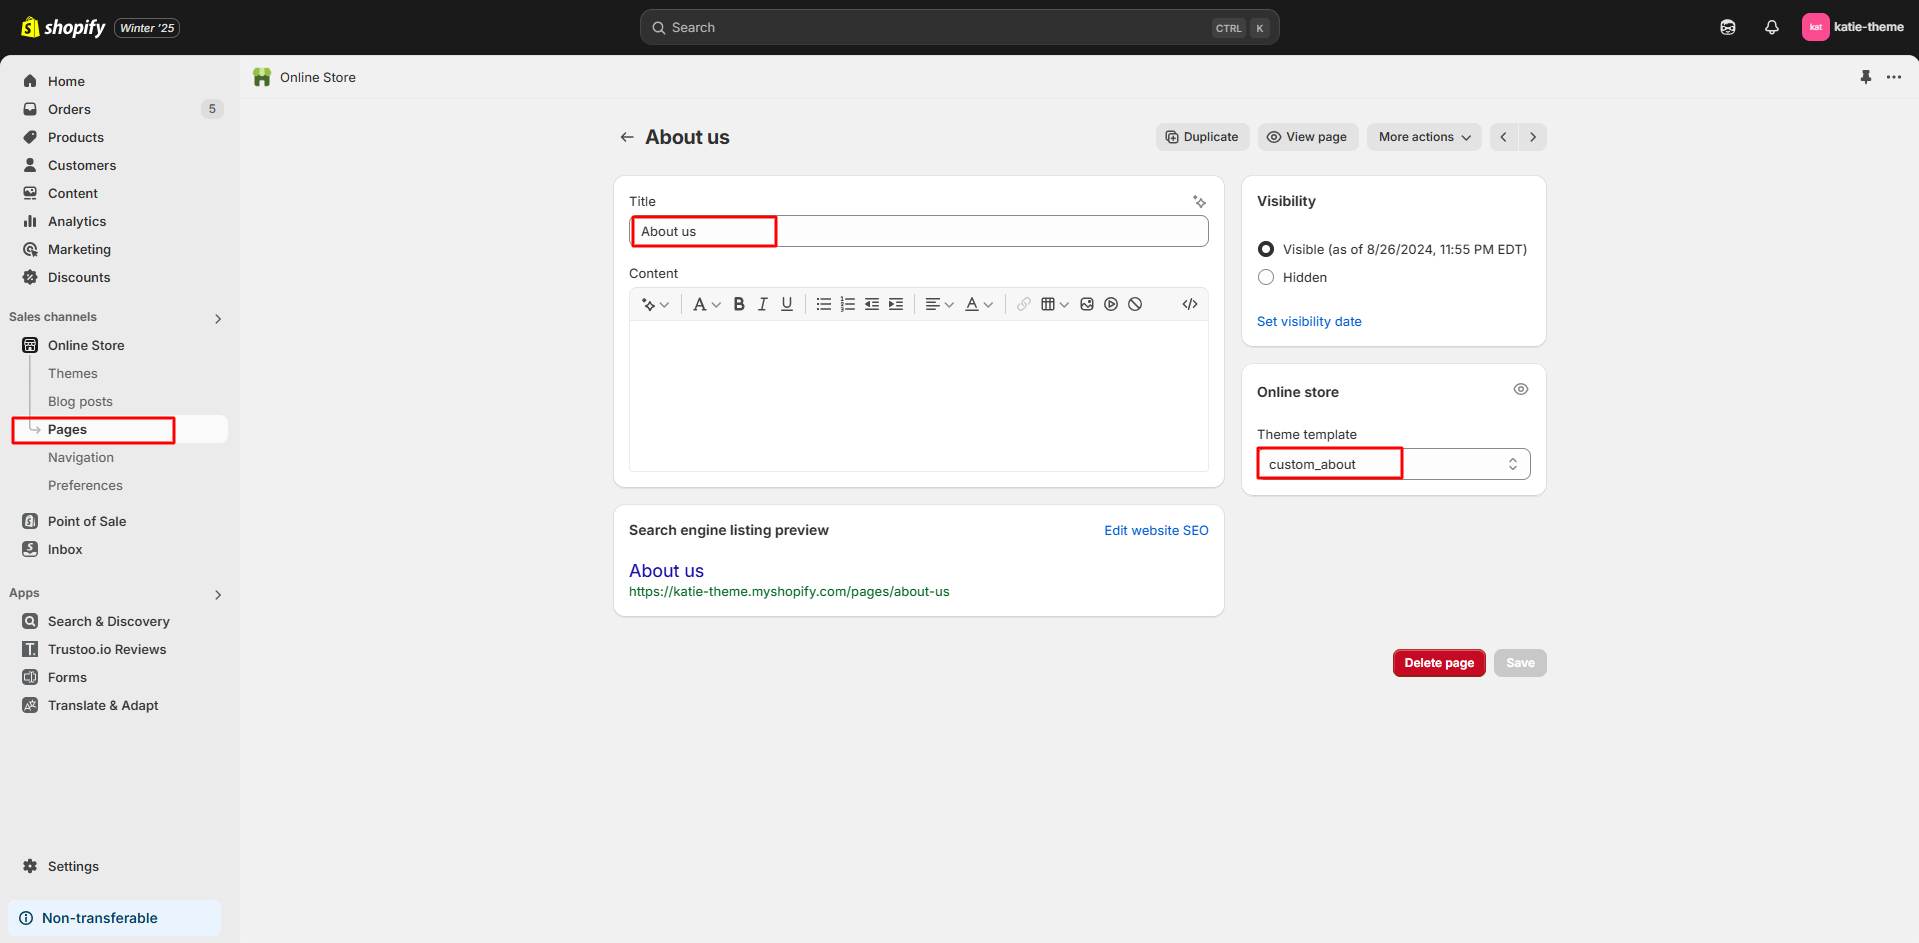
- To config About page add images and content in blocks.

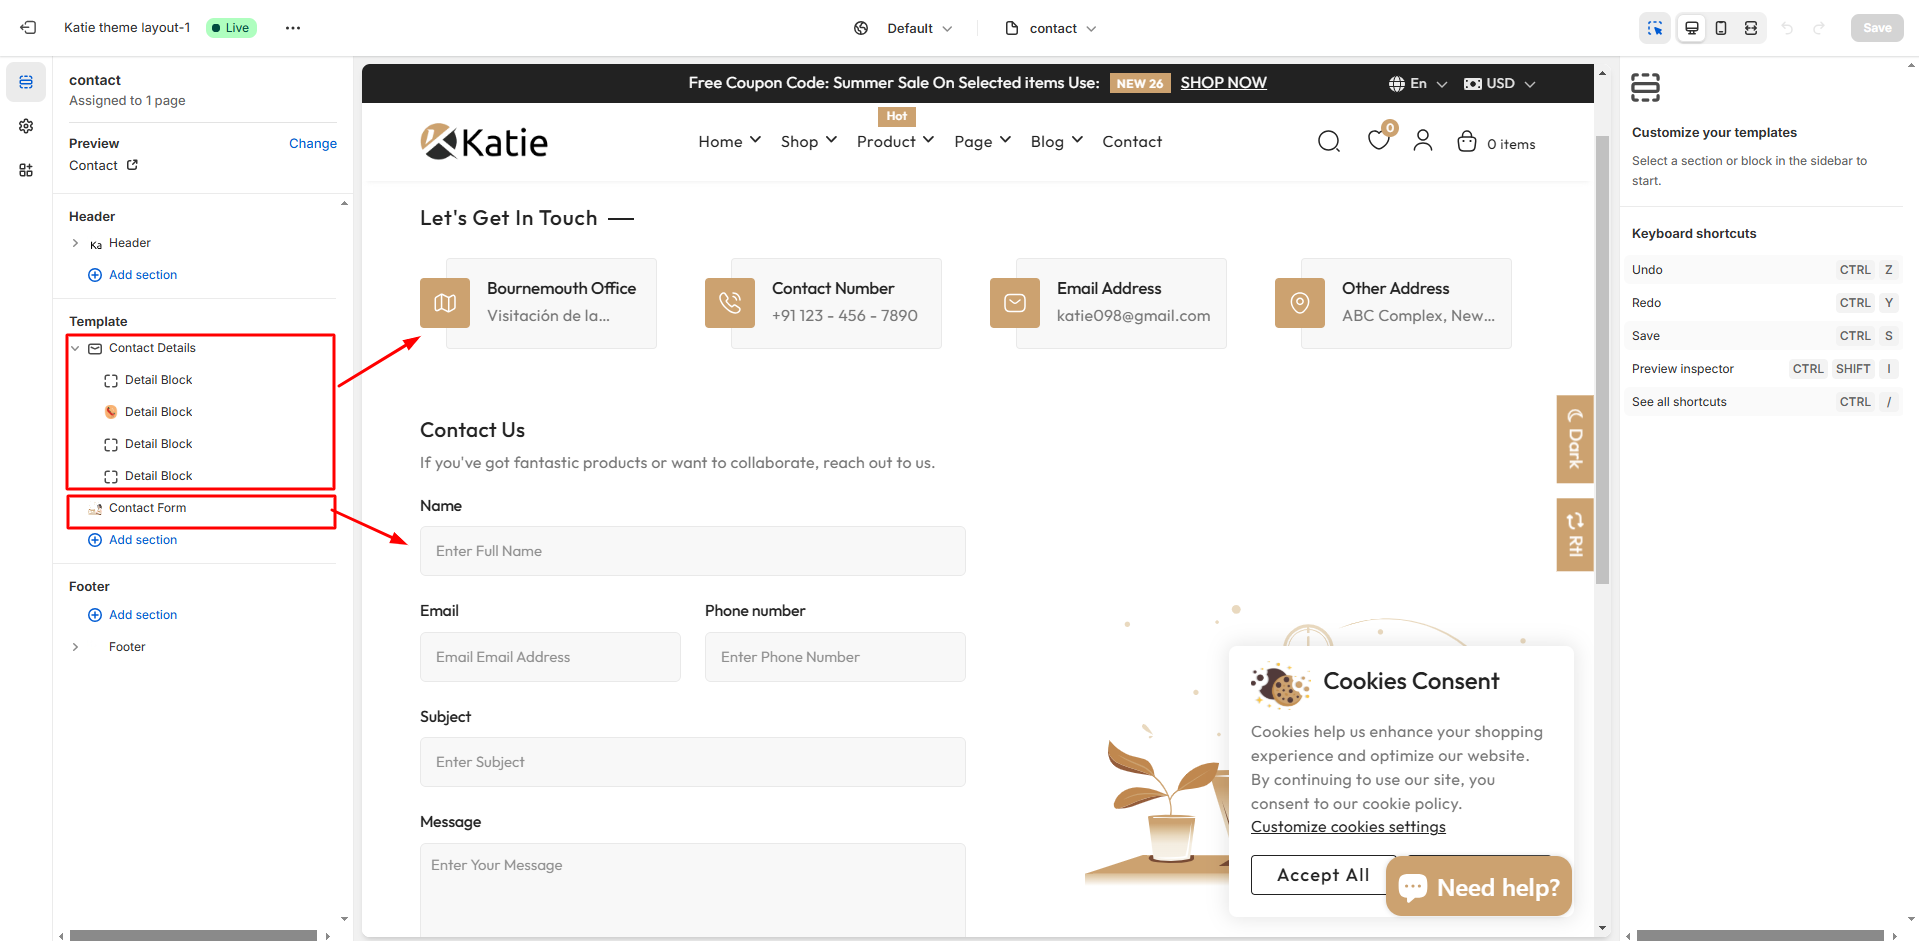
Contact Page
Contact page options can be easily configurable using these settings.
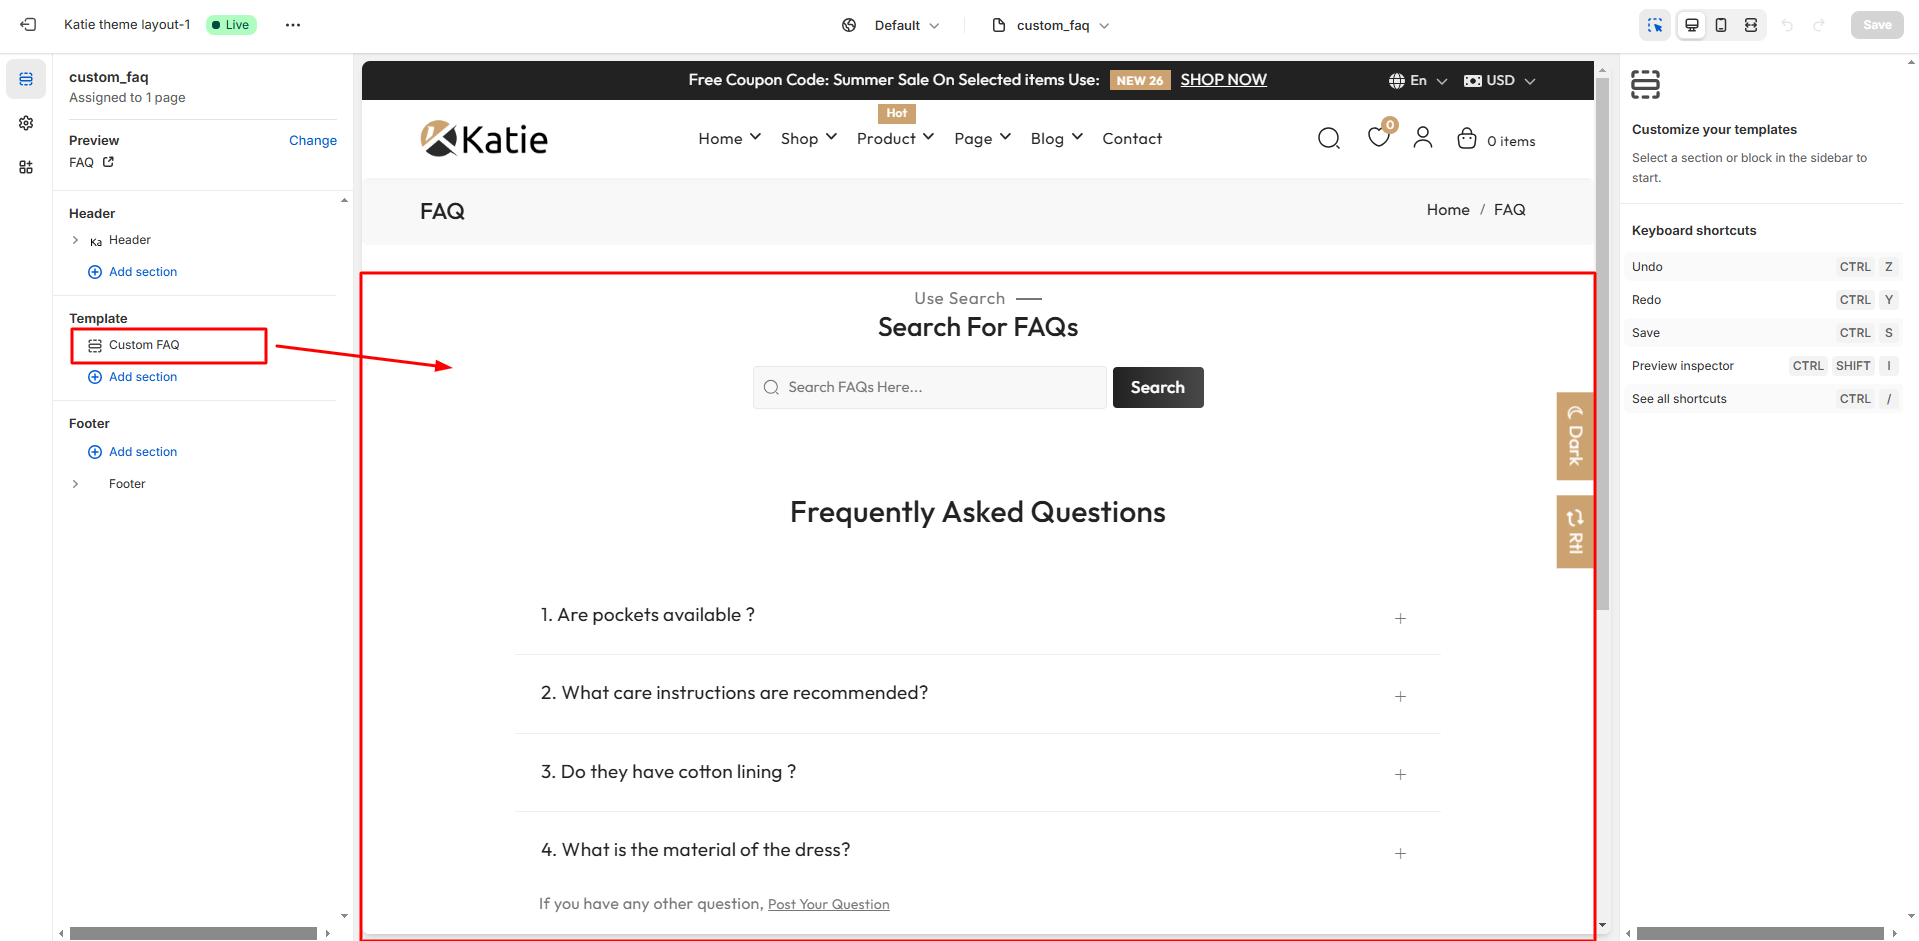
FAQ Page
- Assign page.custom_faq template while creating FAQ page.
Lookbook Page
- Assign page.custom_lookbook template while creating Lookbook page.


Wishlist Page
- Assign page.custom_wishlist template while creating Wishlist page.

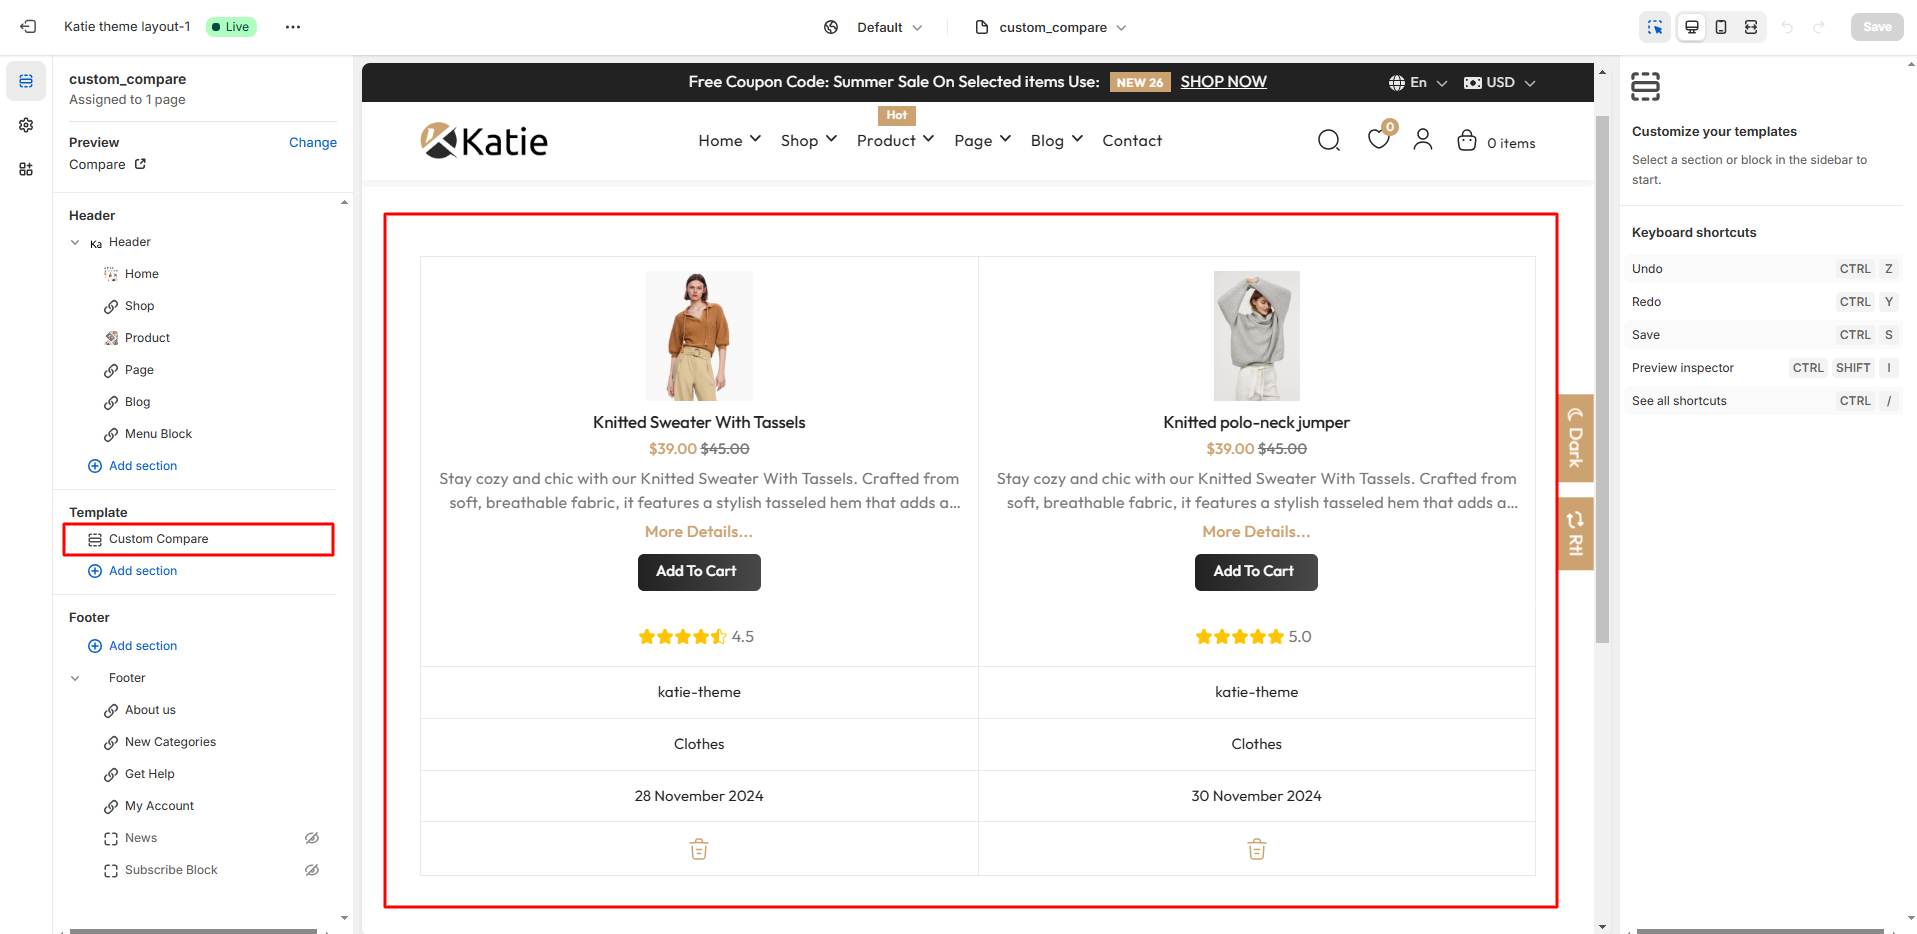
Compare Page
- Assign page.custom_compare template while creating Wishlist page.
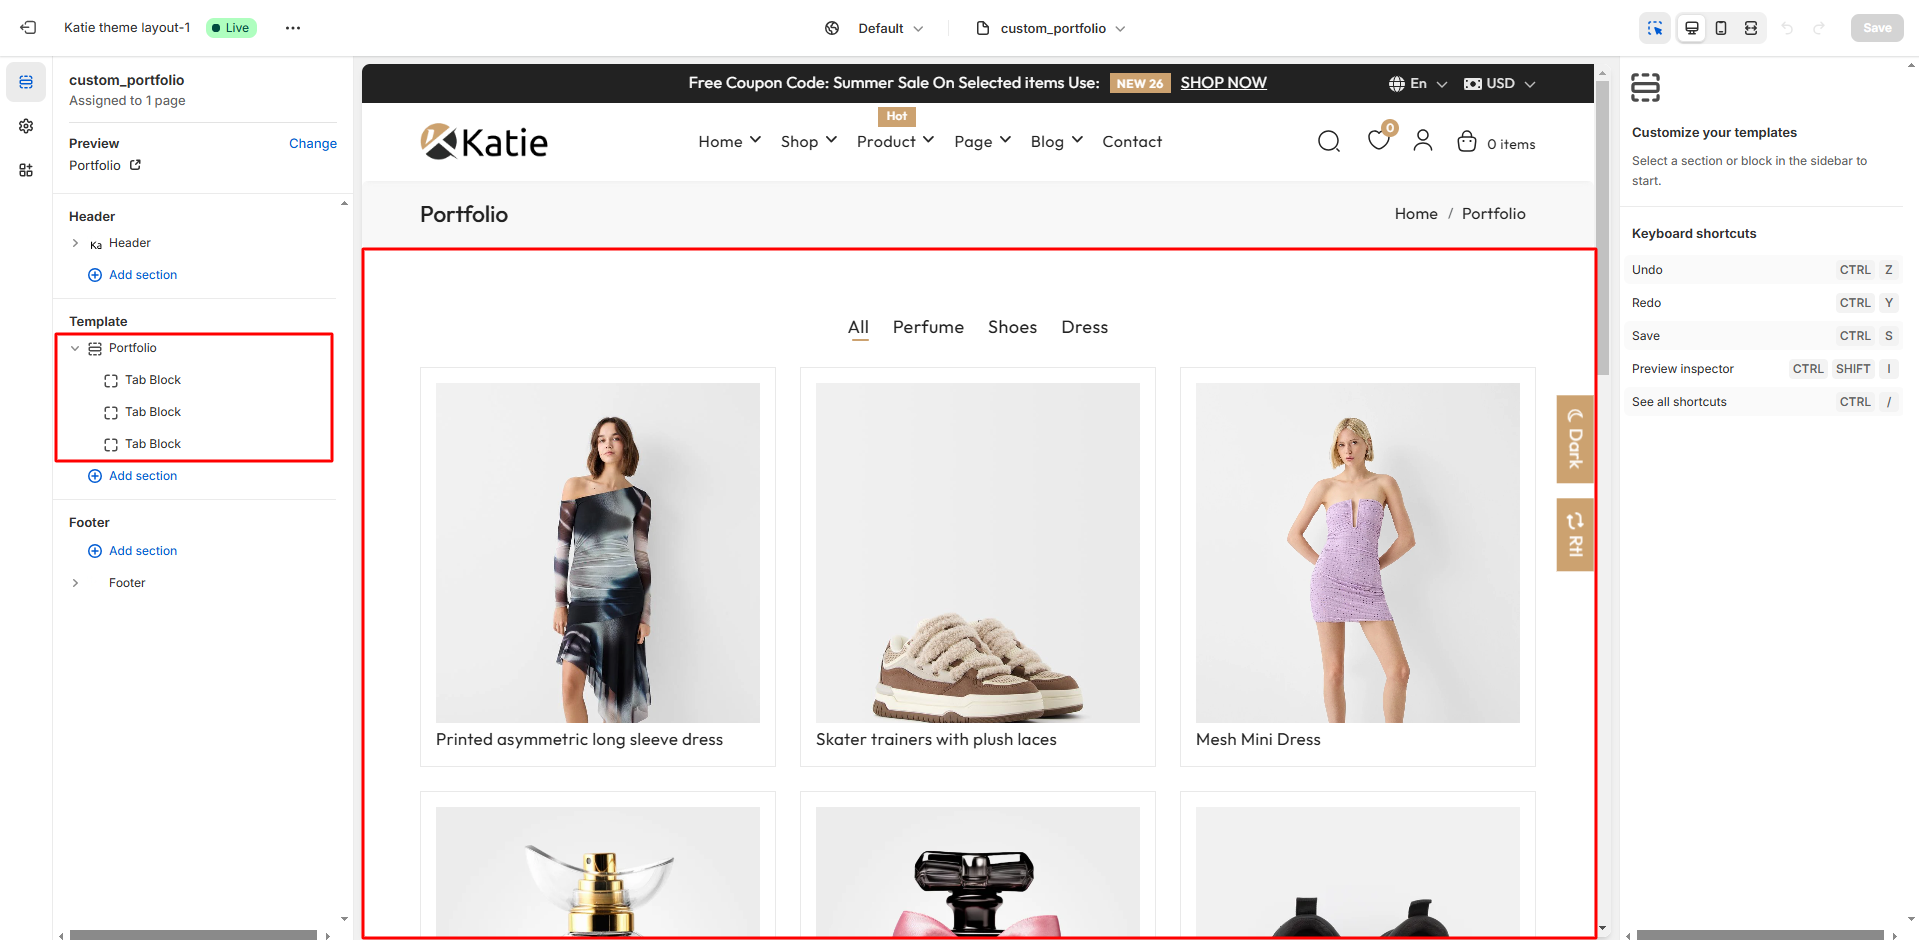
Portfolio Page
- Assign page.custom_portfolio template while creating Wishlist page.
Age Verification Page
- Assign page.custom_age template while creating Age verification page.
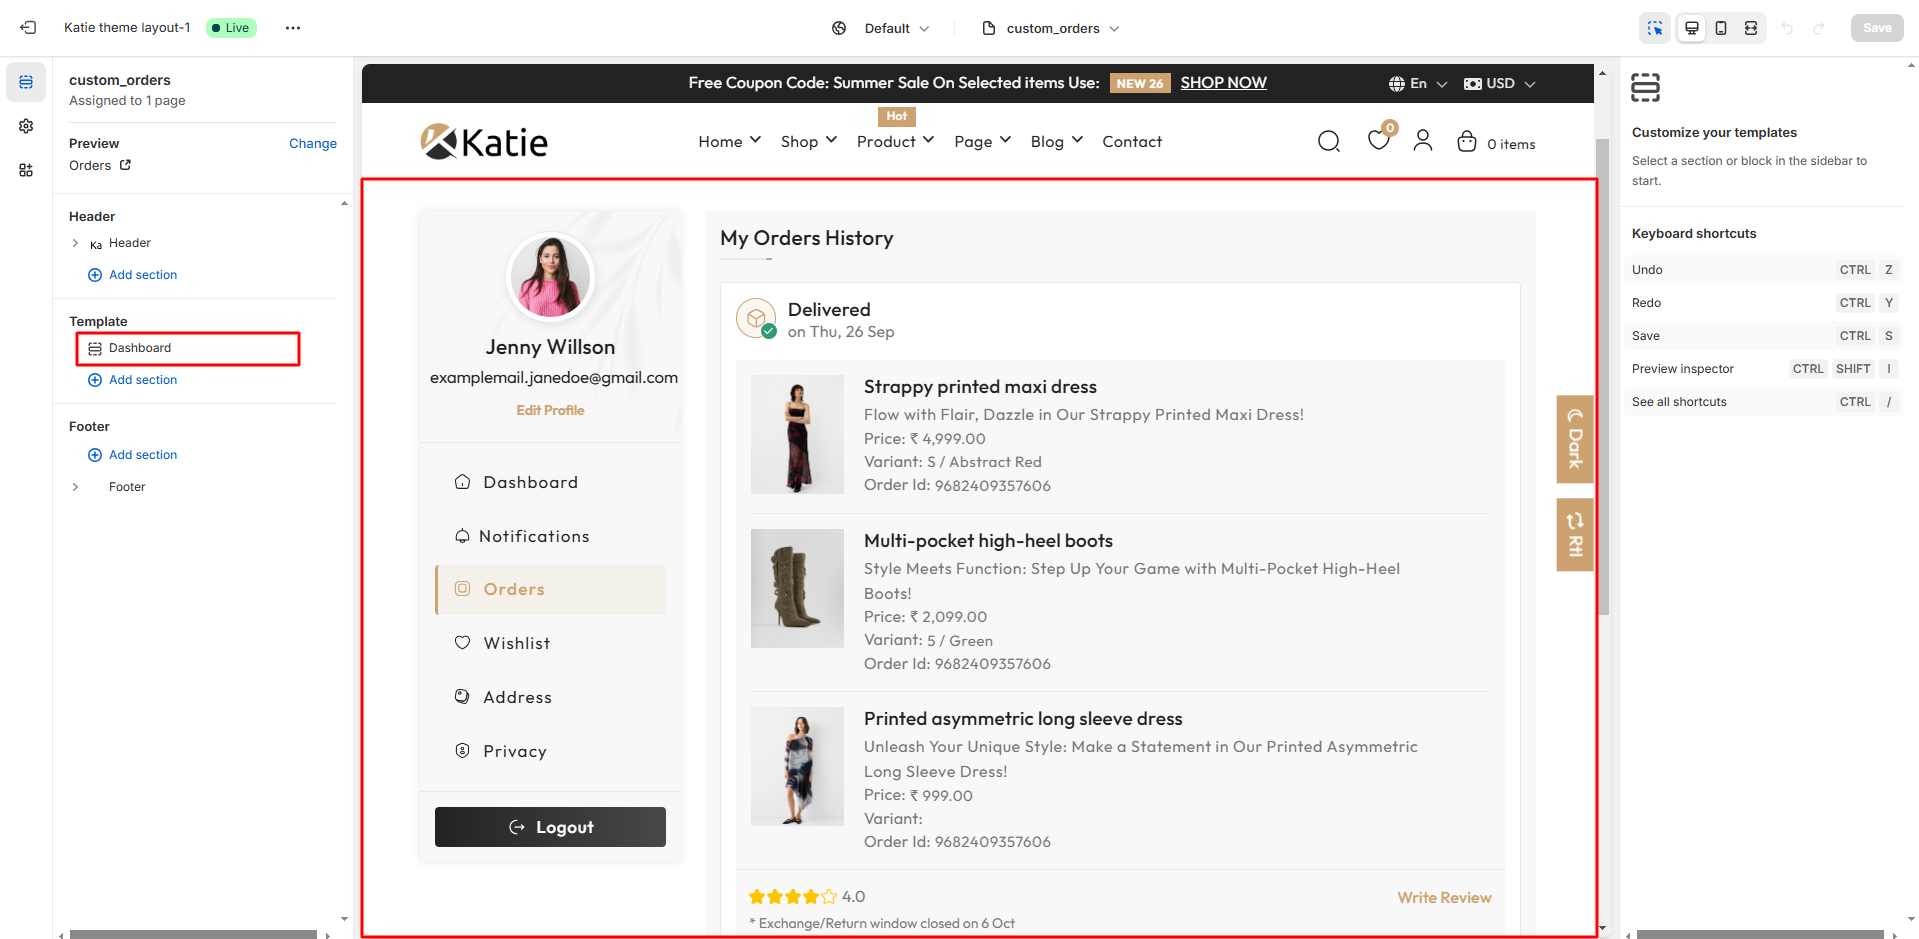
Orders Page
- Assign page.custom_orders template while creating Orders page.
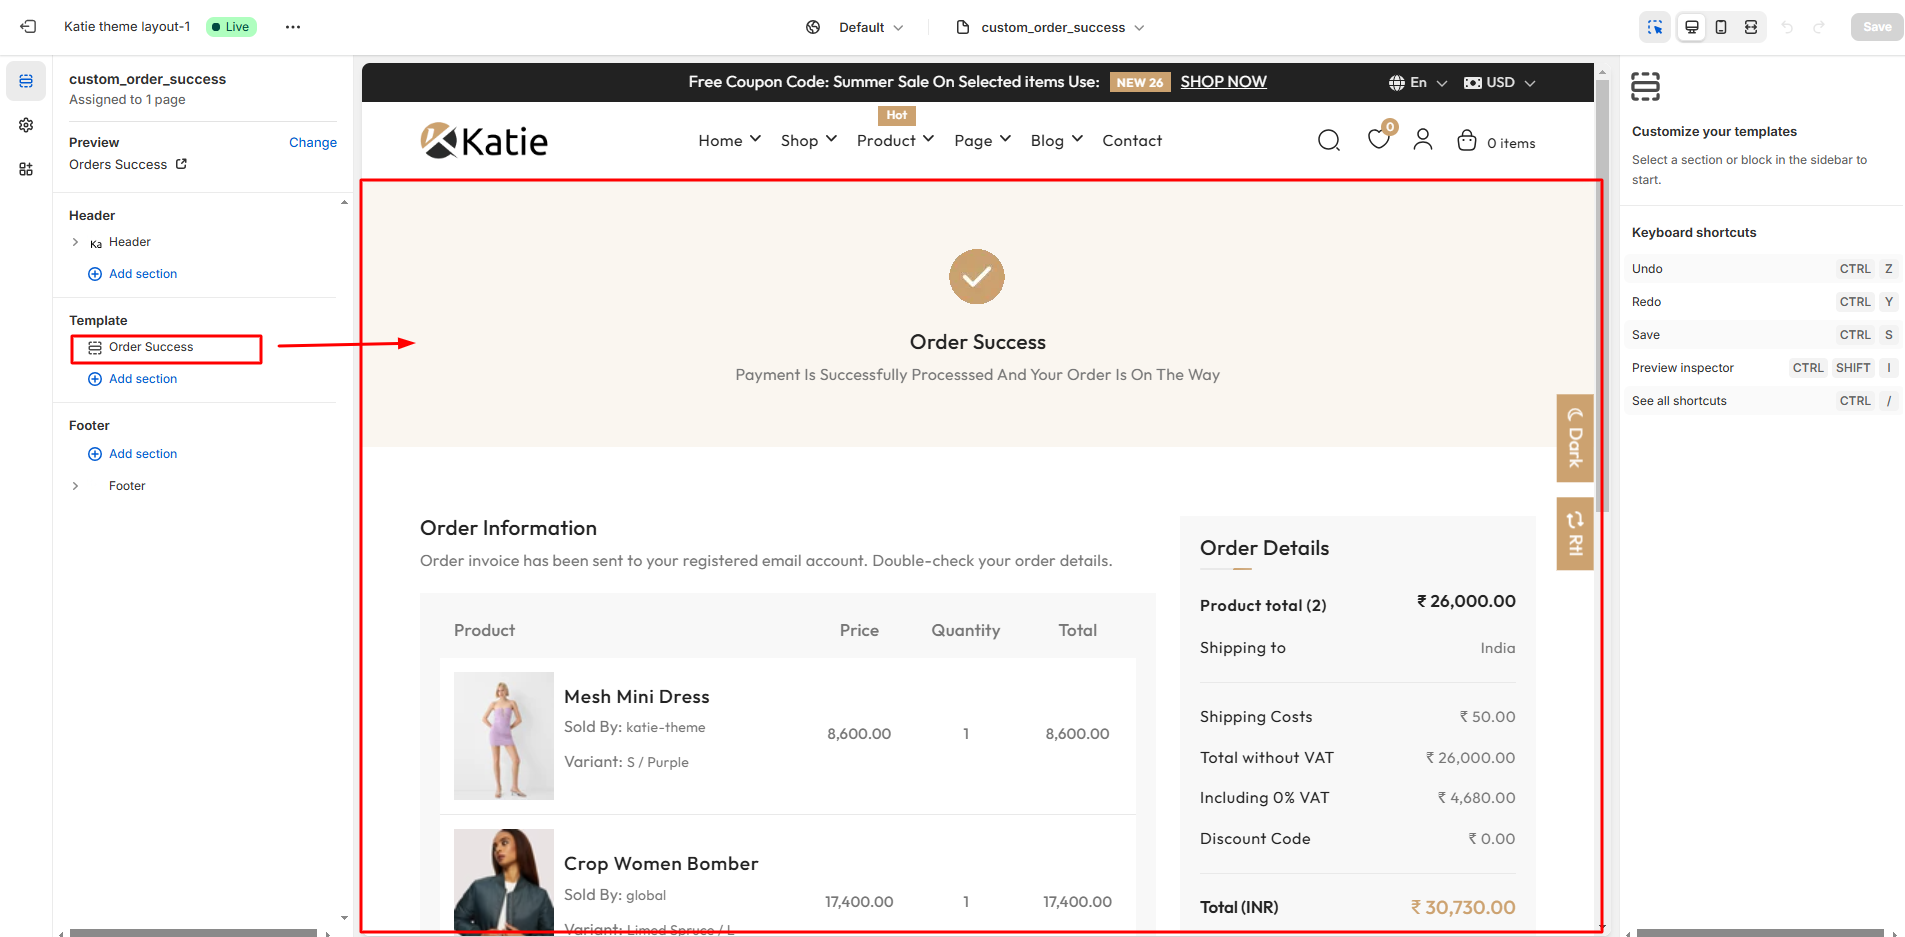
Order Success Page
- Assign page.custom_order_success template while creating Order Success page.
Order Tracking Page
- Assign page.custom-order_tracking template while creating Order Tracking page.
![]()
Maintenance Page
- Assign page.custom_maintenance template while creating Maintenance page.

Blog Settings
Create Blog
-
Create a New Blog
- Go to the Blog Posts section in your admin panel.
- Click on the Manage Blogs option.
-

- In Manage Blogs click on Add Blog button.

- Enter the blog title and Set any required settings in the provided fields.
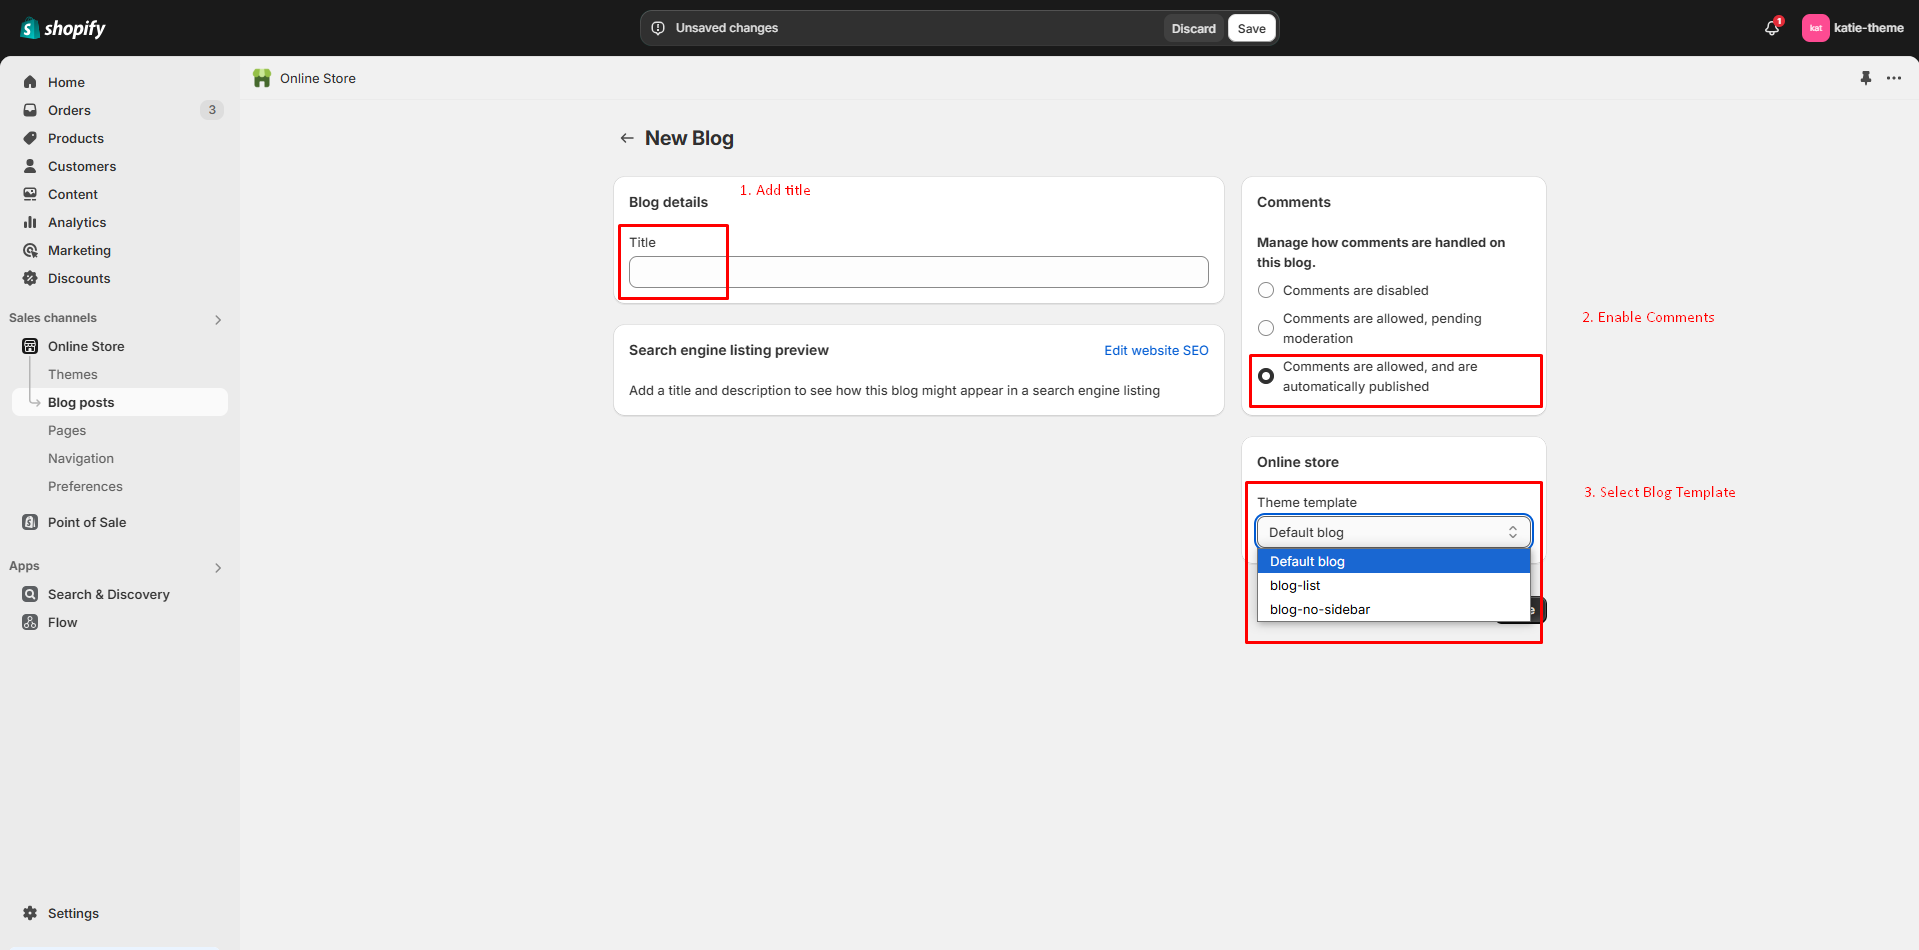
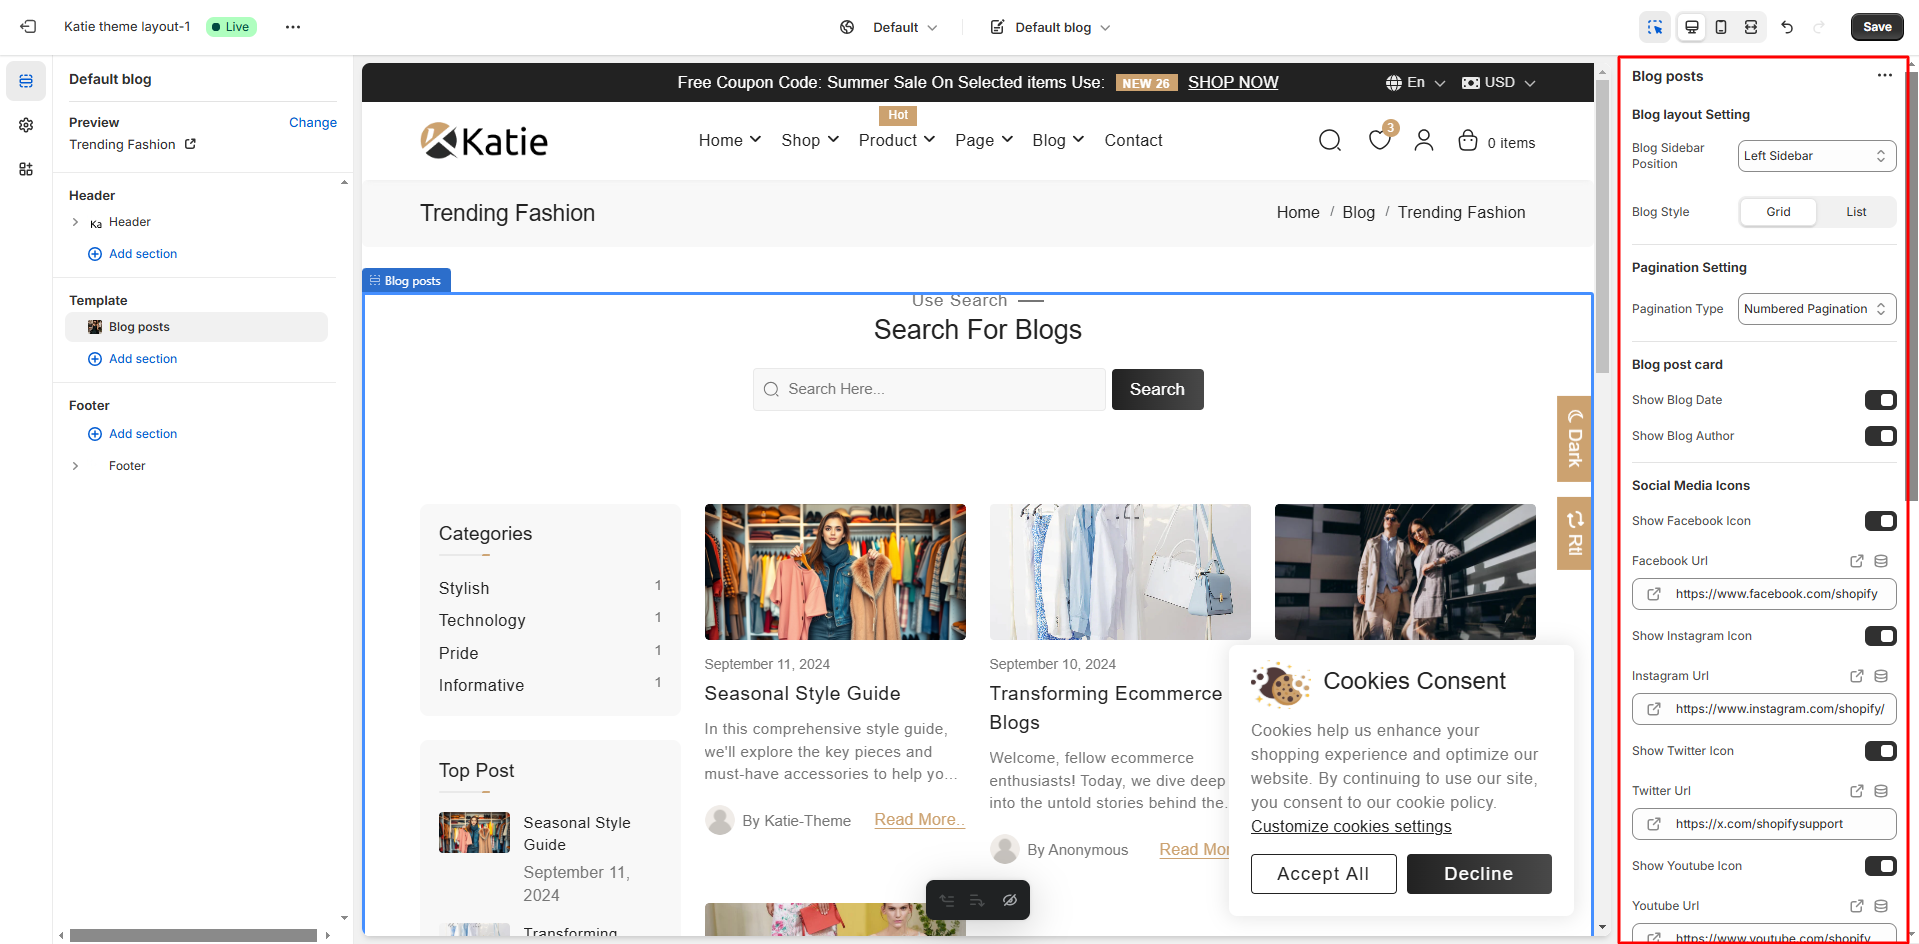
Blog Settings
- Blog Settings: Customize -> Template Dropdown -> Blogs

Create Blog Post
-
Create a New Blog Post (Article)
- Go to the Blog Posts section in your admin panel.
- Click on the Add Blog button.

- Enter the blog title and Set any required settings in the provided fields.

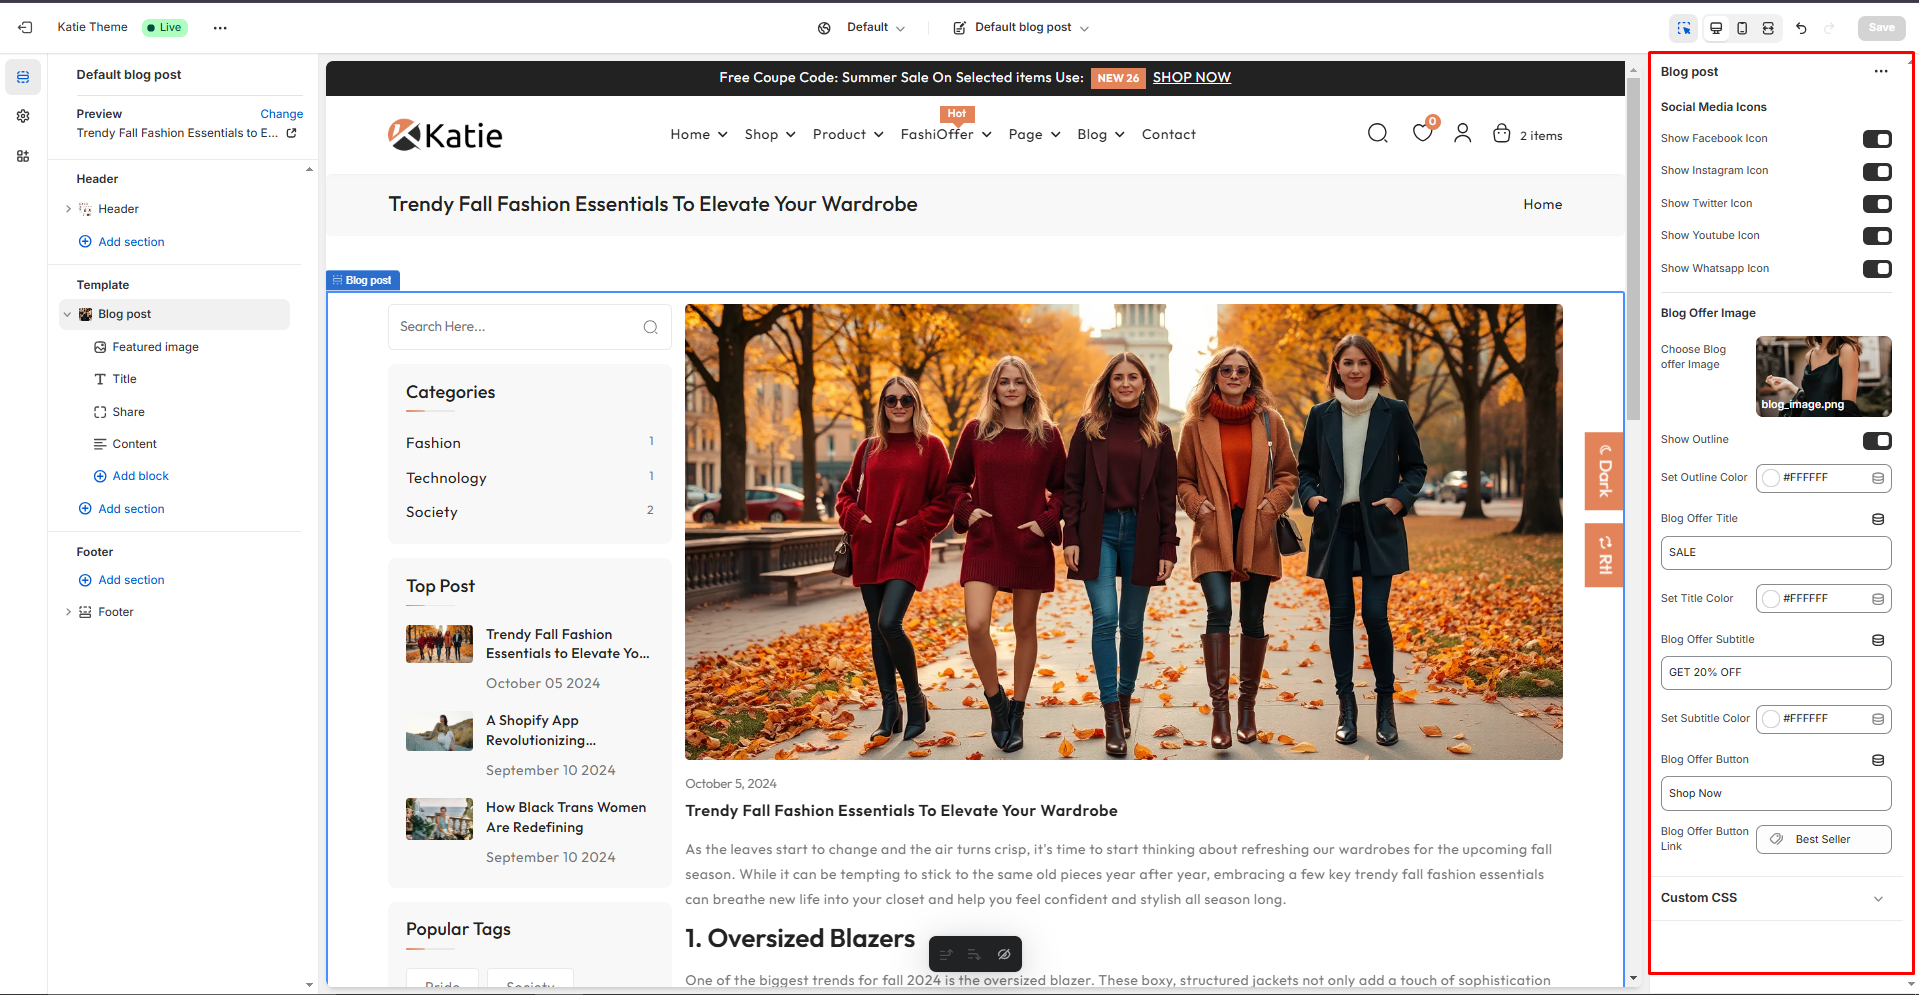
Blog Post Settings
- Blog Post Settings: Customize -> Template Dropdown -> Blog Post

header section
- To change header colors, go to Customize -> Theme Settings -> Colors
- To change logo, go to Customize -> Theme Settings -> Logo & favicon
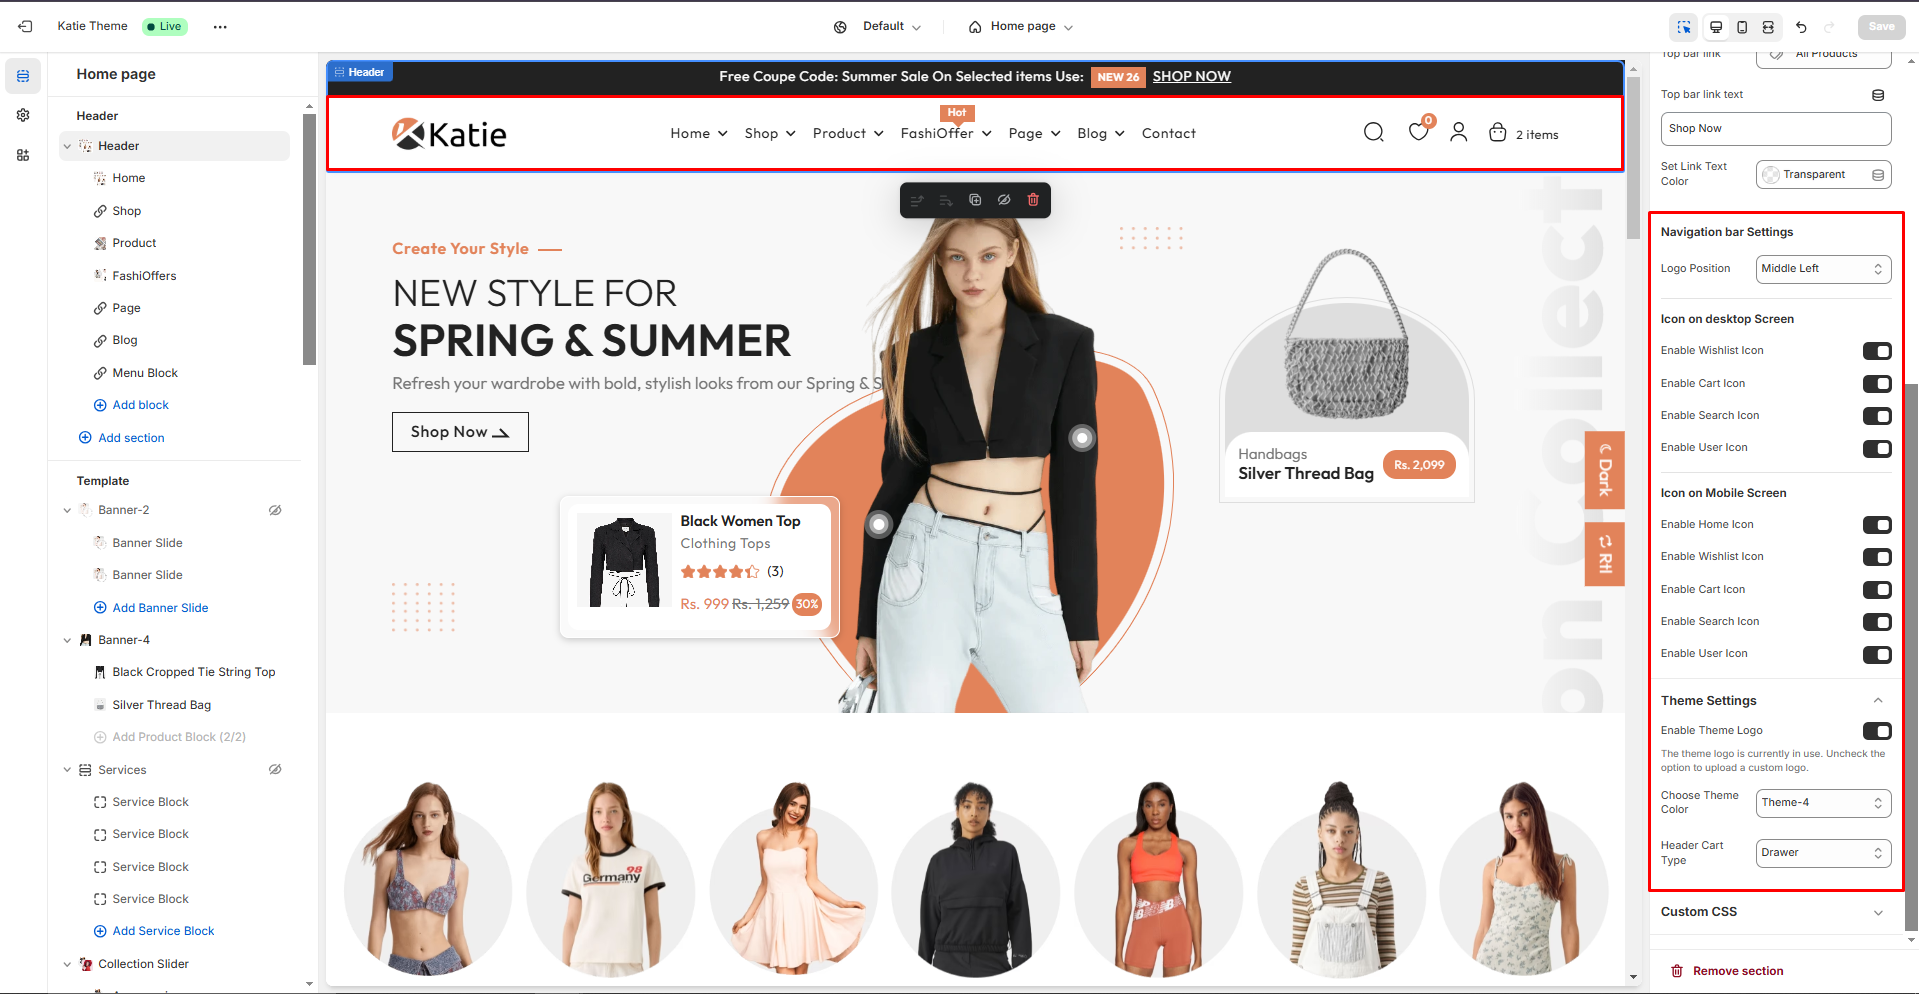
Top Bar Setting
- Open your Shopify Admin Panel, go to Online Store -> Customize -> Sections, and select the Header section to edit.

Setup header
-
Open your Shopify Admin Panel, go to Online Store -> Customize -> Sections -> Header
header 1

header 2

header 3

header 4

header 5

Footer section
- To change footer colors, go to Customize -> Theme Settings -> Colors
- To change logo, go to Customize -> Theme Settings -> Logo & favicon
Setup Footer
-
Open your Shopify Admin Panel, go to Online Store -> Customize -> Sections -> Header

Footer 1
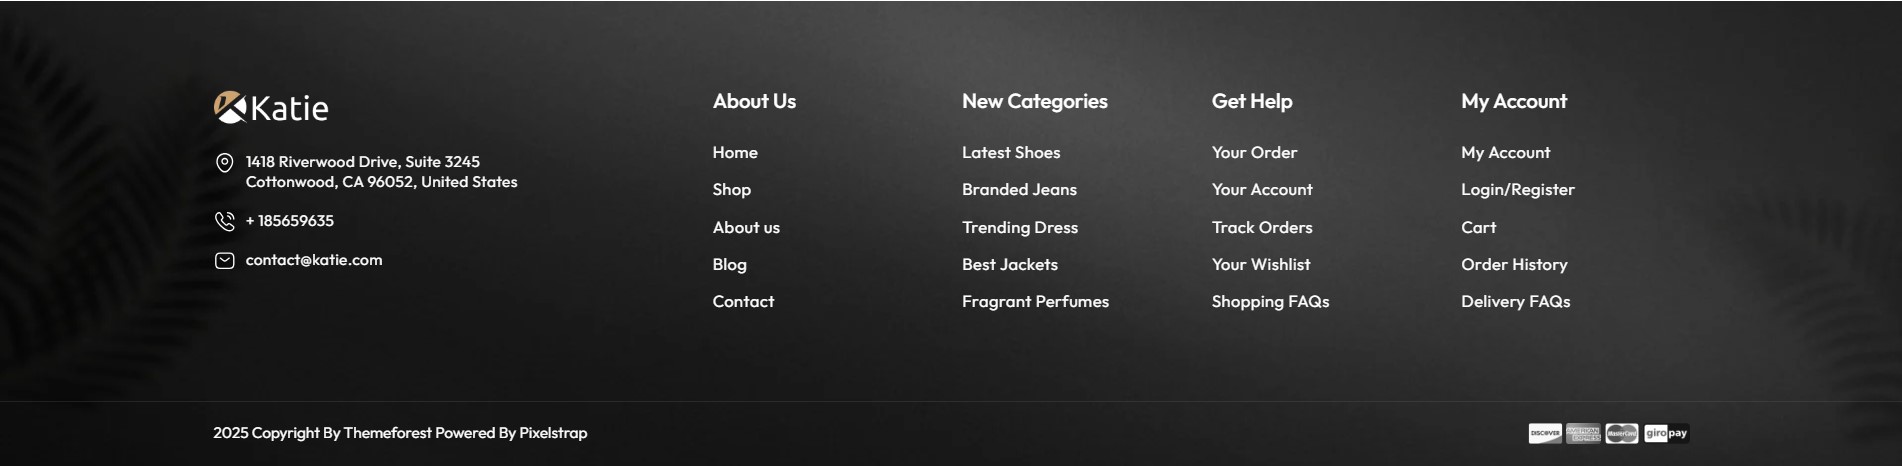
Footer 2
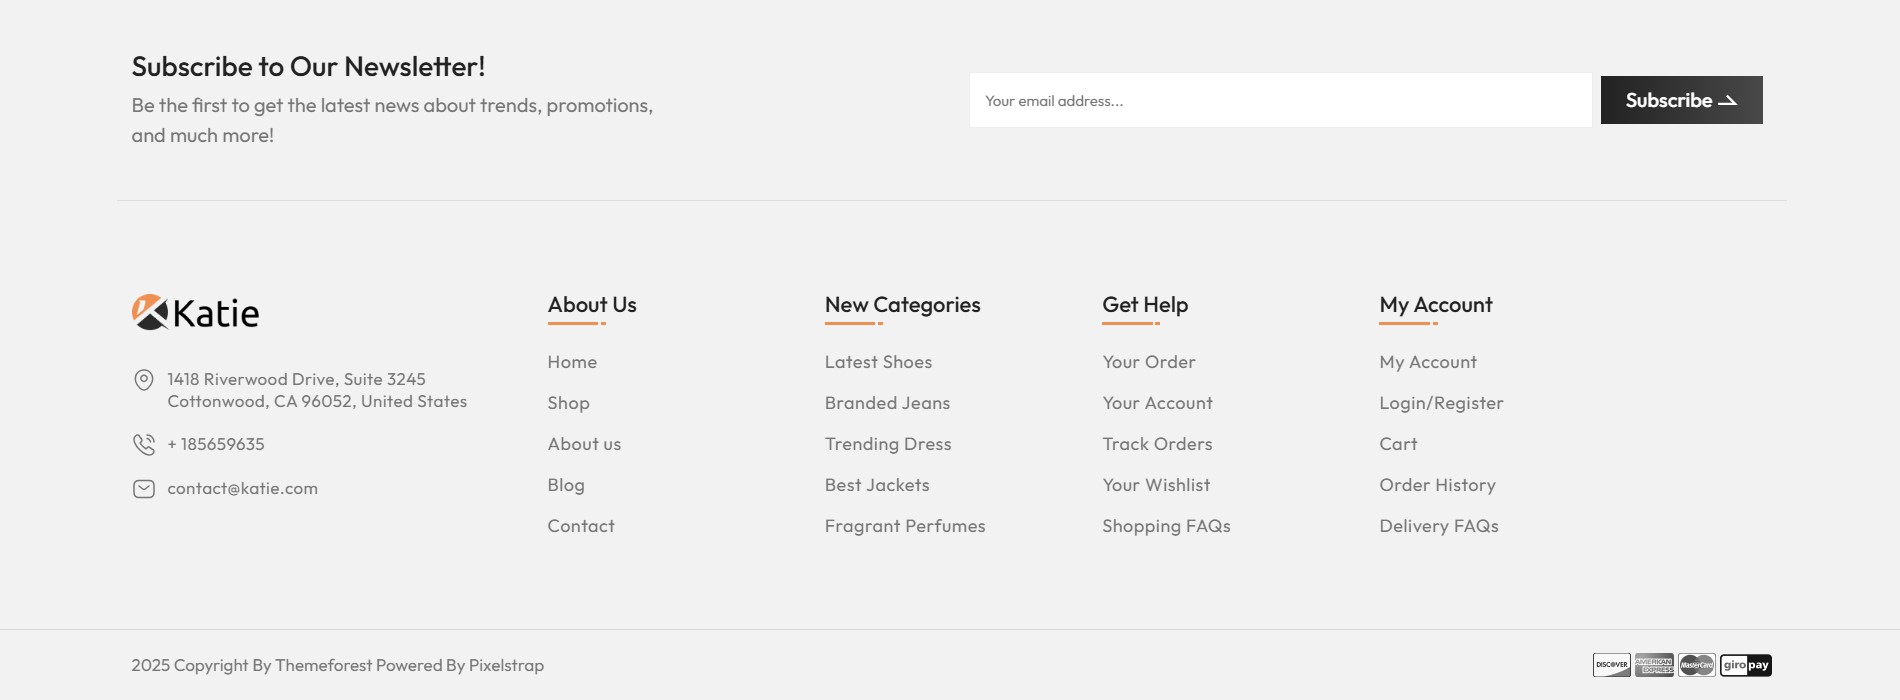
Footer 3

Footer 4

home sections
Banner & Slideshow
To add this section, kindly follow below steps:
- For Banner Section go to -> Customize -> click Add section -> select Banner
Banner 1
- The Banner 1 section includes two layout options: a classic banner and a banner slider.


Banner 2
- The Banner 2 section includes two layout options: a classic banner and a banner slider.


Banner 3
- The Banner 3 section includes two layout options: a classic banner and a banner slider.


Banner 4
- The Banner 4 section includes only classic banner layout with floating products.

Collection Banners
To add this section, kindly follow below steps:
- For Collection Banners Section go to -> Customize -> click Add section -> select Collection Banner
Collection Banner 1

Collection Banner 2

Collection Banner 3

Collection Banner 4

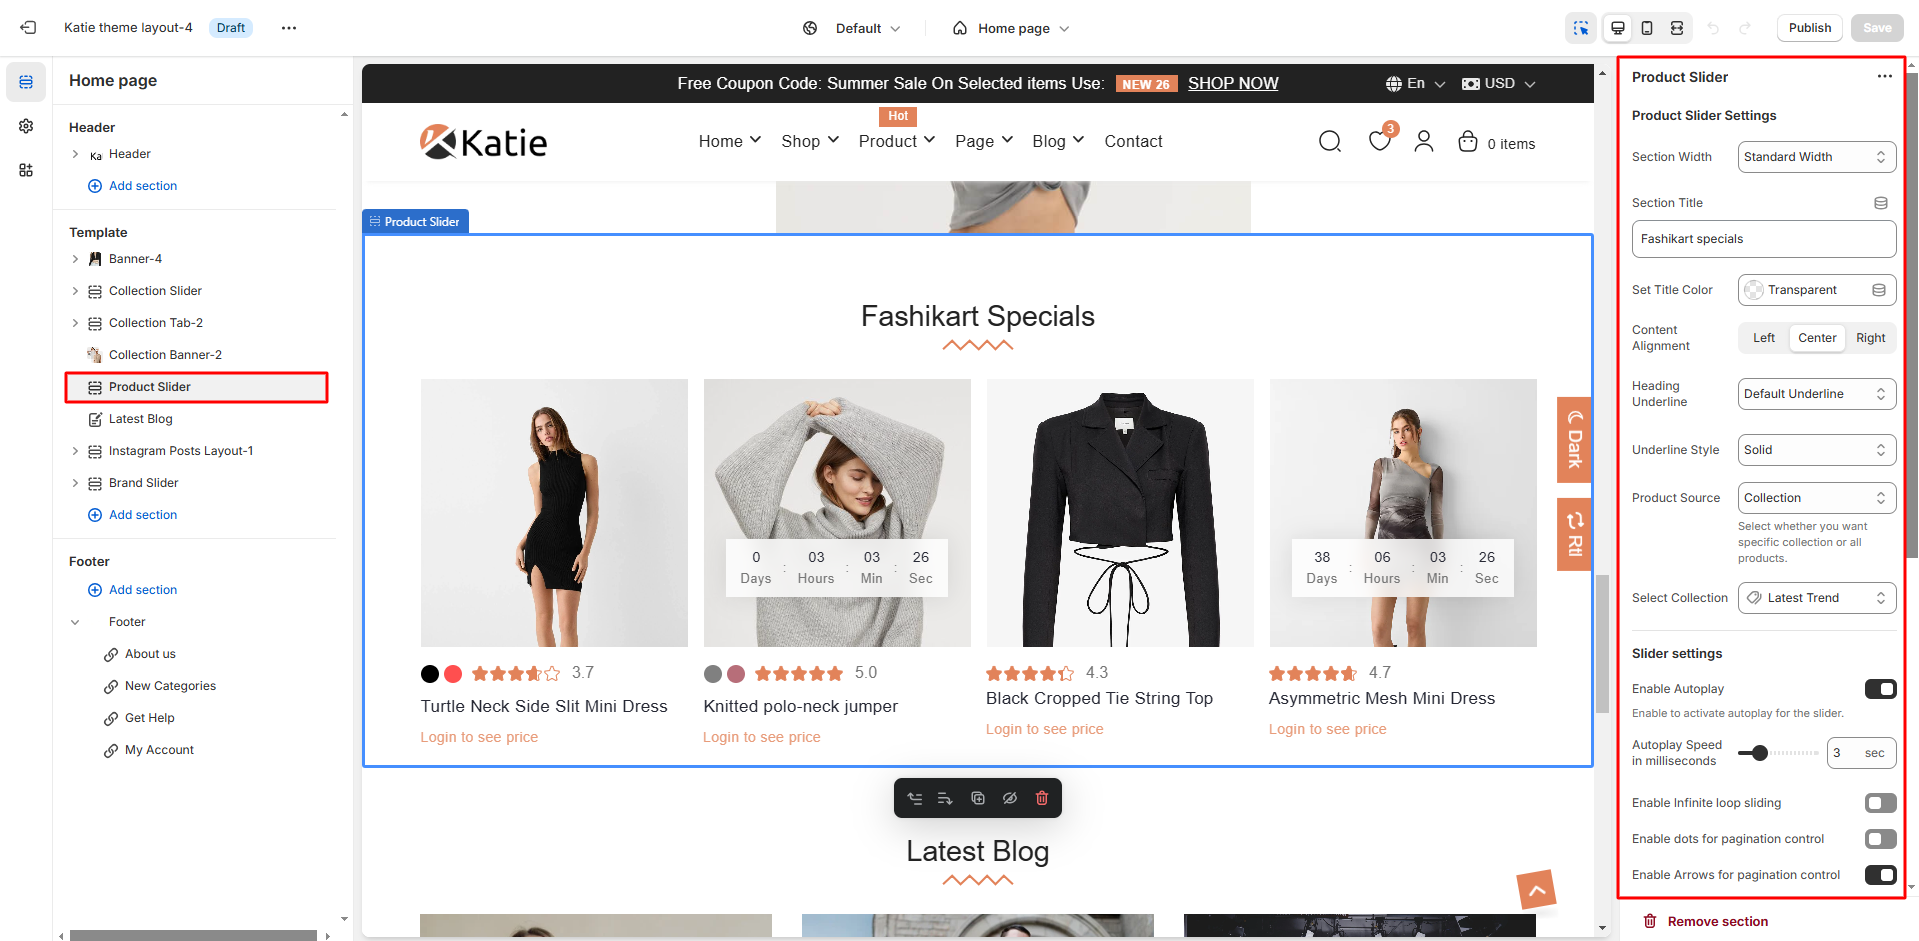
Product slider
To add this section, kindly follow below steps:
- For Product Slider Section go to -> Customize -> click Add section -> select Product Slider
Collection Tabs
To add this section, kindly follow below steps:
- For Collection Tab Section go to -> Customize -> click Add section -> select Collection Tab
Collection Tab 1

Collection Tab 2
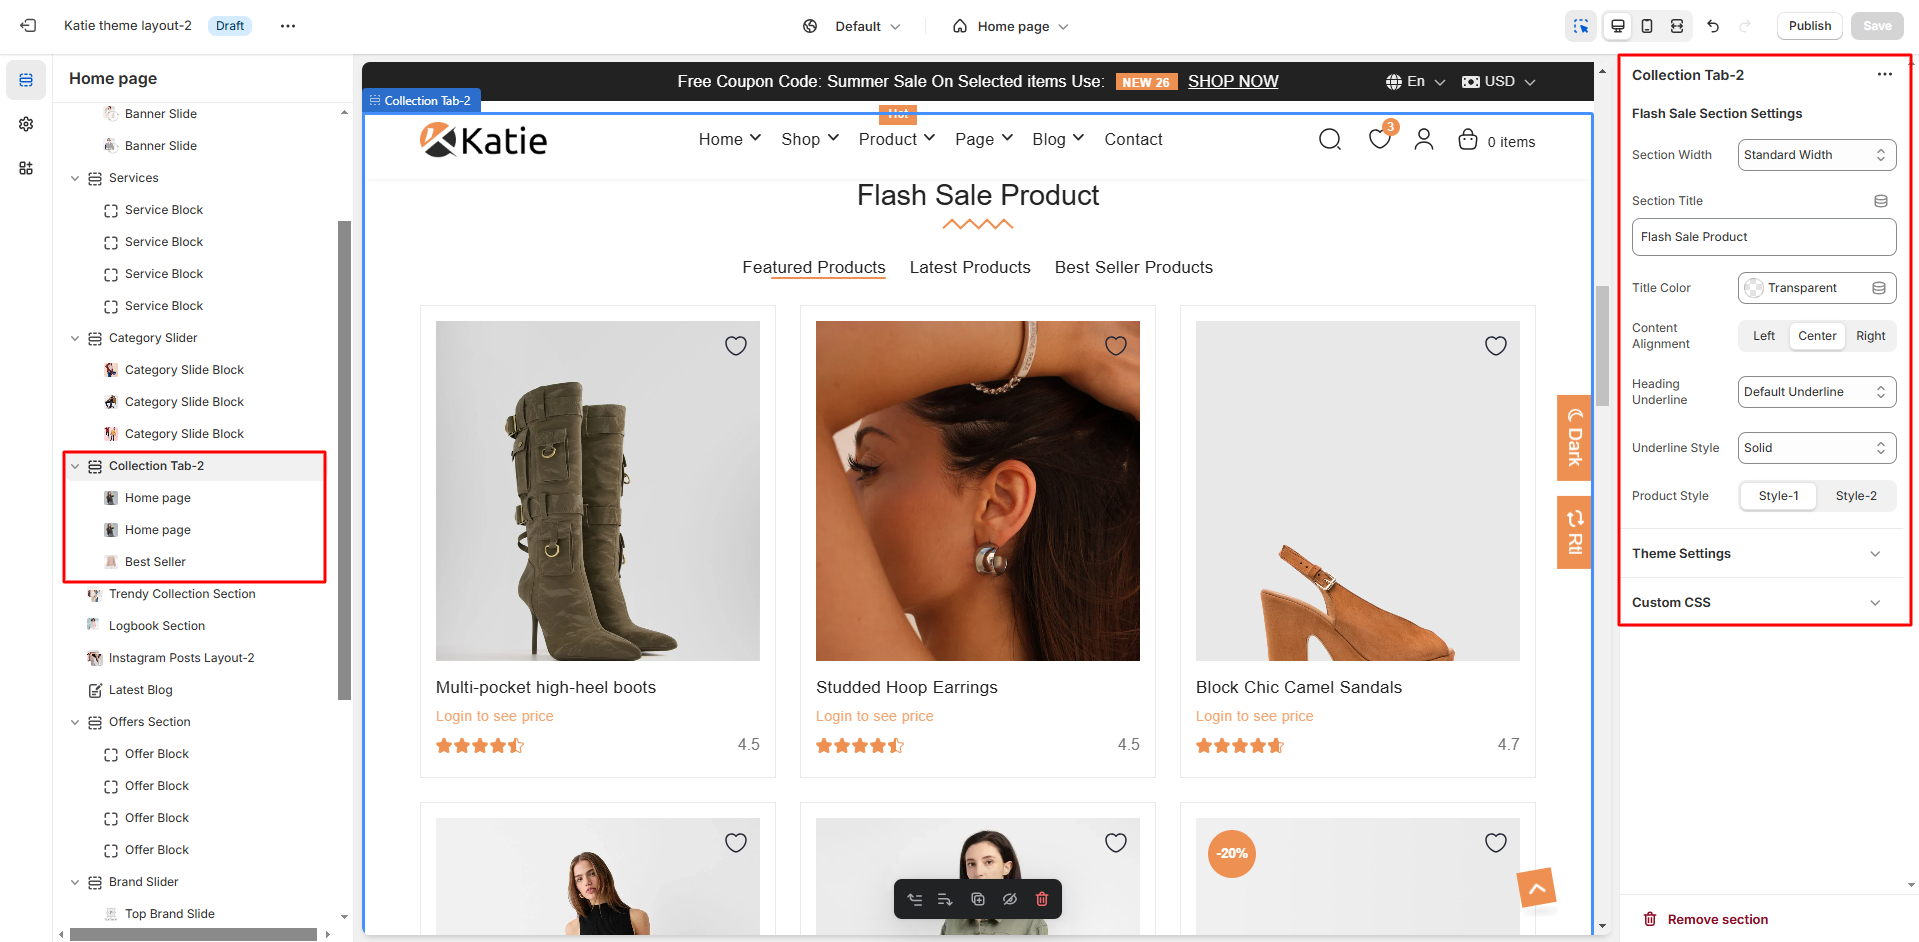
Collection Tab 3

Services
To add this section, kindly follow below steps:
- For Services Section go to -> Customize -> click Add section -> select Services

Latest Blog
To add this section, kindly follow below steps:
- For Latest Blog Section go to -> Customize -> click Add section -> select Latest blog


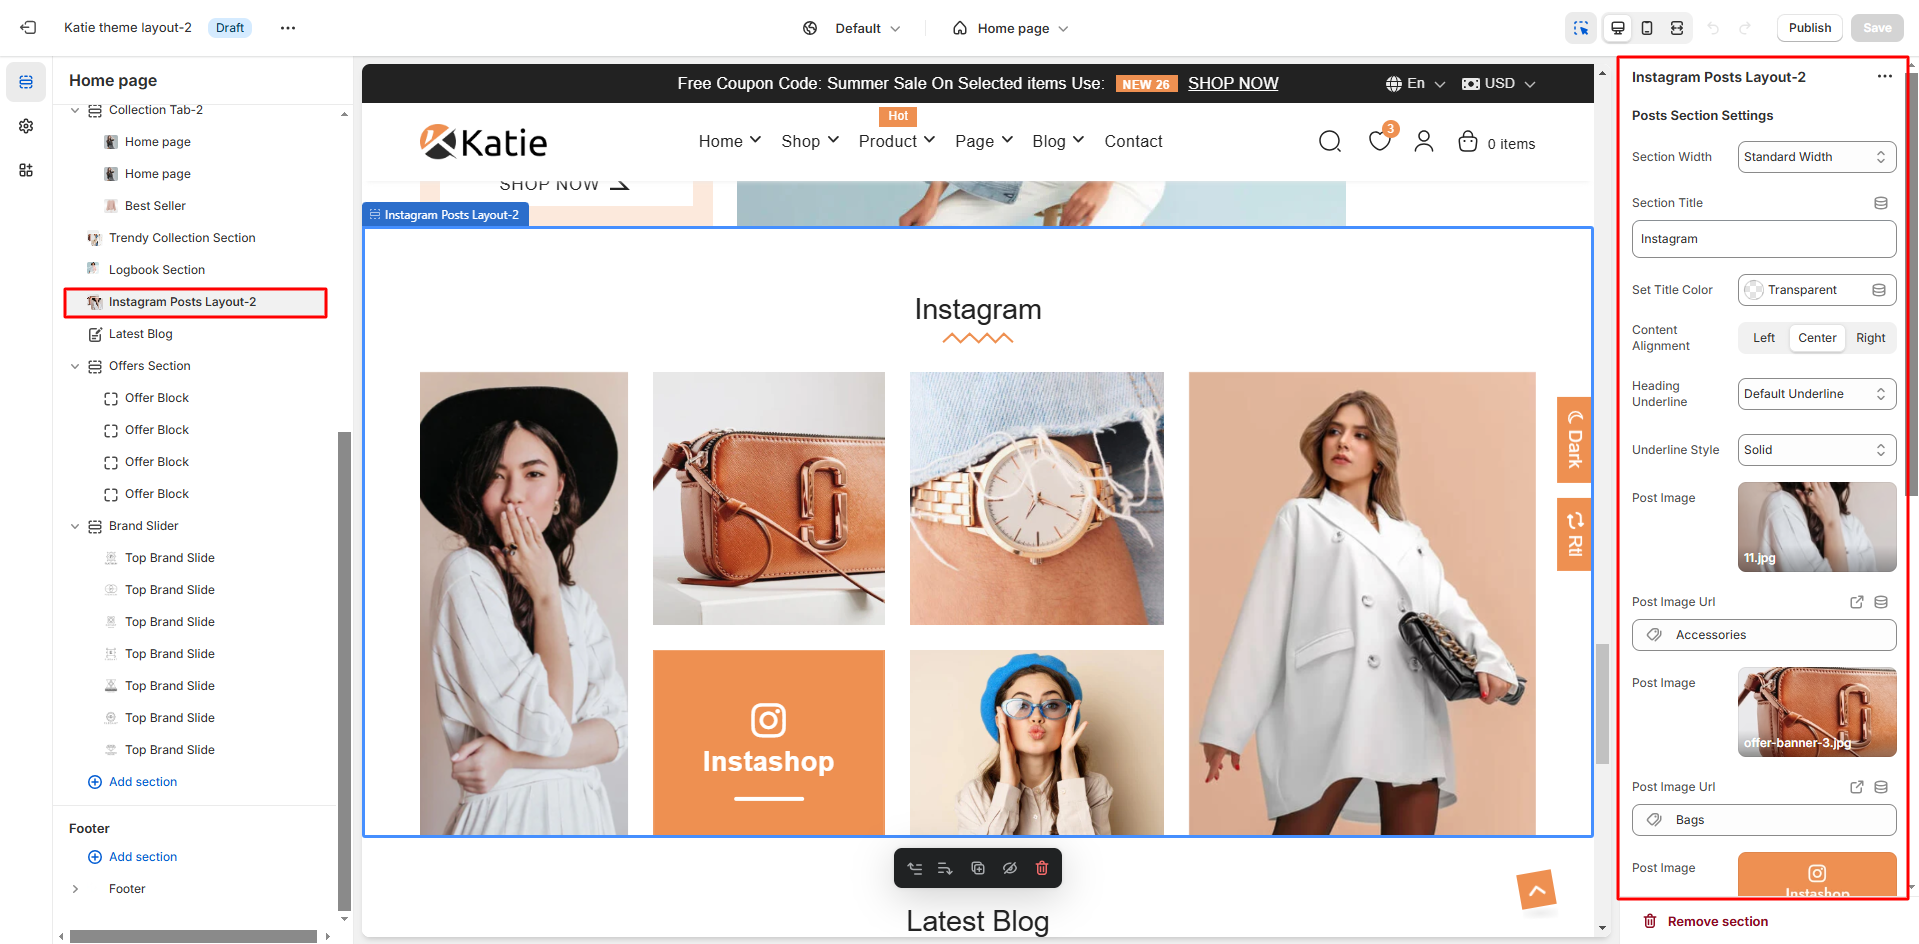
Instagram Posts Layout
To add this section, kindly follow below steps:
- For Instagram Posts Layout Section go to -> Customize -> click Add section -> select Instagram Posts Layout
Instagram Posts Layout-1


Instagram Posts Layout-2
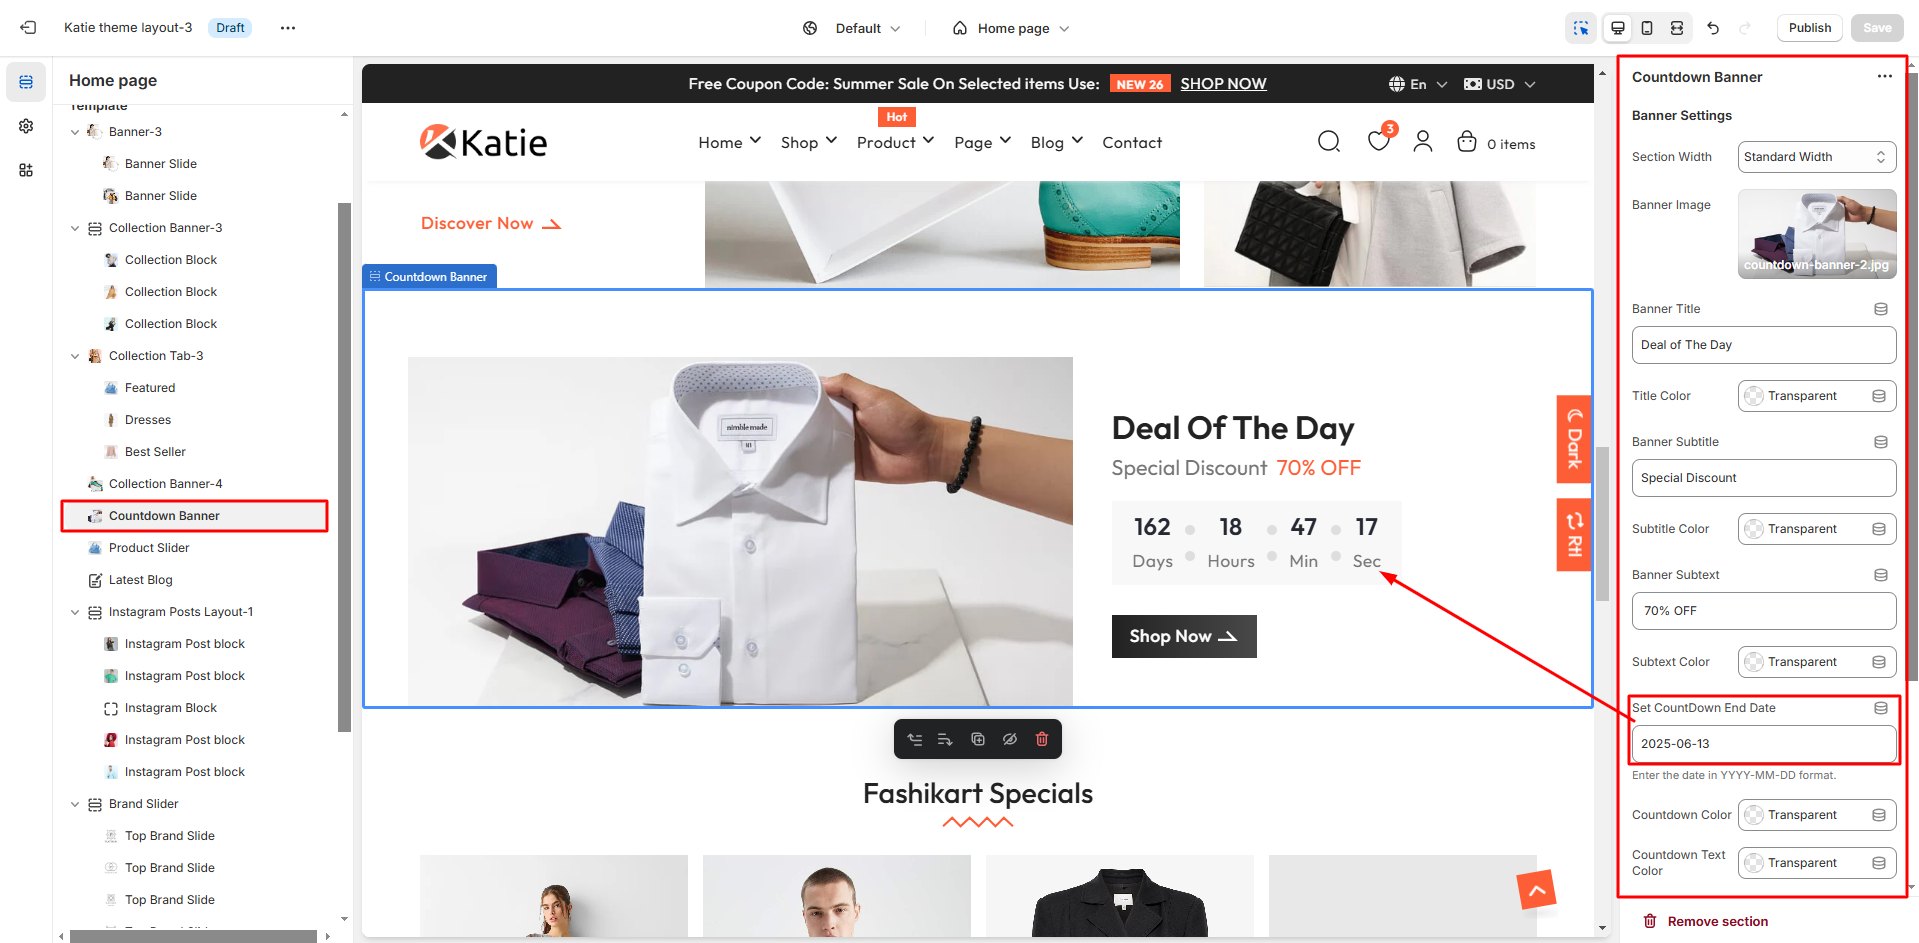
Countdown Banner
To add this section, kindly follow below steps:
- For Countdown Banner go to -> Customize -> click Add section -> select Countdown Banner
Brand Logo Slider
To add this section, kindly follow below steps:
- For Logo Slider go to -> Customize -> click Add section -> select Brand Logo Slider
Logbook Section
To add this section, kindly follow below steps:
- For Logbook go to -> Customize -> click Add section -> select Logbook Section


Brand Collection
To add this section, kindly follow below steps:
- For Brand Collection go to -> Customize -> click Add section -> select Brand Collection

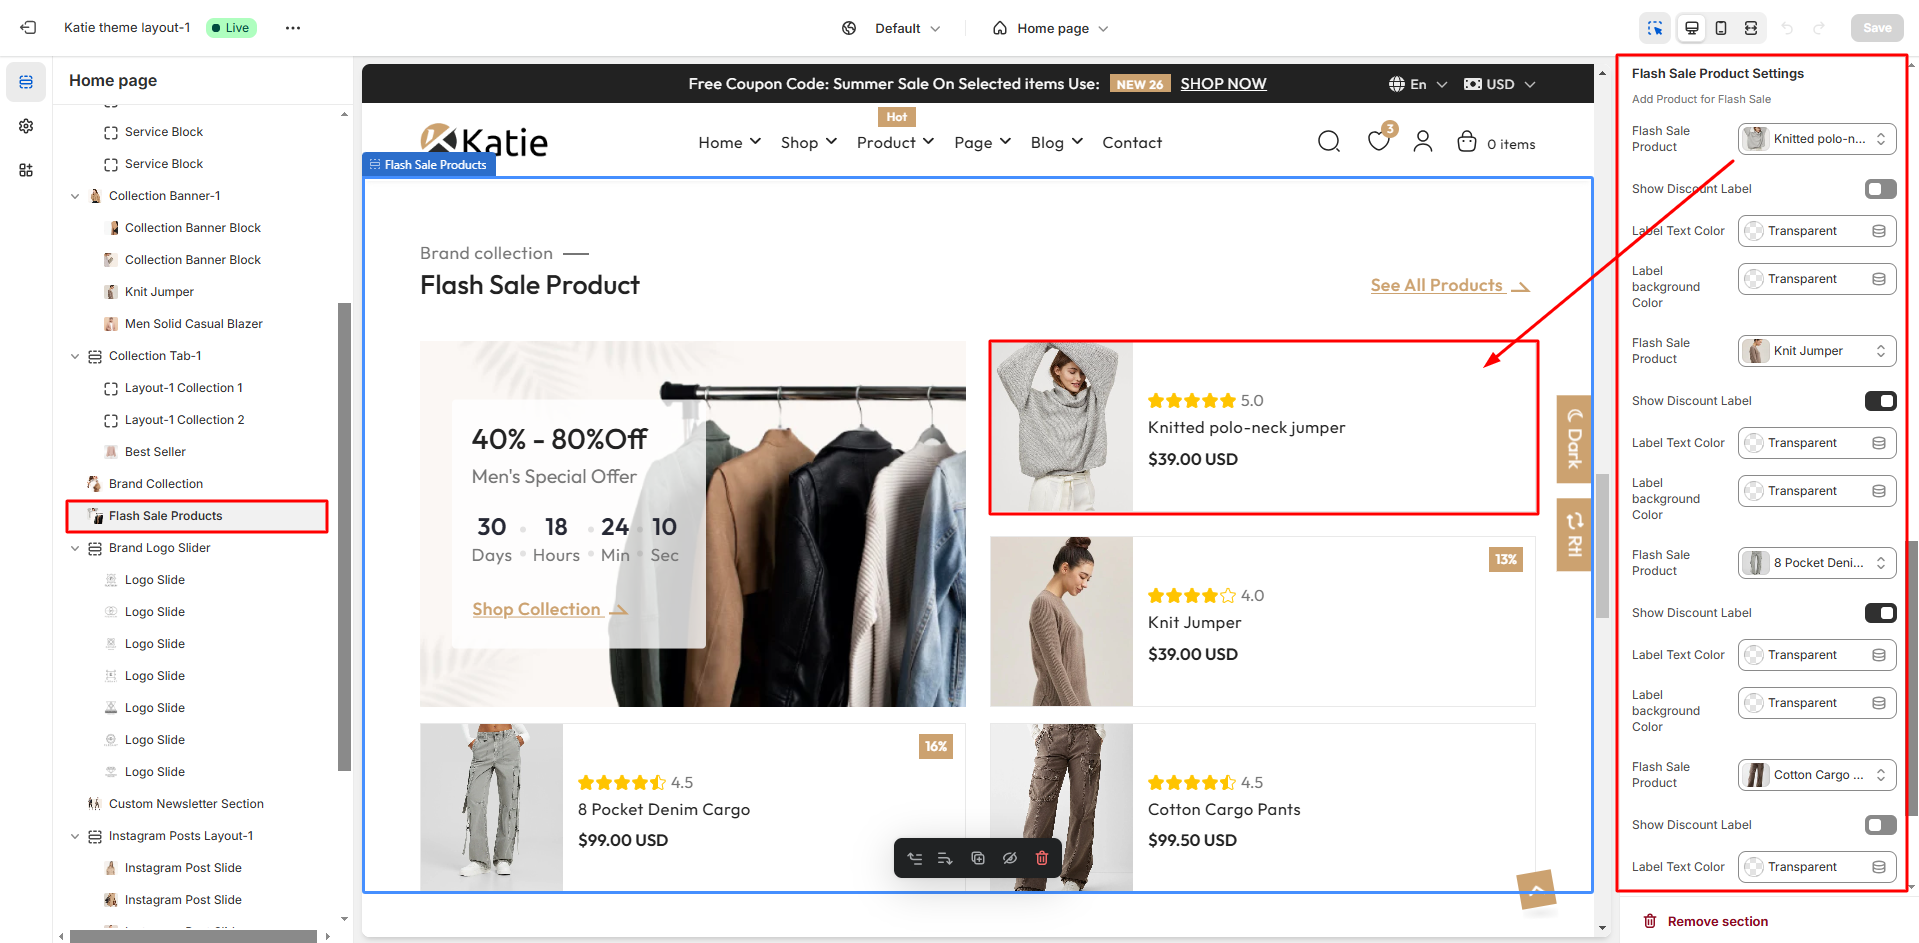
Flash Sale Products
To add this section, kindly follow below steps:
- For Flash Sale Section go to -> Customize -> click Add section -> select Flash Sale Products

Newsletter Section
To add this section, kindly follow below steps:
- For Newsletter Section go to -> Customize -> click Add section -> select Newsletter Section

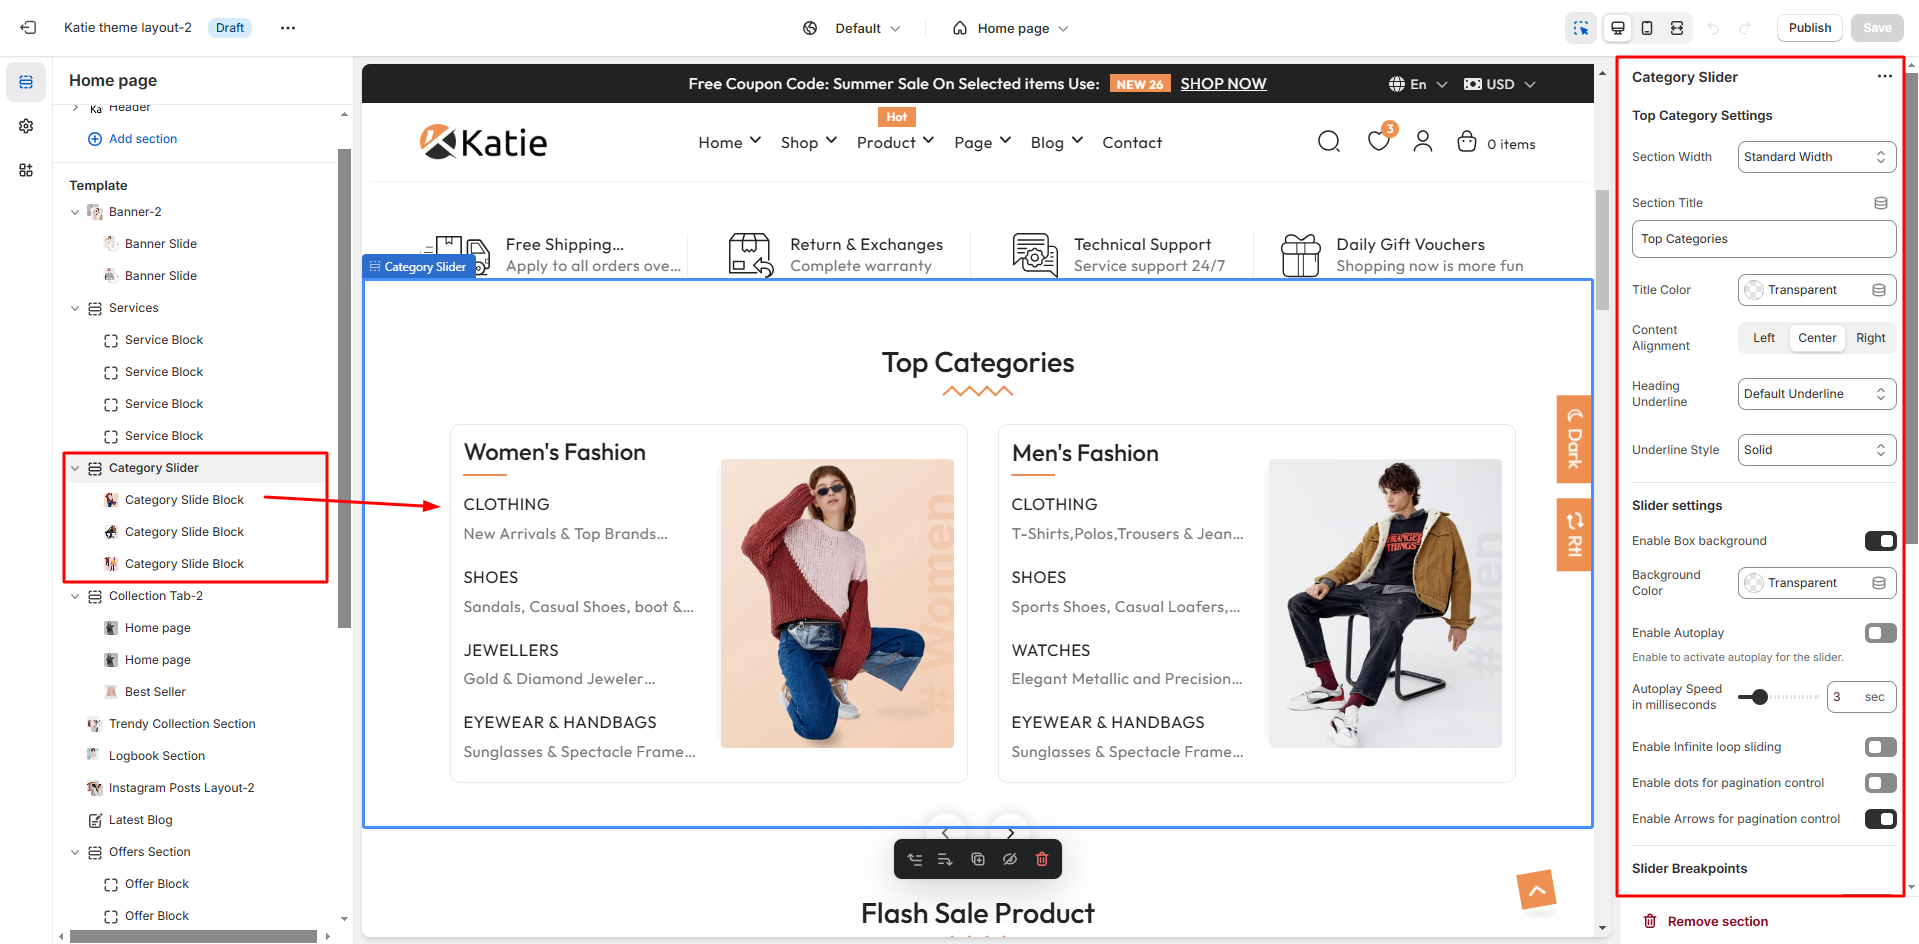
Category Slider
To add this section, kindly follow below steps:
- For Category Slider go to -> Customize -> click Add section -> select Category Slider
Trendy Collection Section
To add this section, kindly follow below steps:
- For Trendy Collection go to -> Customize -> click Add section -> select Trendy Collection Section

Offer Section
To add this section, kindly follow below steps:
- For Offer Section go to -> Customize -> click Add section -> select Offer Section

Collection Slider
To add this section, kindly follow below steps:
- For Collection Slider go to -> Customize -> click Add section -> select Collection Slider

Collections pages
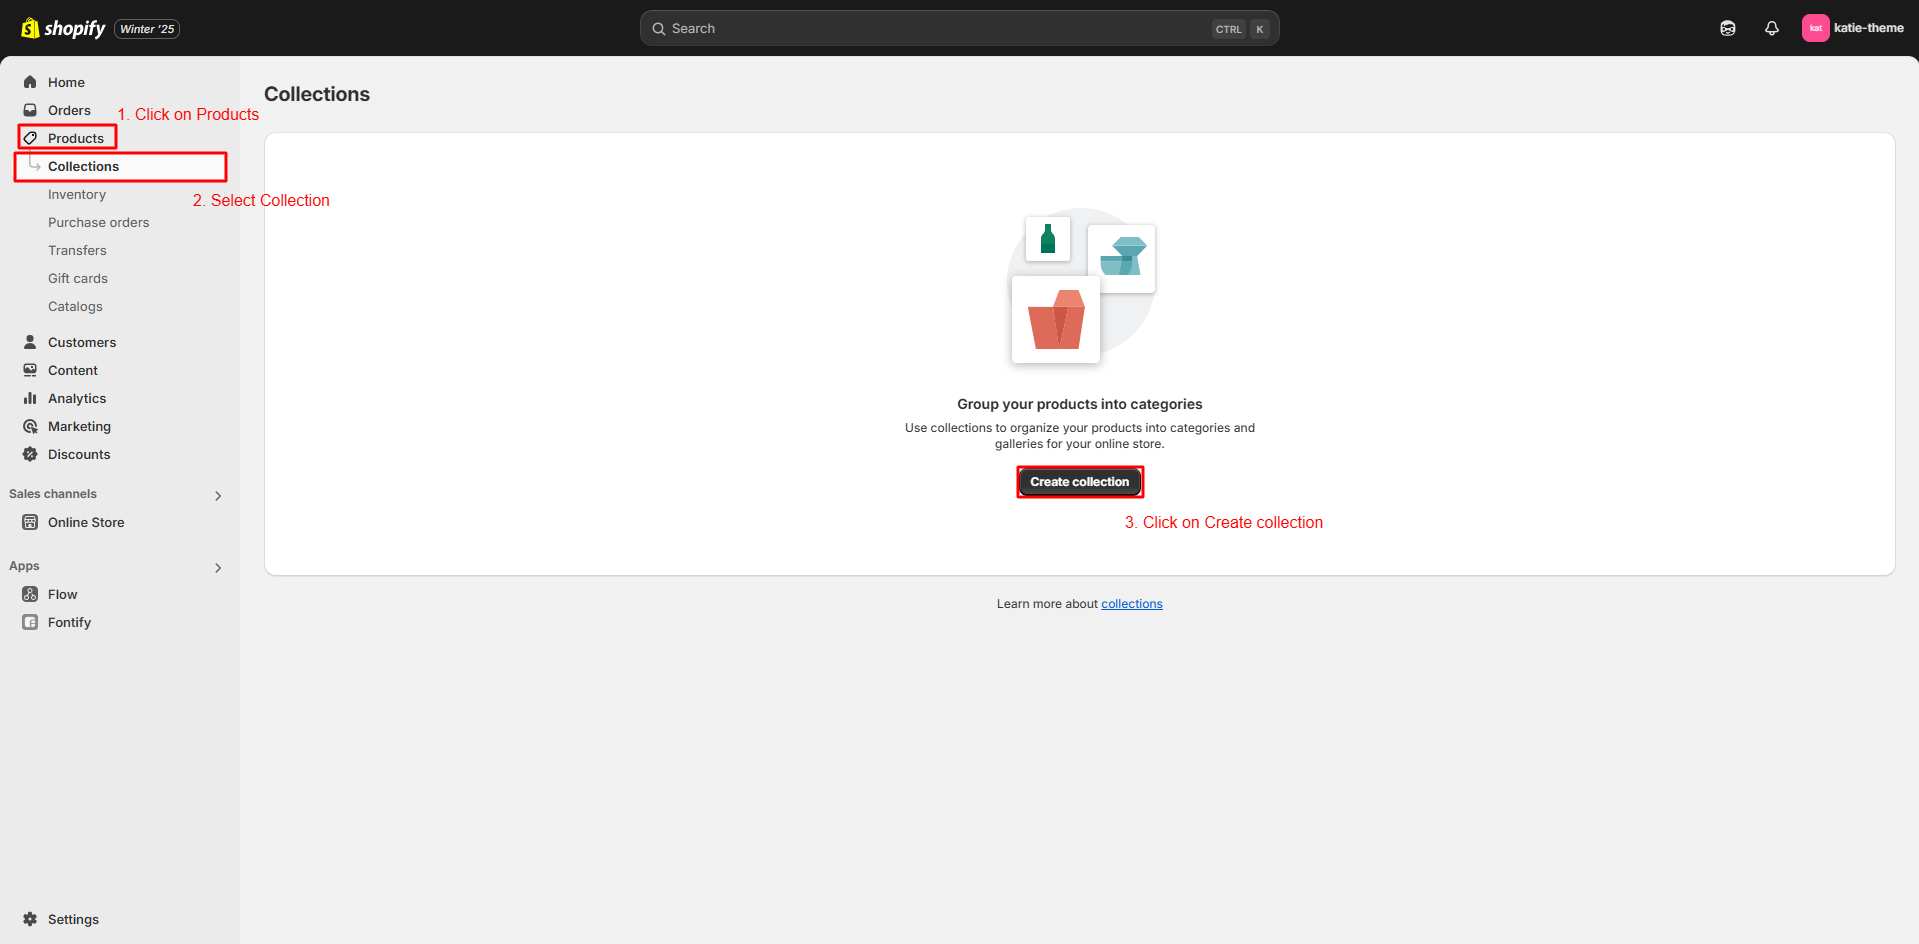
Create Collections
- From Shopify Admin panel go to -> Products -> click on Collections.
Collection Template Overview
| Collection Templates Name |
| collection |
| collection.collection-grid-3 |
| collection.collection-grid-4 |
| collection.collection-left-sidebar |
| collection.collection-no-sidebar |
| collection.collection-offcanvas |
| collection.collection-right-sidebar |
| collection.collection-slider |
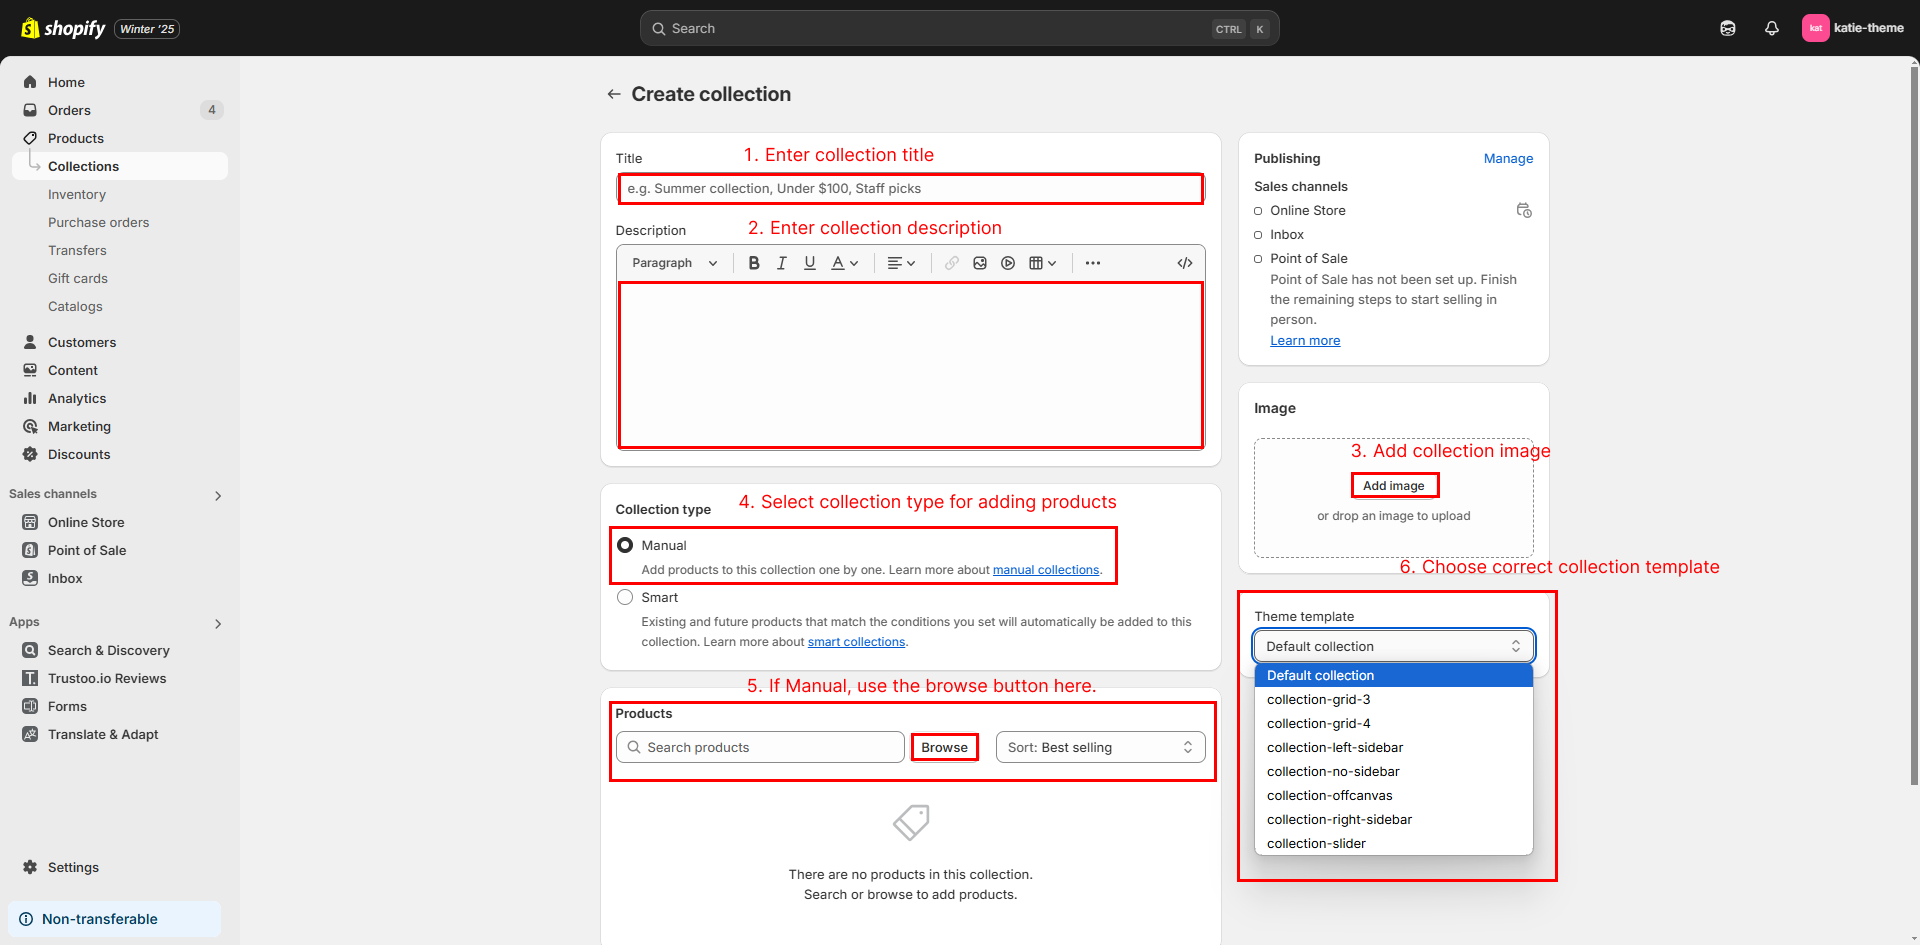
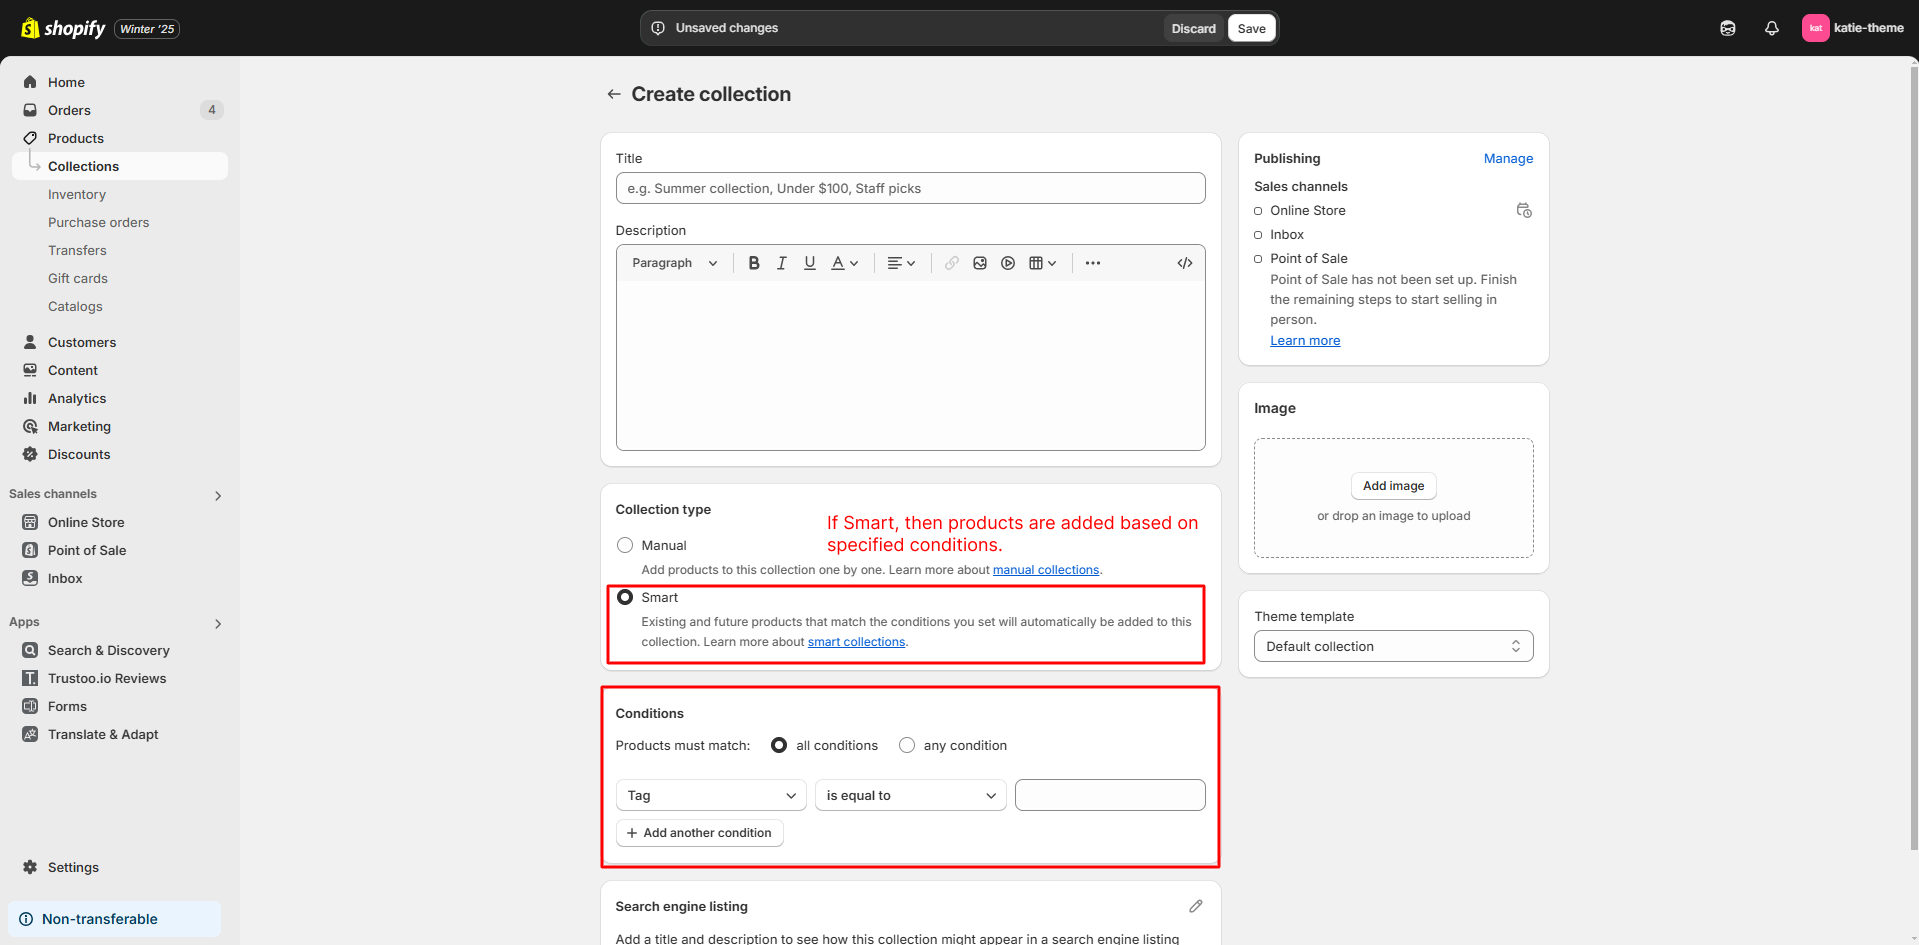
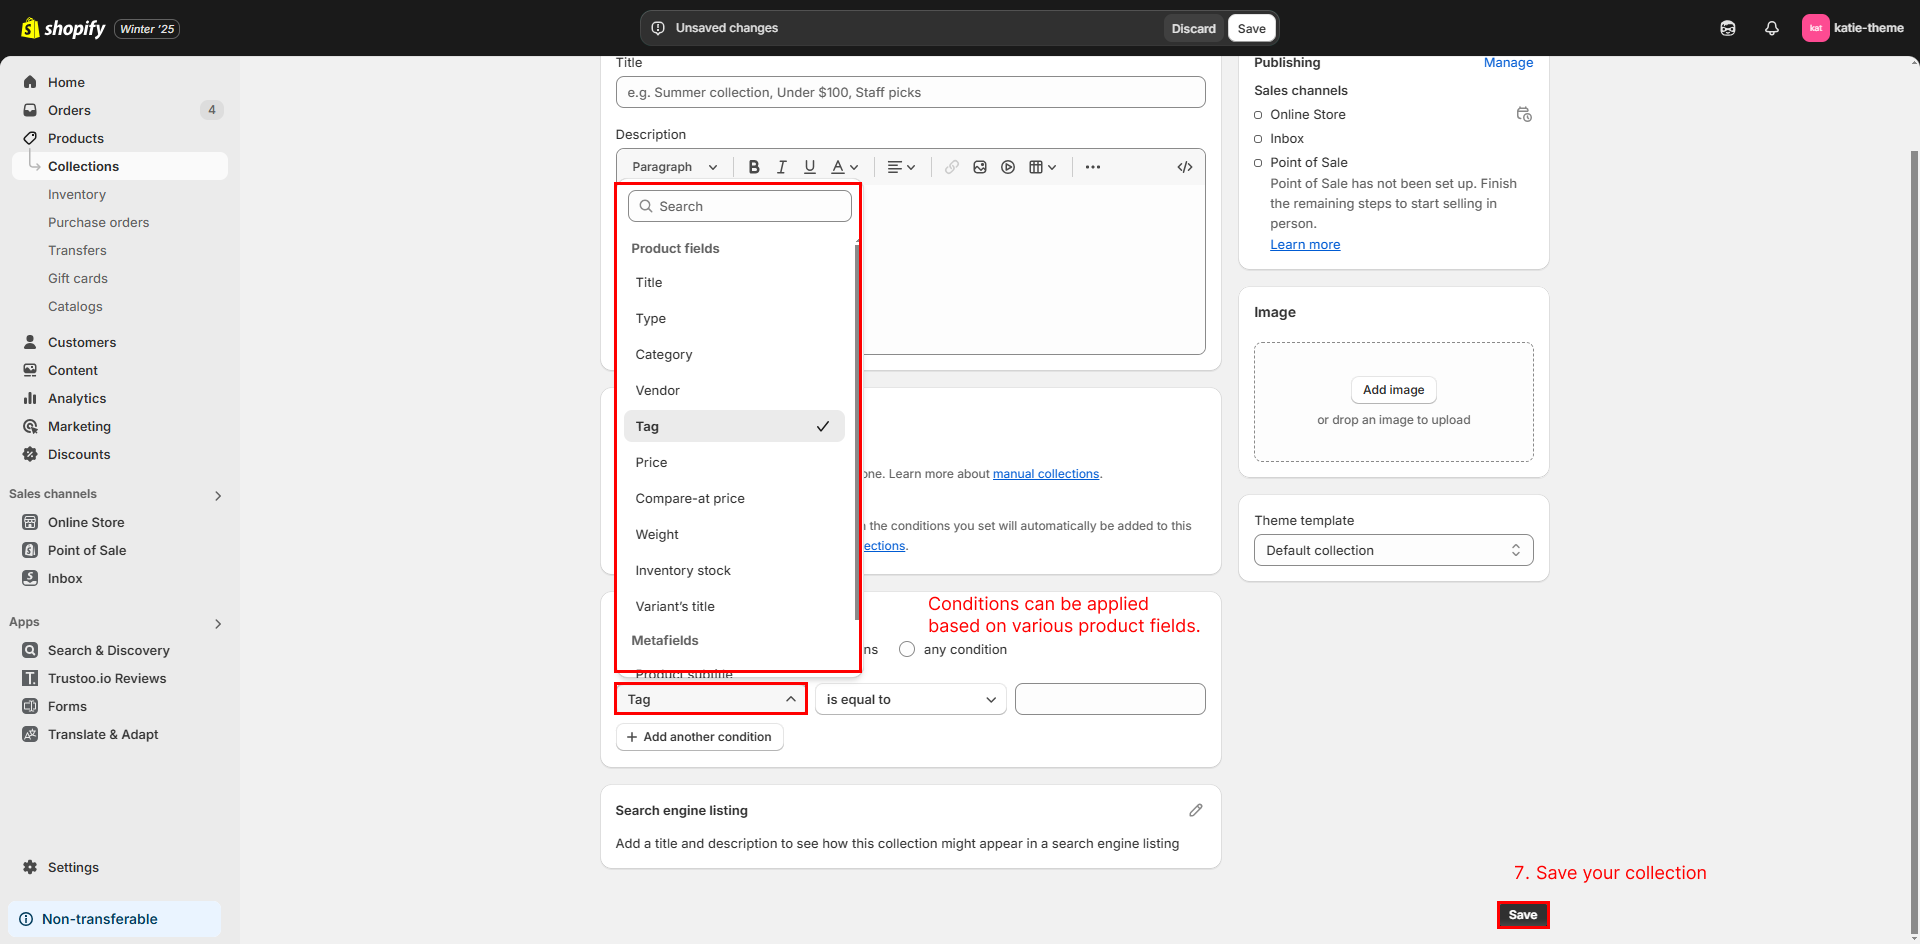
Collections page
Collection settings help configure and organize the product grid for better display and navigation.
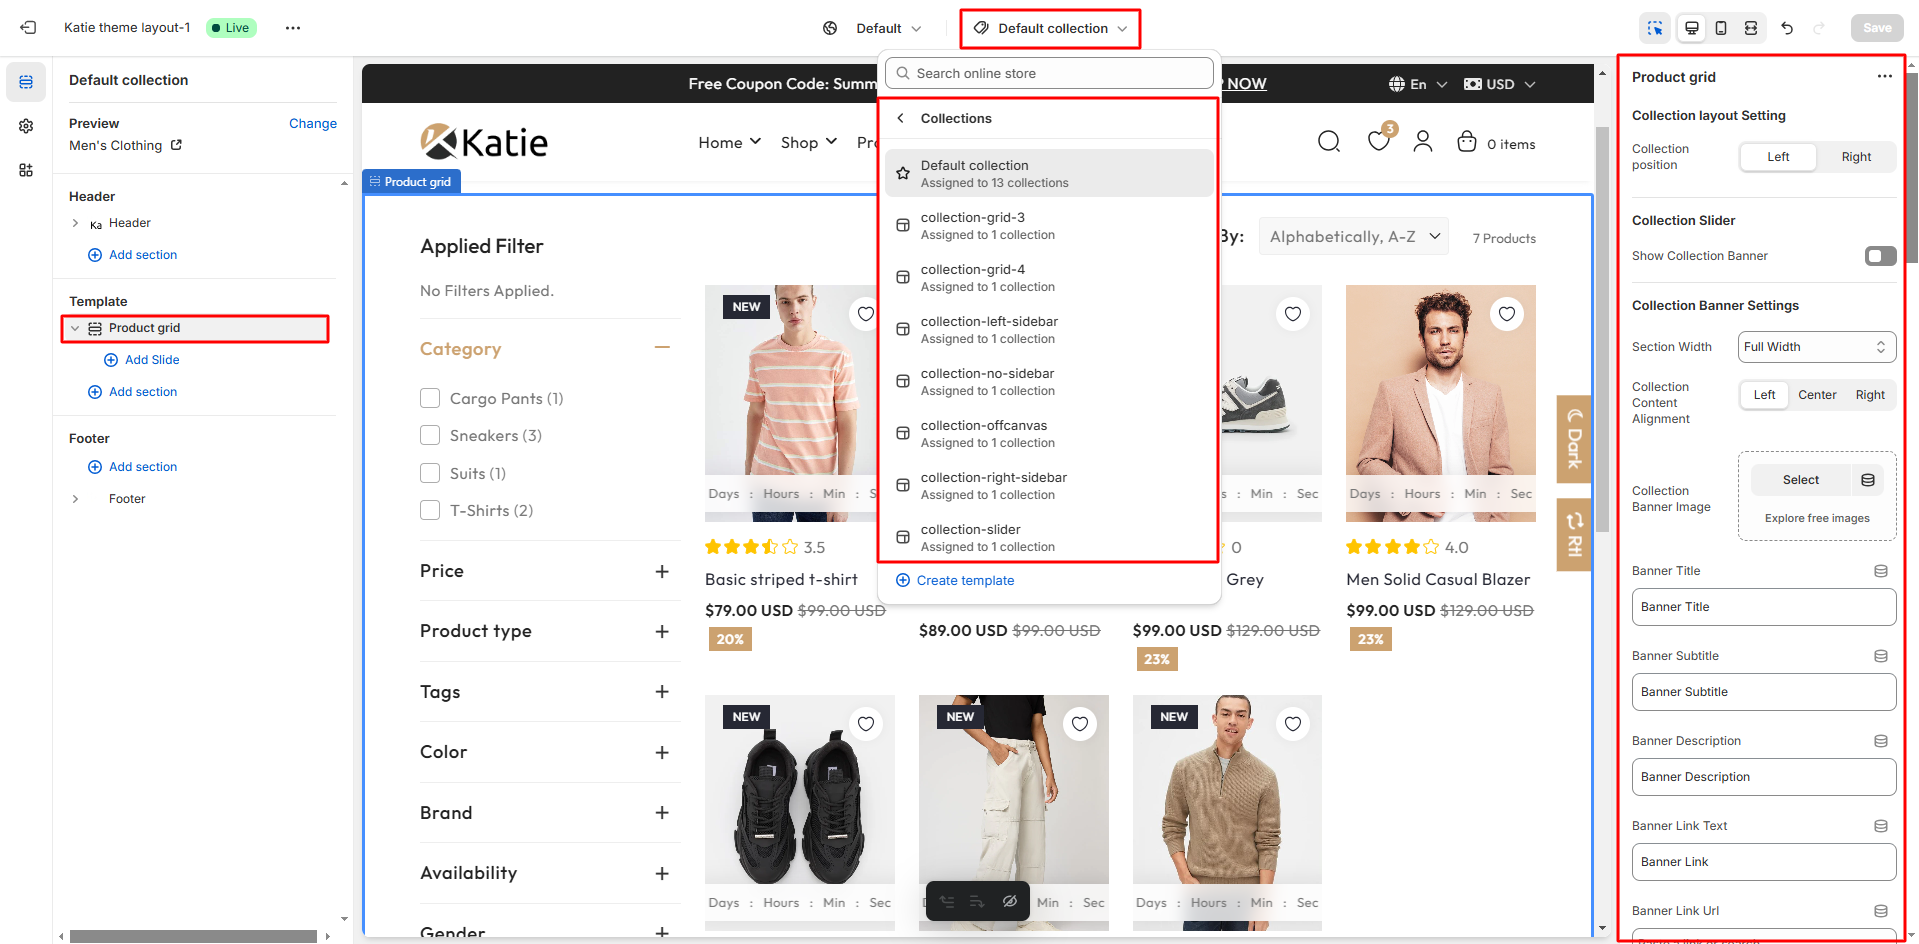
Collection page contains following options.
- Sorting: Allows sorting products by options such as low-to-high price, high-to-low price, best products, newest to oldest, and oldest to newest.
- Grid View: Includes options for grid-4, grid-3, grid-2, and list view layouts.
- Filter Layout: Offers vertical, horizontal, and drawer filter configurations.

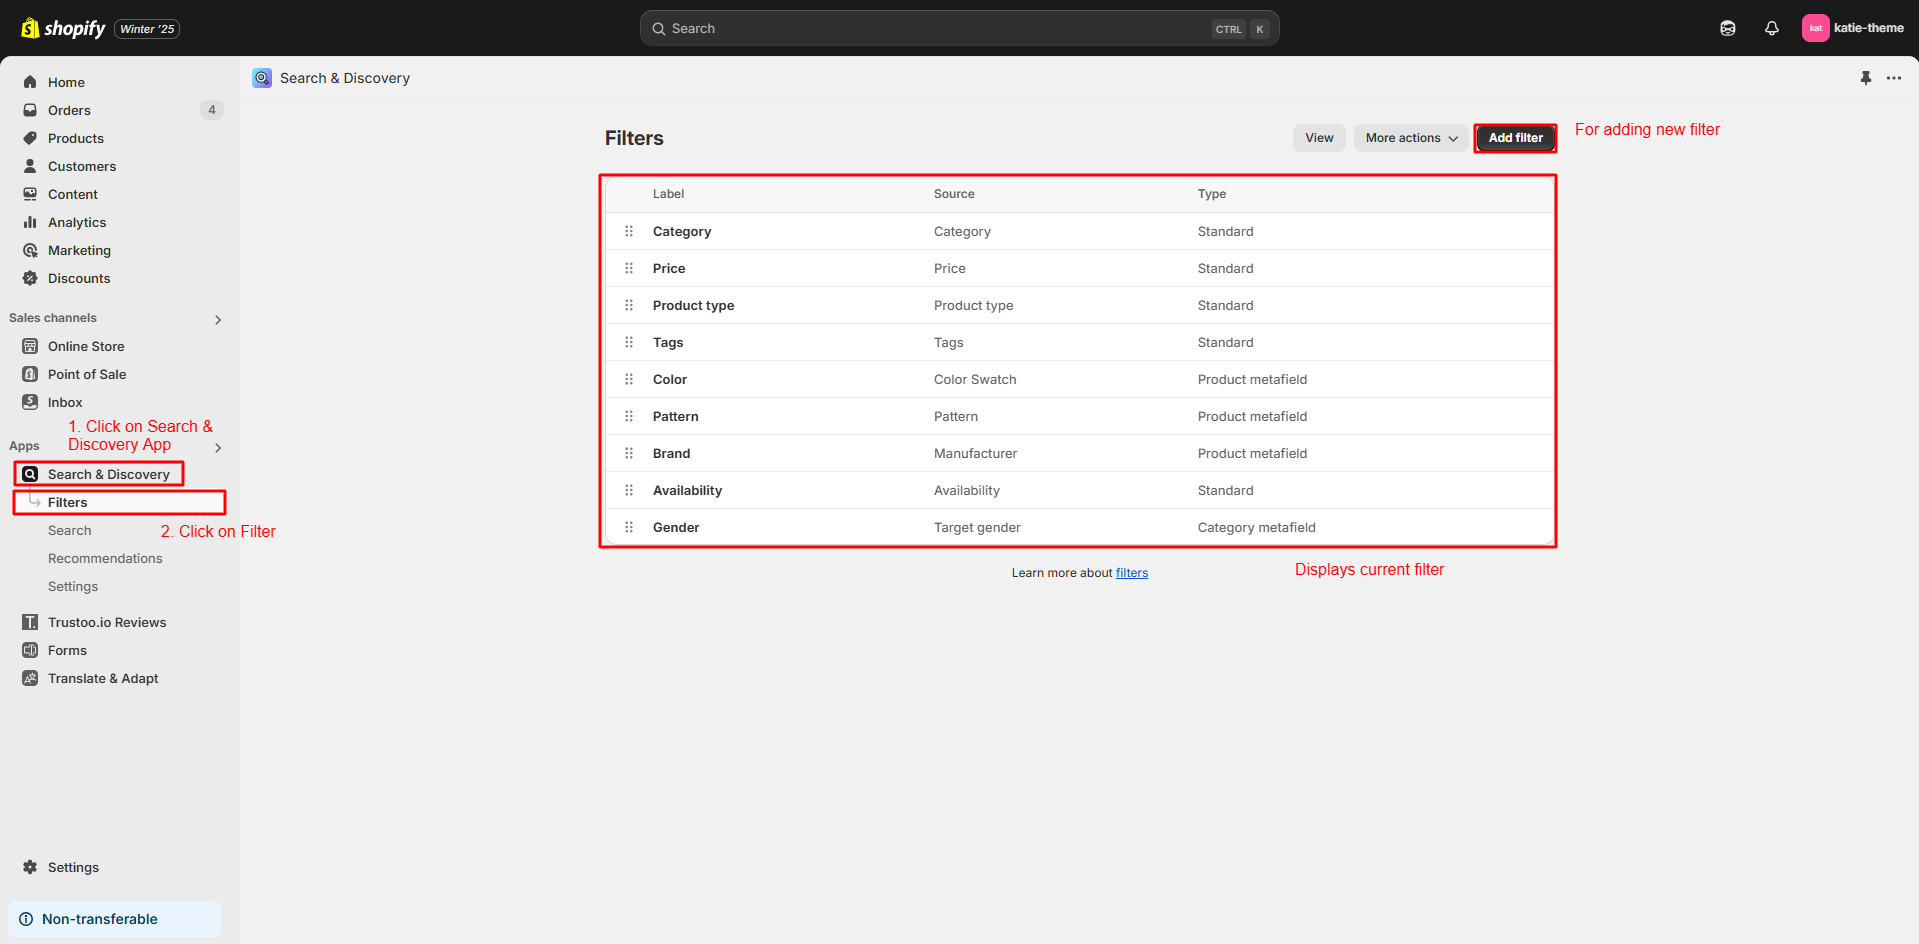
FILTER
Using Shopify and the Discovery app makes filtering both easy and fast.
- From Shopify Admin panel go to -> Shopify & Discovery App -> click on Filters.
Product page
Create Product

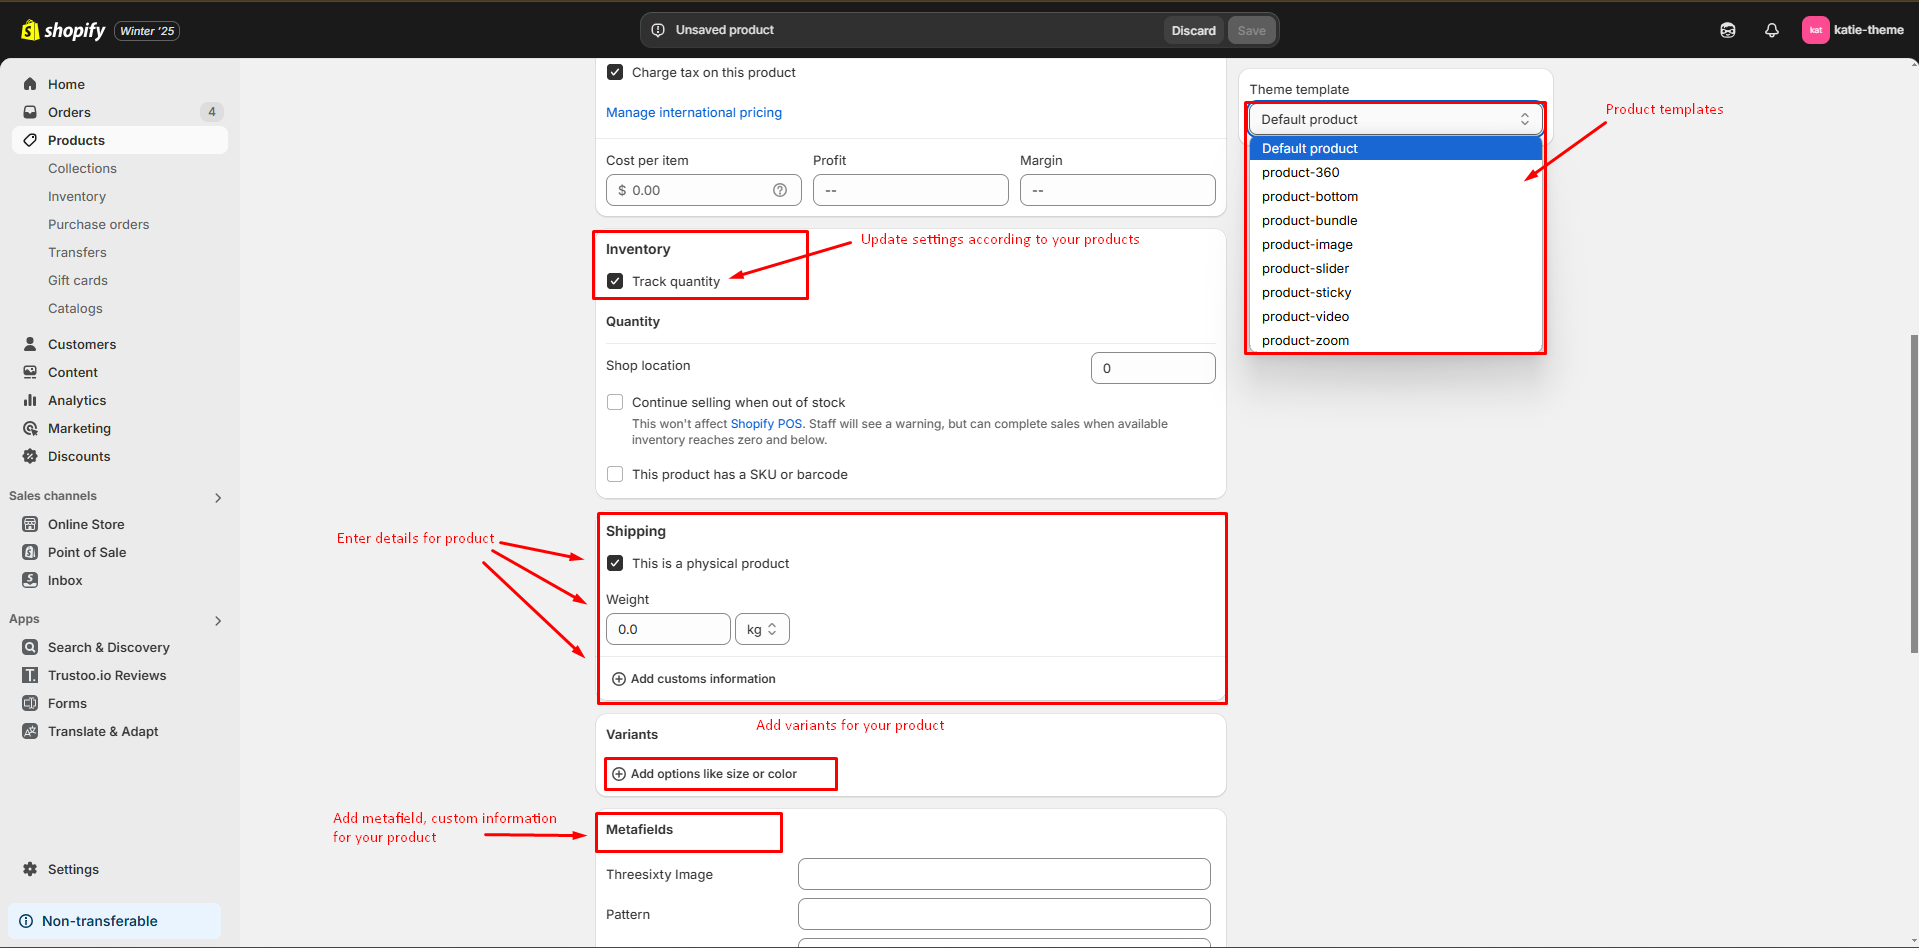
Add Product Variants
You can add supported variants by default such as size, color, material in any products.
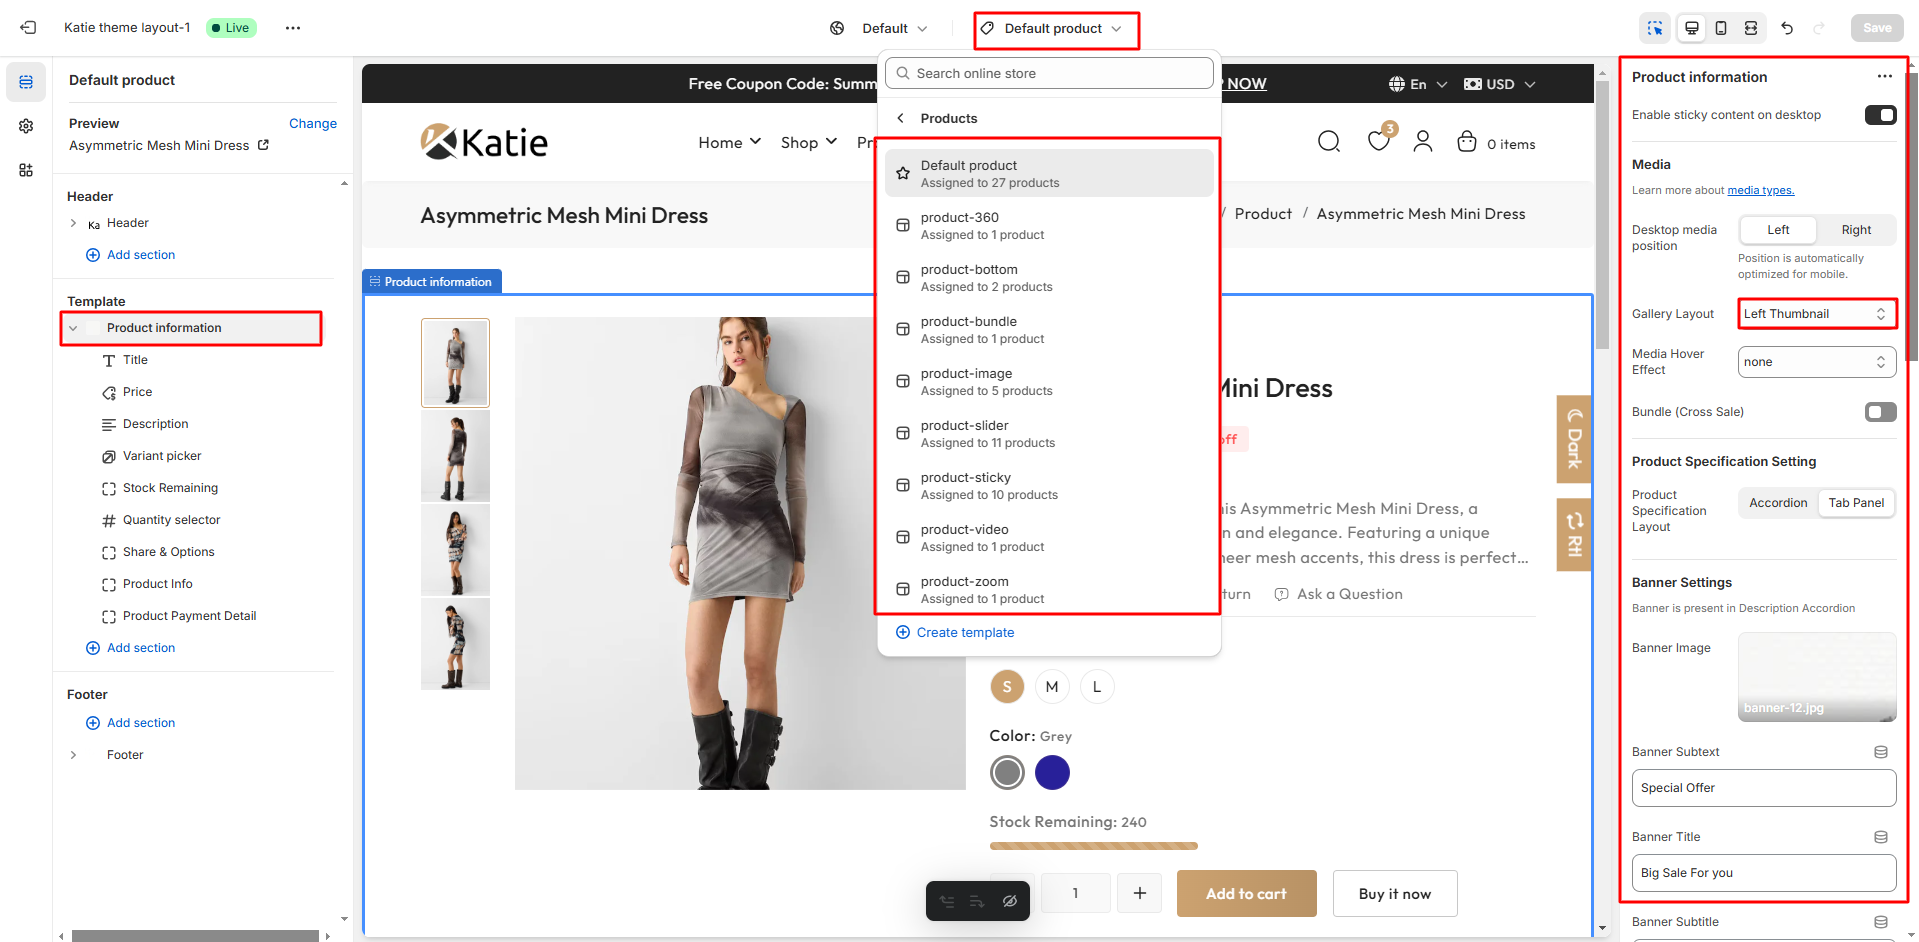
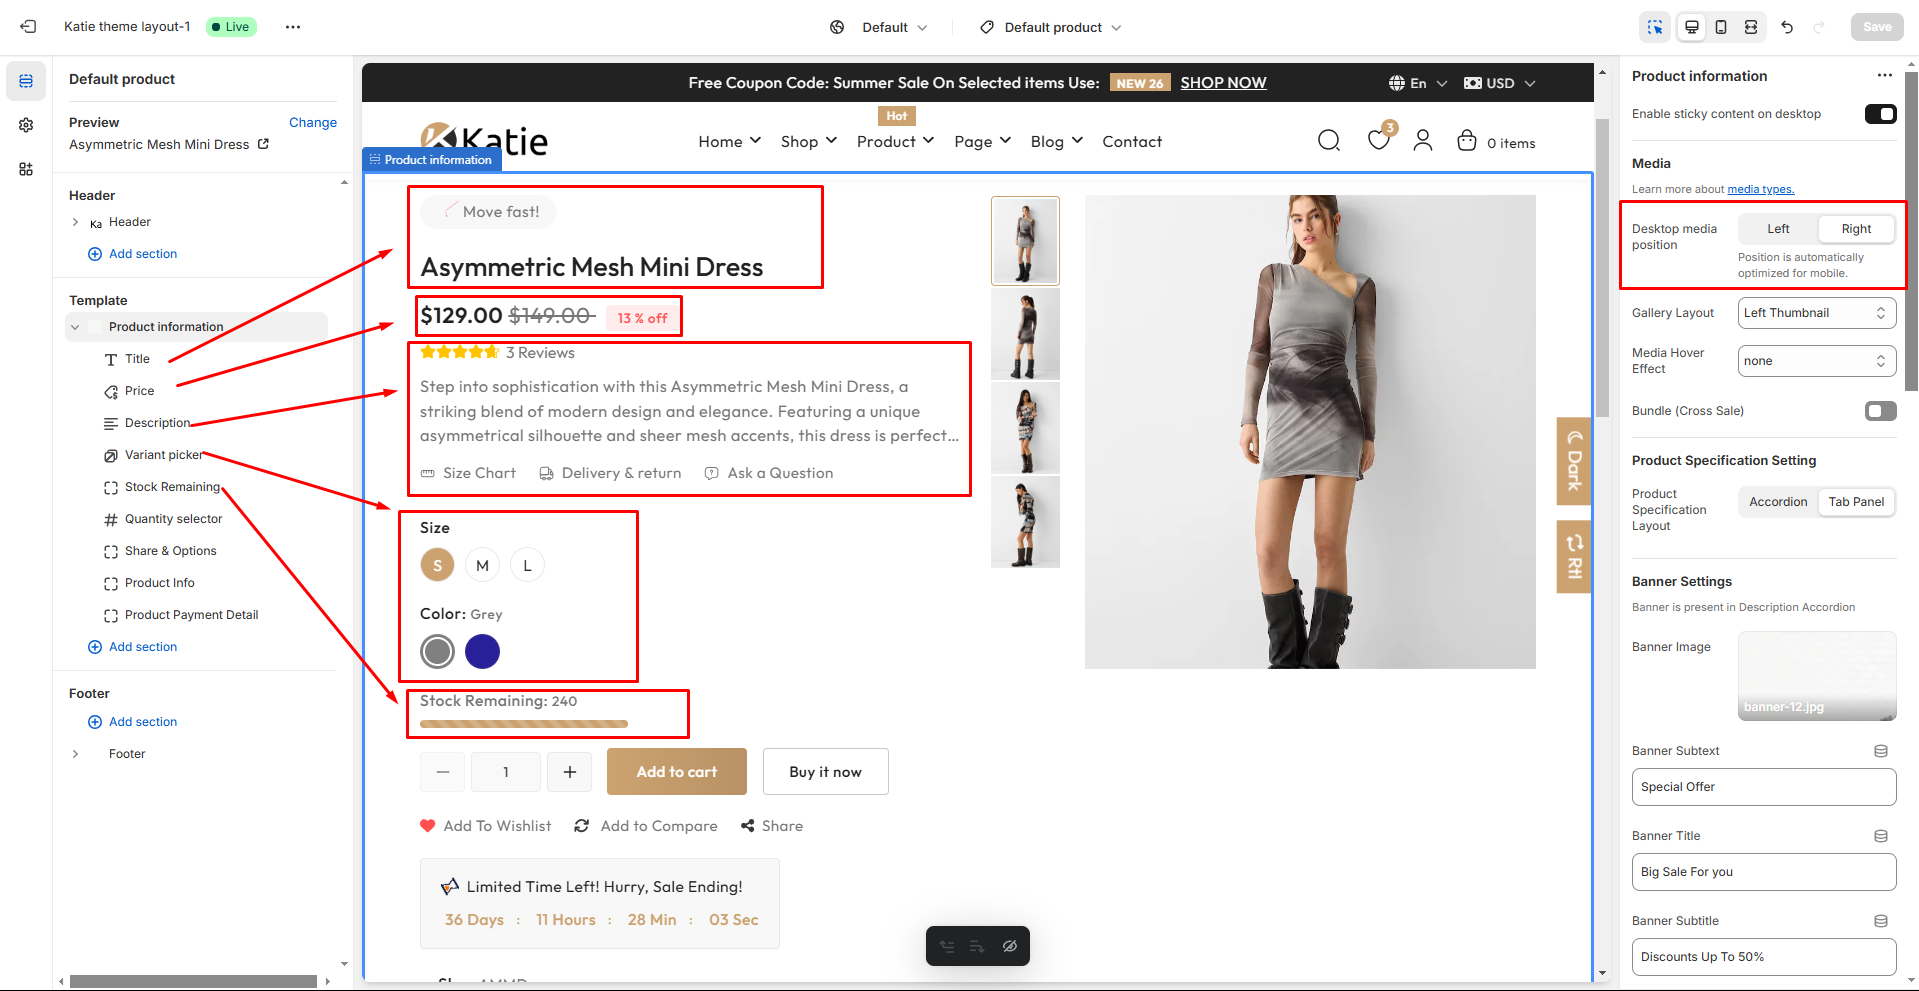
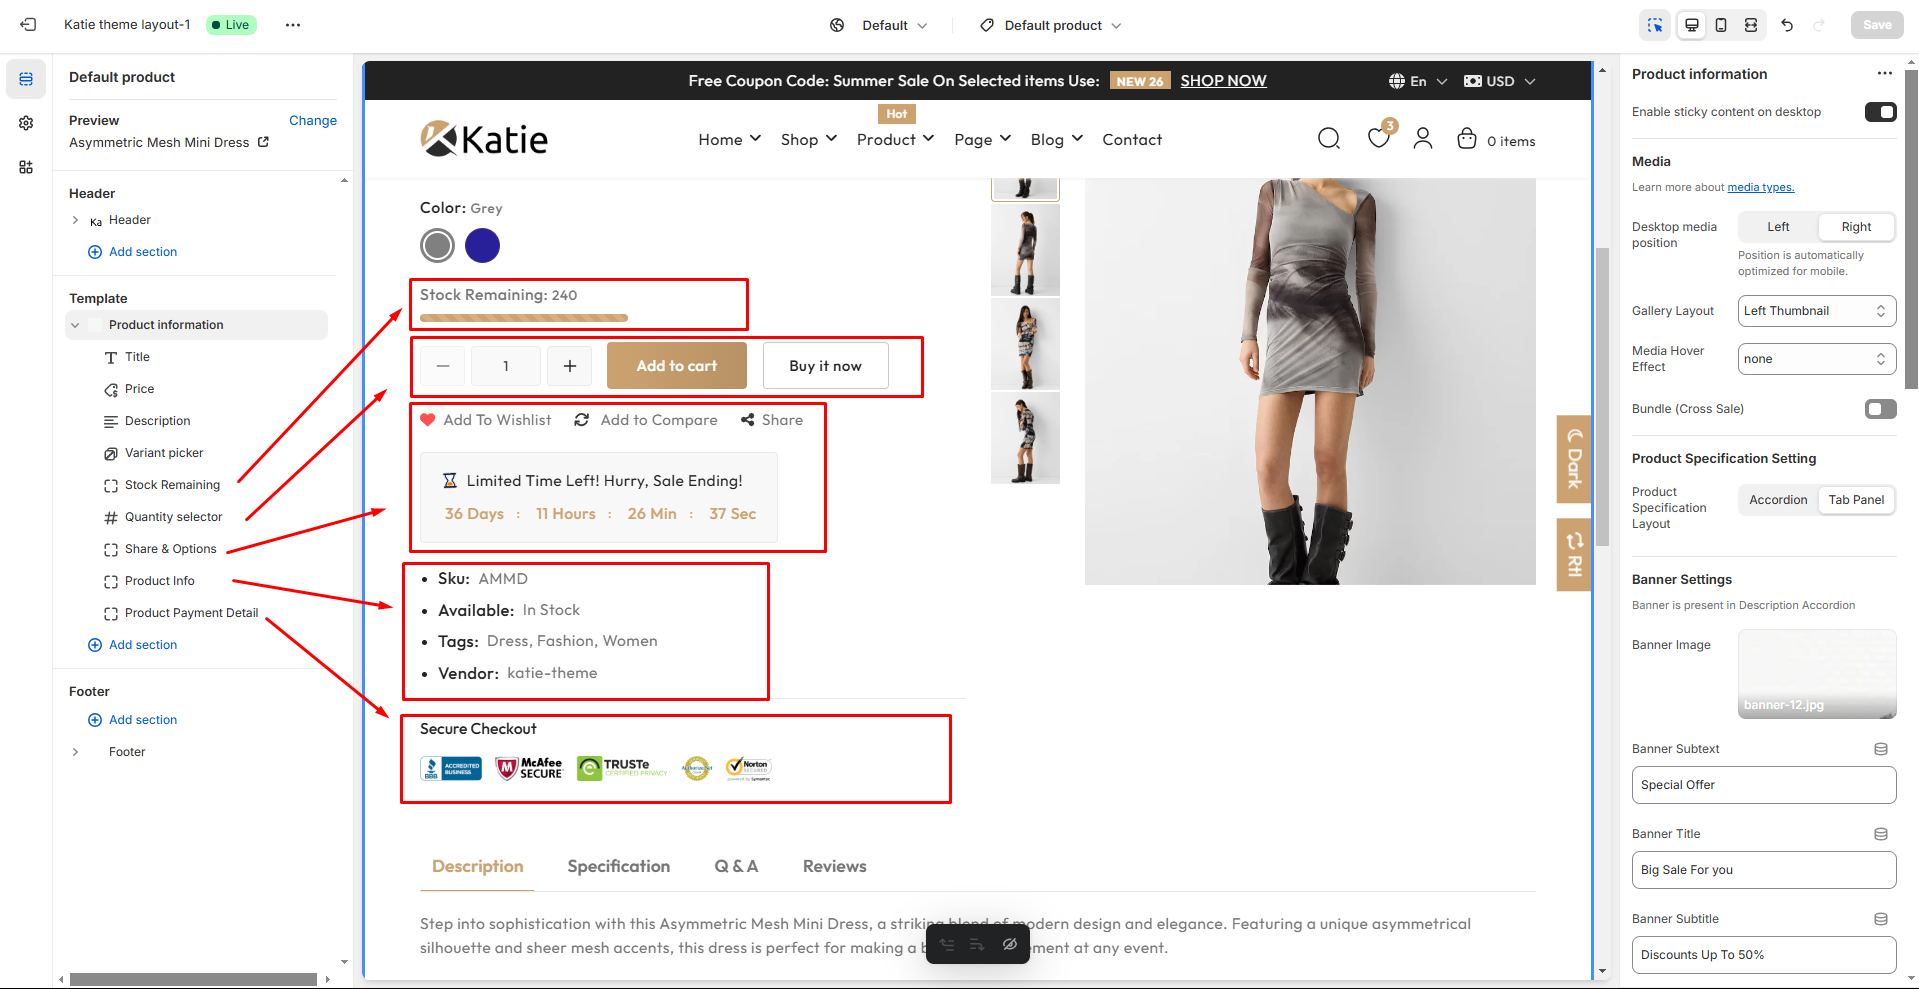
Product Page Setting
Product detail page includes:
- Product gallery layout.
- Product color variant displayed as color swatches .
- Product availability Option, Product vendor, Product type, SKU, and Inventory bar.
- Add to cart option and product quantity.
- Add to wishlist.
- Social sharing.
- Related products.
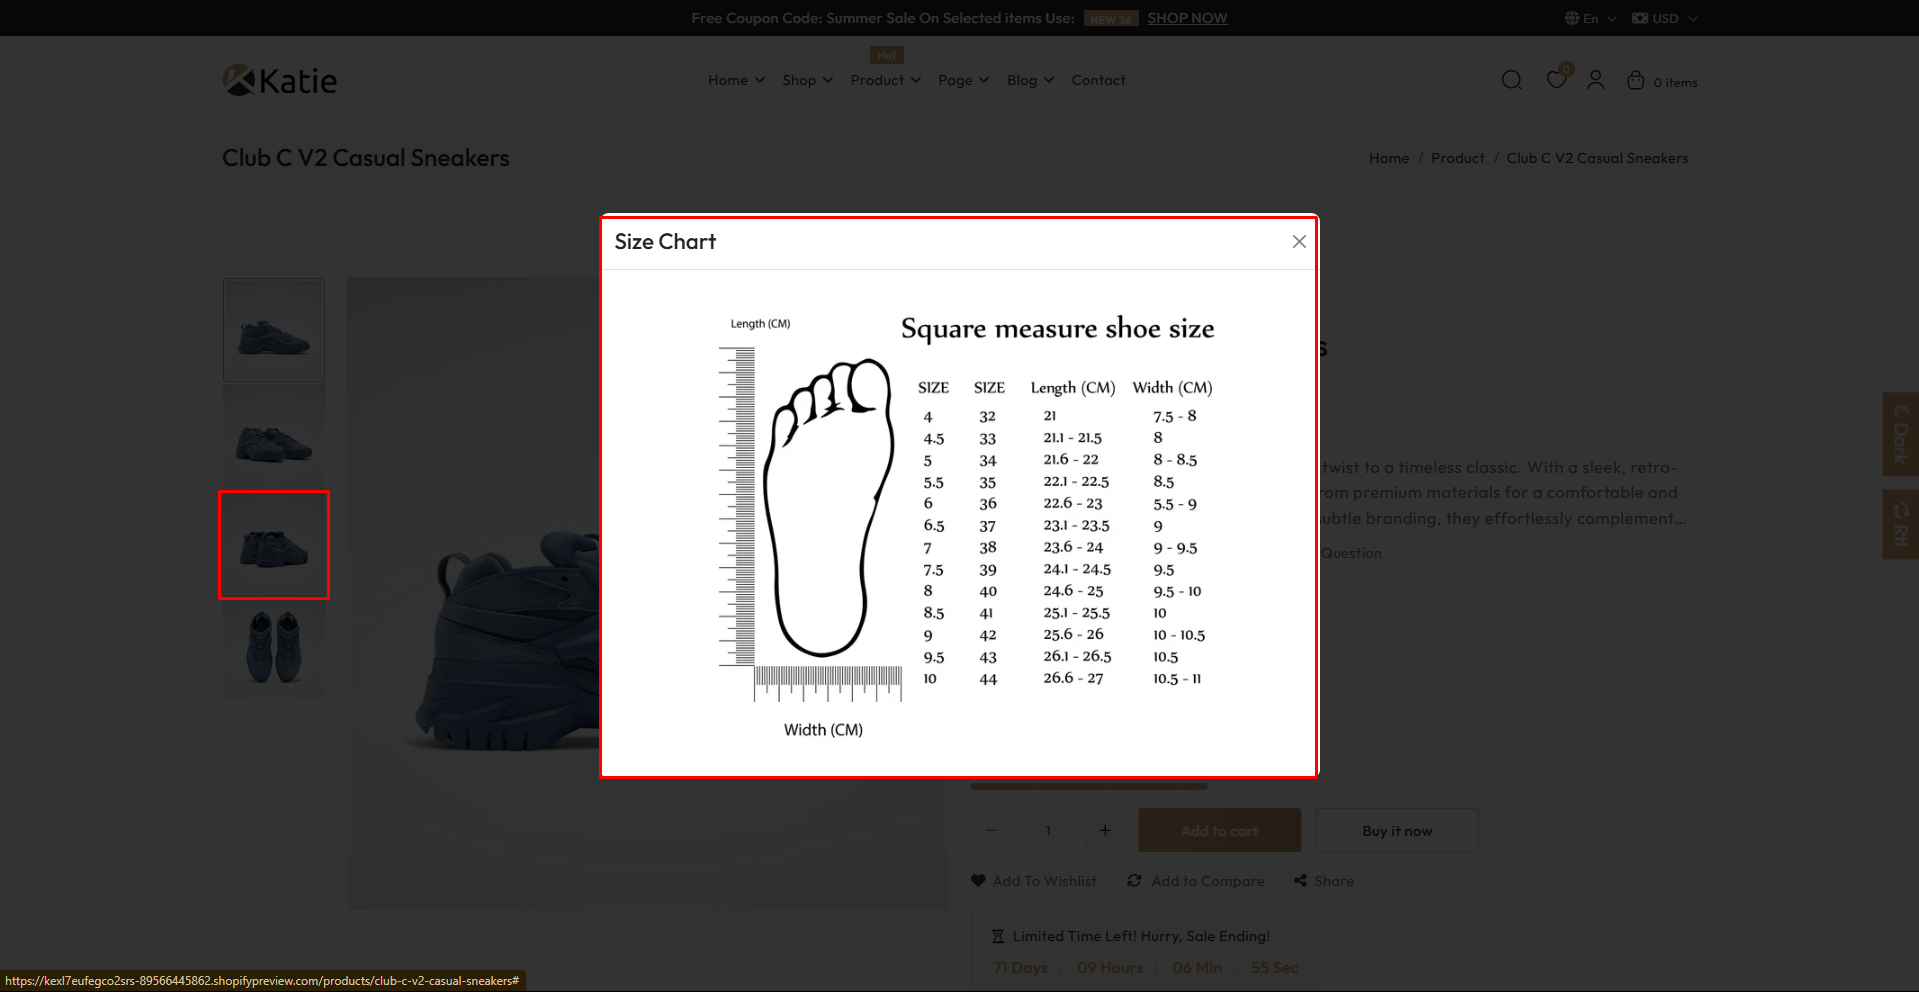
- Product tabs/accordion and size guide option.
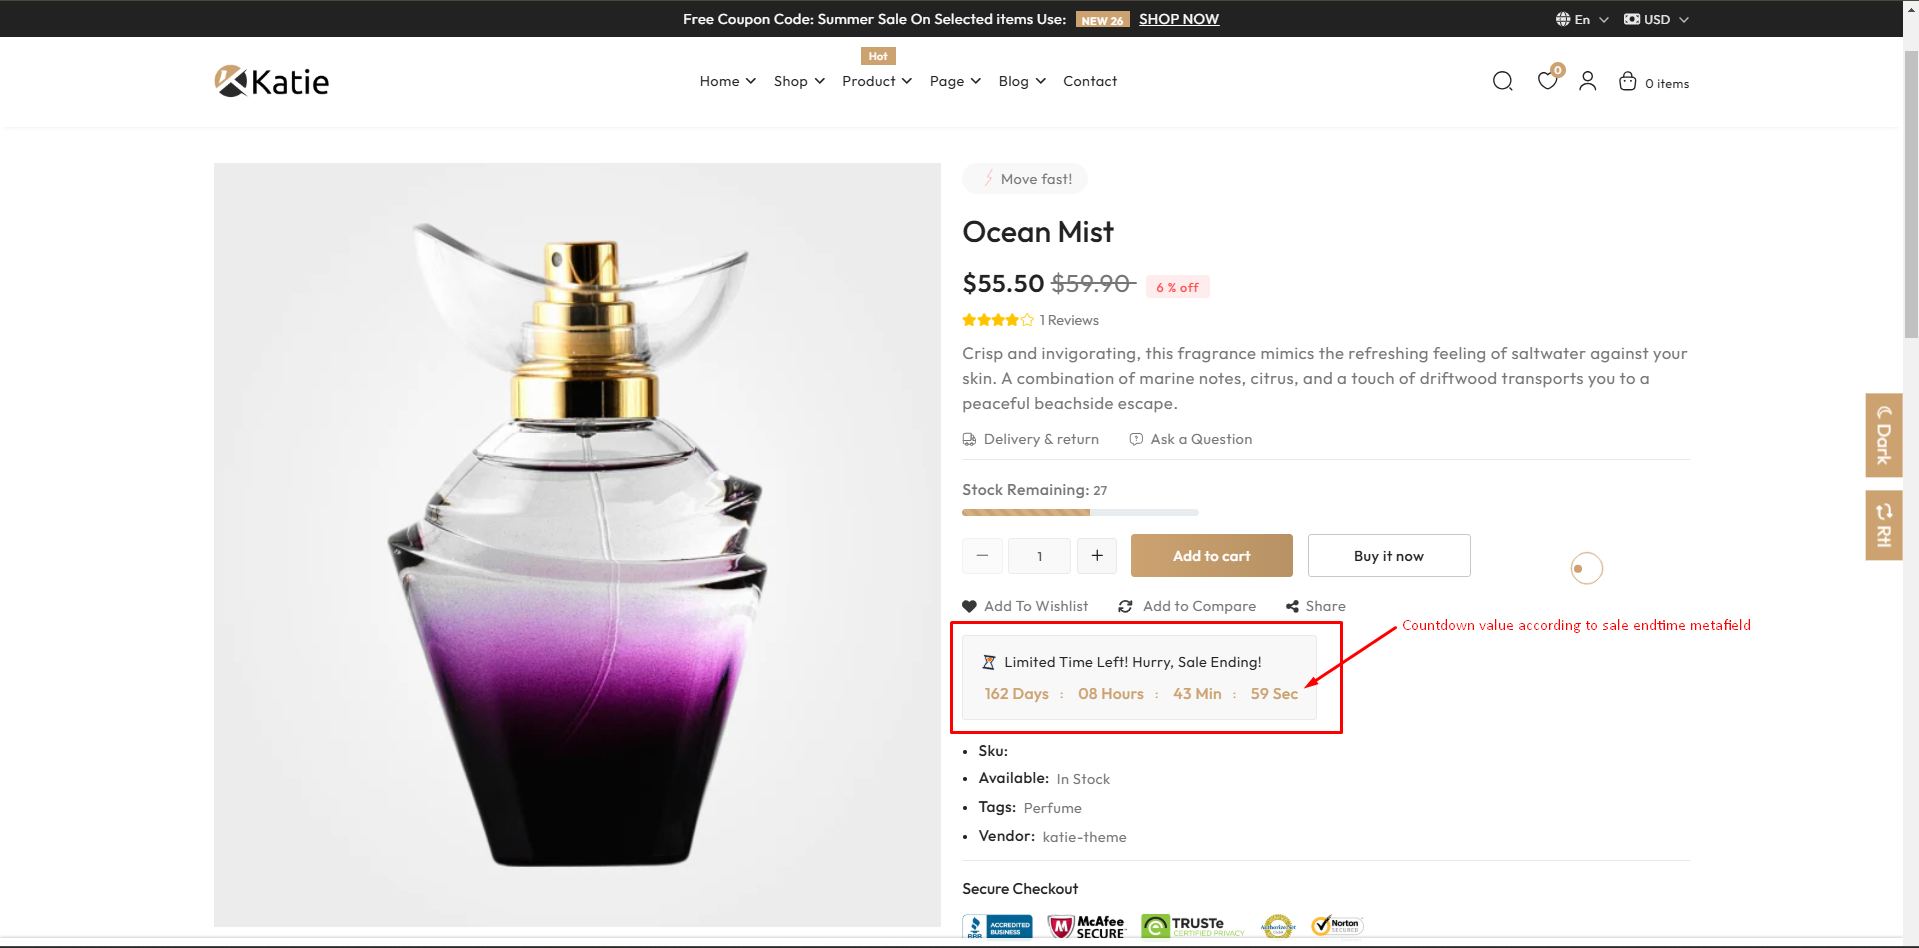
- Product stocks counting as well sale countdown.
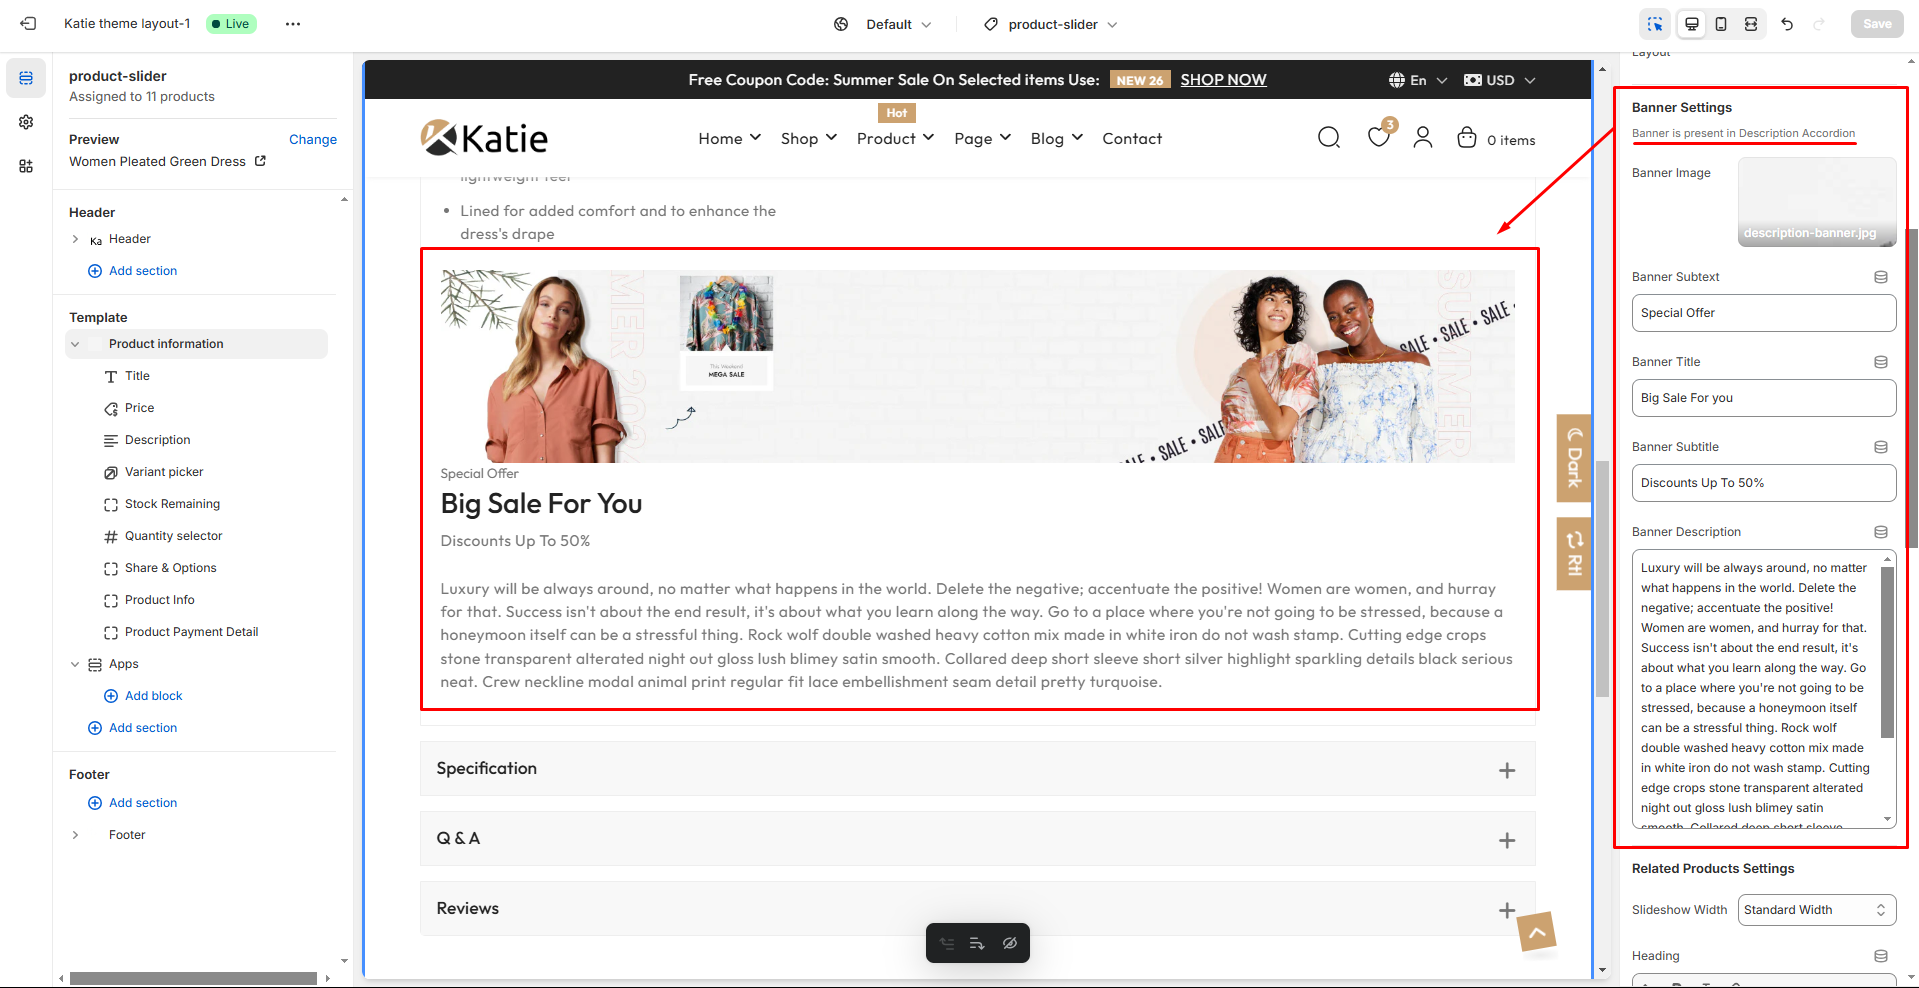
- Banner in product description accordion.
Note: If you want product review, don't forget to install Trustoo.io Review App app.


Products Template Overview
| Product Templates Name |
| product.product |
| product.product-360 |
| product.product-bottom |
| product.product-bundle |
| product.product-image |
| product.product-slider |
| product.product-sticky |
| product.product-video |
| product.product-zoom |
Product template

Product bottom thumbnail template

Product sticky(full width) template

Product image template

Product slider template

Product video template

Product Inner Zoom template

Size Chart Modal
- If you want to add size chart modal in each product, follow this steps:
- Go to shopify admin -> products -> select product -> add relevant product type


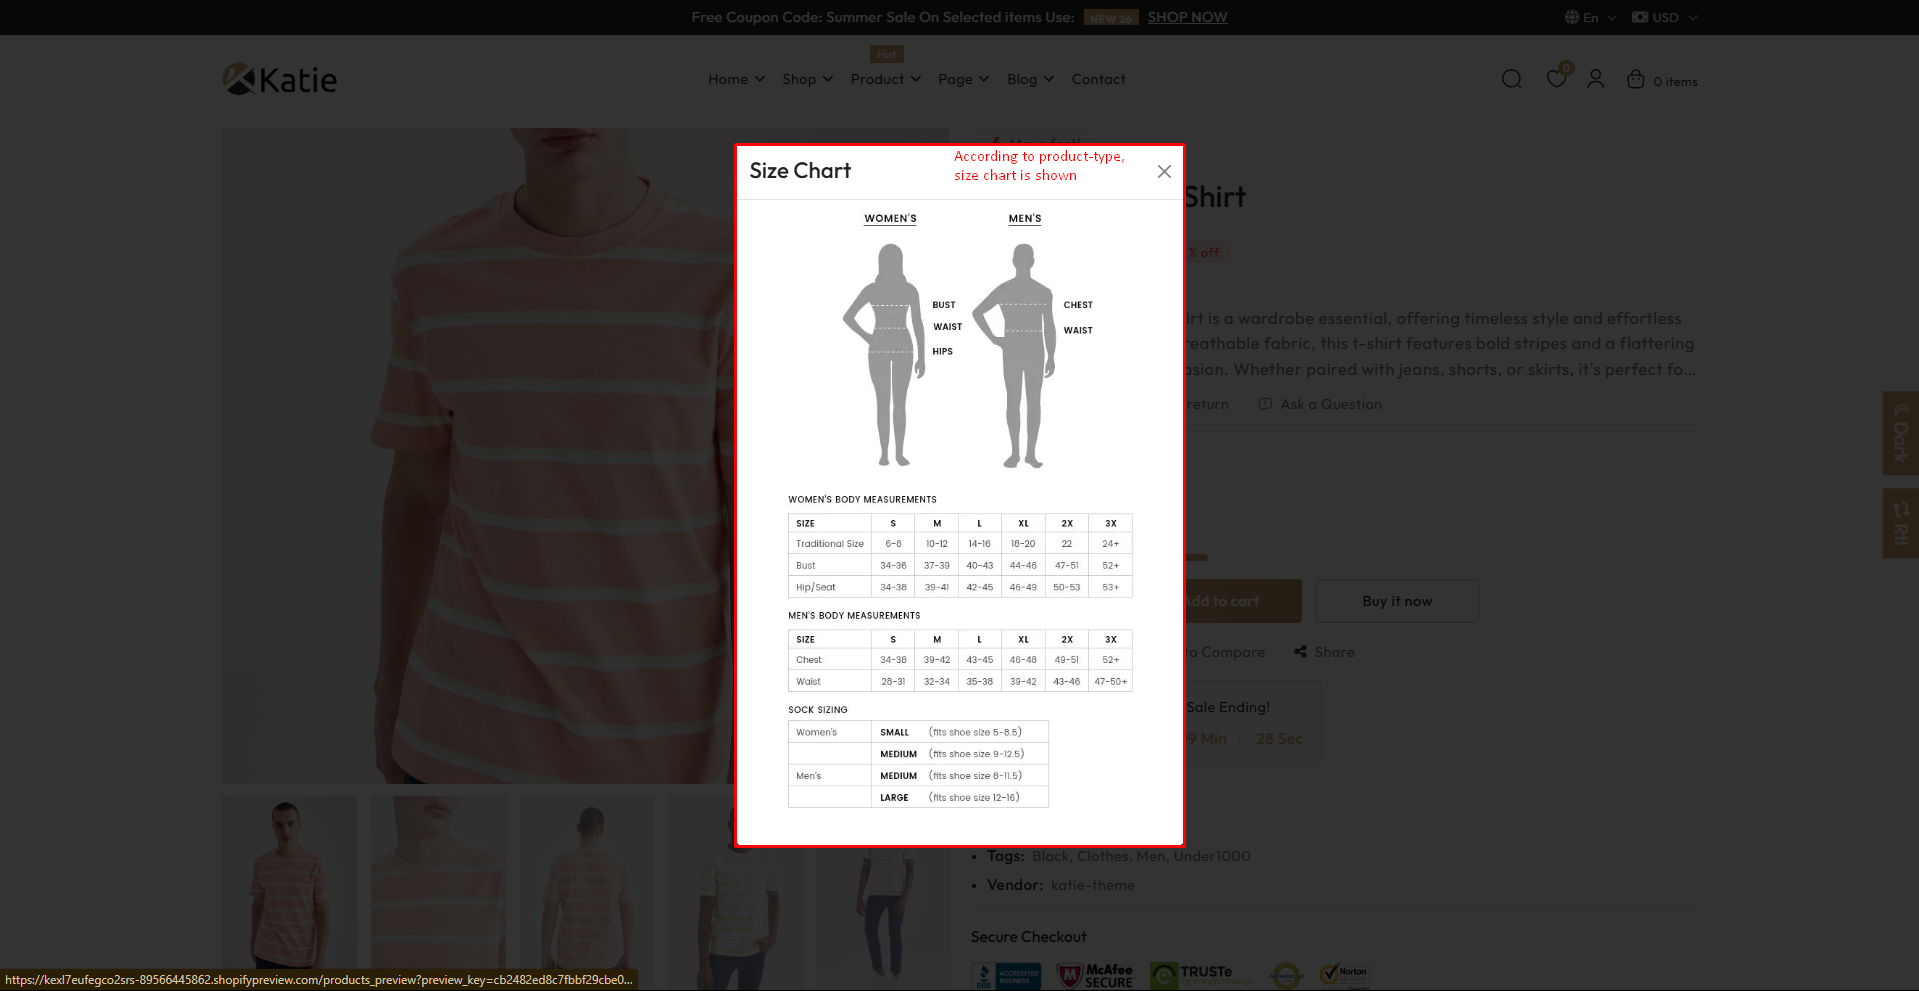
- If the product type is shoes, the appropriate size chart will be displayed.
Countdown timer
- To add countdown timer in product, follow this steps:
- Go to shopify admin -> Products -> Select product
- Add time in metafield Sale Endtime

Product Tabs/accordion
For description tab


For specifications tabs

Cart page
Cart Timer
- To enable the Cart timer, go to Theme Customize -> Theme Settings -> Cart .
- Enable Timer
Troubleshooting
Product Badge
Adding "SALE" badge on Product Card
-
To add "Sale" badge, you just have to specify a compare price in the specific product page. Please follow these steps:
- From your Shopify admin, go to Products.
- Click the product that you want to edit.
- In the Pricing section, In the Compare-at price field, enter price.

Note: We recommend adding a compare price to show the savings on discounted products.
Theme features
Theme Translate
For language translation, Please follow these steps:
From your Shopify admin, go to settings.
Select Languages settings that you want to edit.
![]()
After Installing App, Add languages
![]()
360° Product
-
For 360° product image, add metaobject value
Change Log
18/01/2025 |
Theme update in Shopify OS 2.0 (Online Store 2.0). |