 Social account setup
Connecting to Facebook
1. Create a New App
- Visit: https://developers.facebook.com
- Click on “My Apps” (top-right). (If you don’t have a developer account, create one by clicking Get Started.)
- Click “Create App”.
-
Fill in:
- App Name (anything you like)
- Contact Email
- Select the use case: Choose “Other“
- Select the app type: Choose “Business”.
- Click “Next”.
- Click “Create App” and complete any security checks (CAPTCHA).
Make sure you have enabled the necessary permissions:
- Which permission?
pages_show_list(required to list pages). - Where to add it? As a scope in Facebook Login (OAuth).
- What does the client do? When logging into the app with Facebook, they must approve this permission.
- In production? If the app is “Live,” you need to request approval for
pages_show_listunder App Review → Permissions & Features. - Technical note: The
/me/accountscall must be made with a user access token (not an app or page token).
Permissions list:
'pages_manage_posts',
'pages_show_list',
'pages_read_user_content',
'pages_read_engagement',
'Read_insights'
2. Add Facebook Login App
Once your app is created, you will see a page titled “Add products to your app”:
- Find Facebook Login App on the list and click Set up.
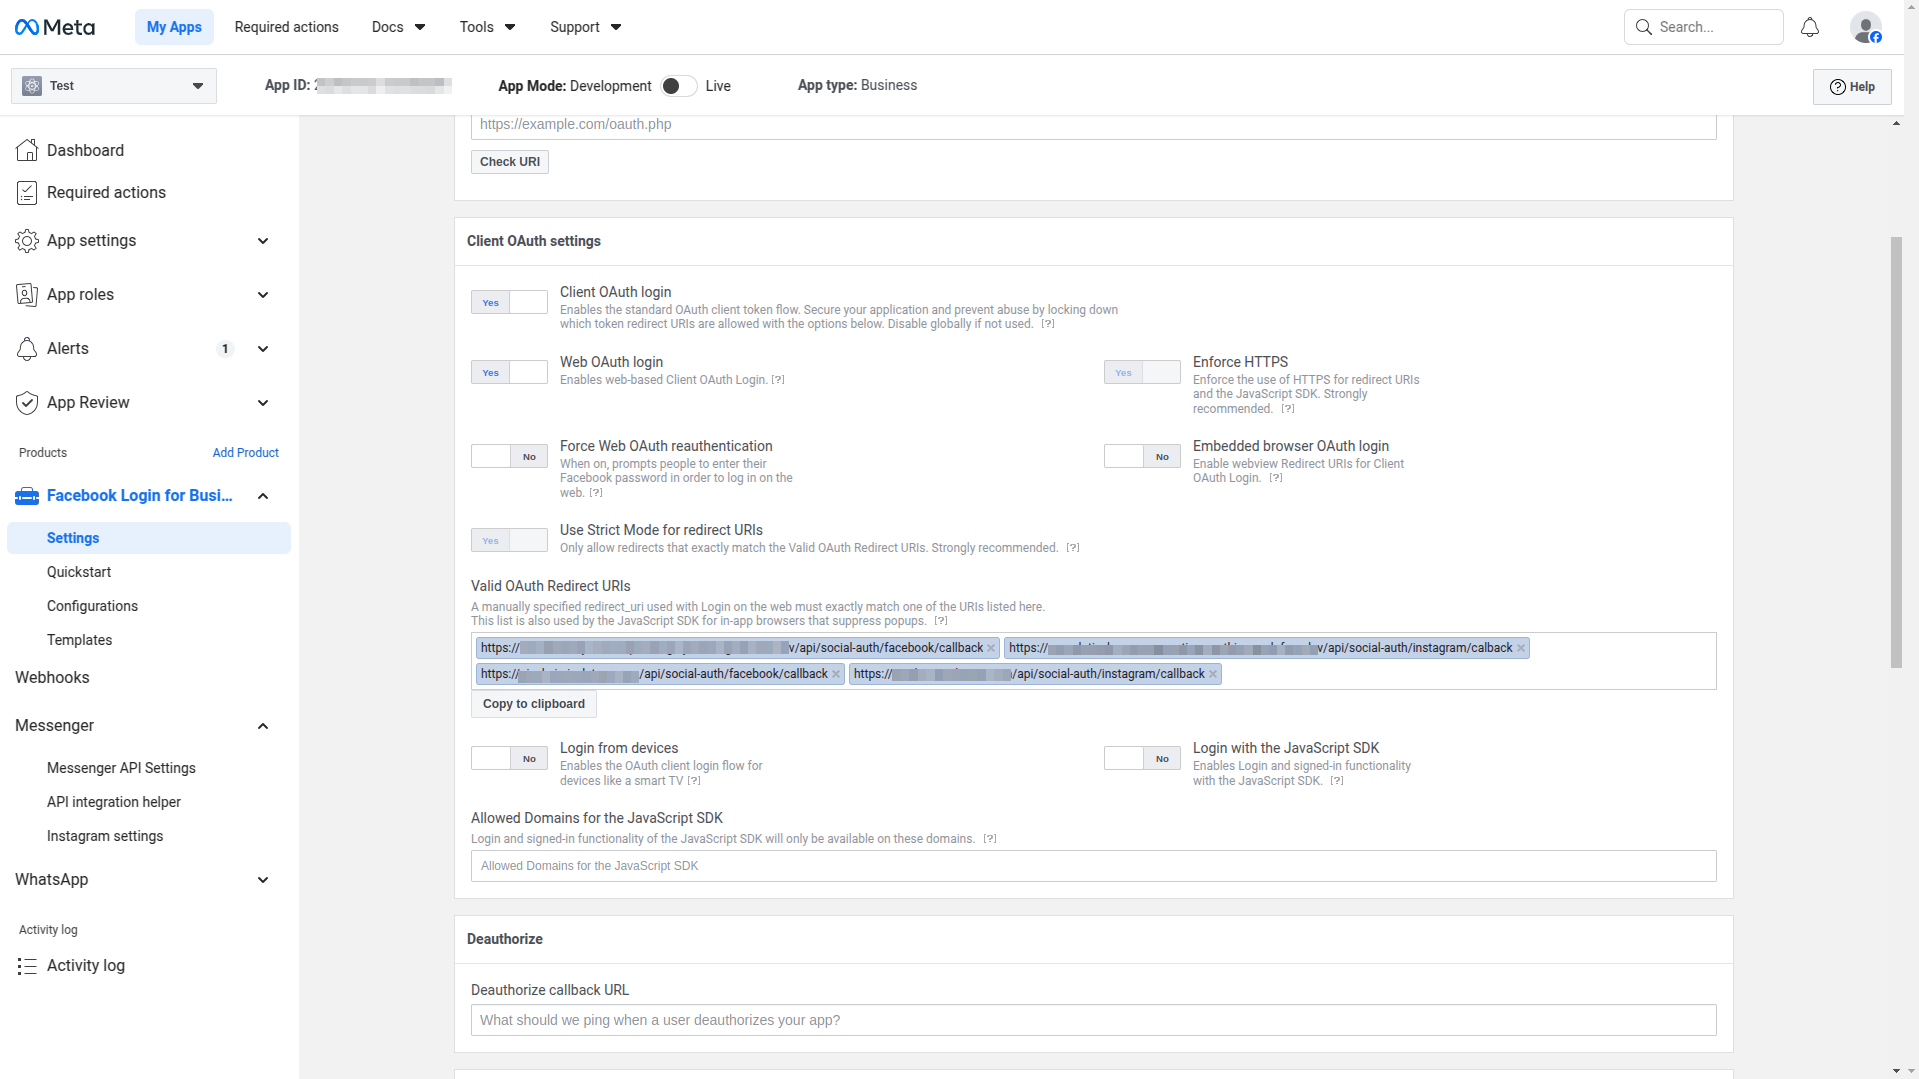
- Add the Redirect URL to the Valid OAuth Redirect URIs section in Facebook Login settings page. Then click Save Changes.
3. Adjusting App Settings
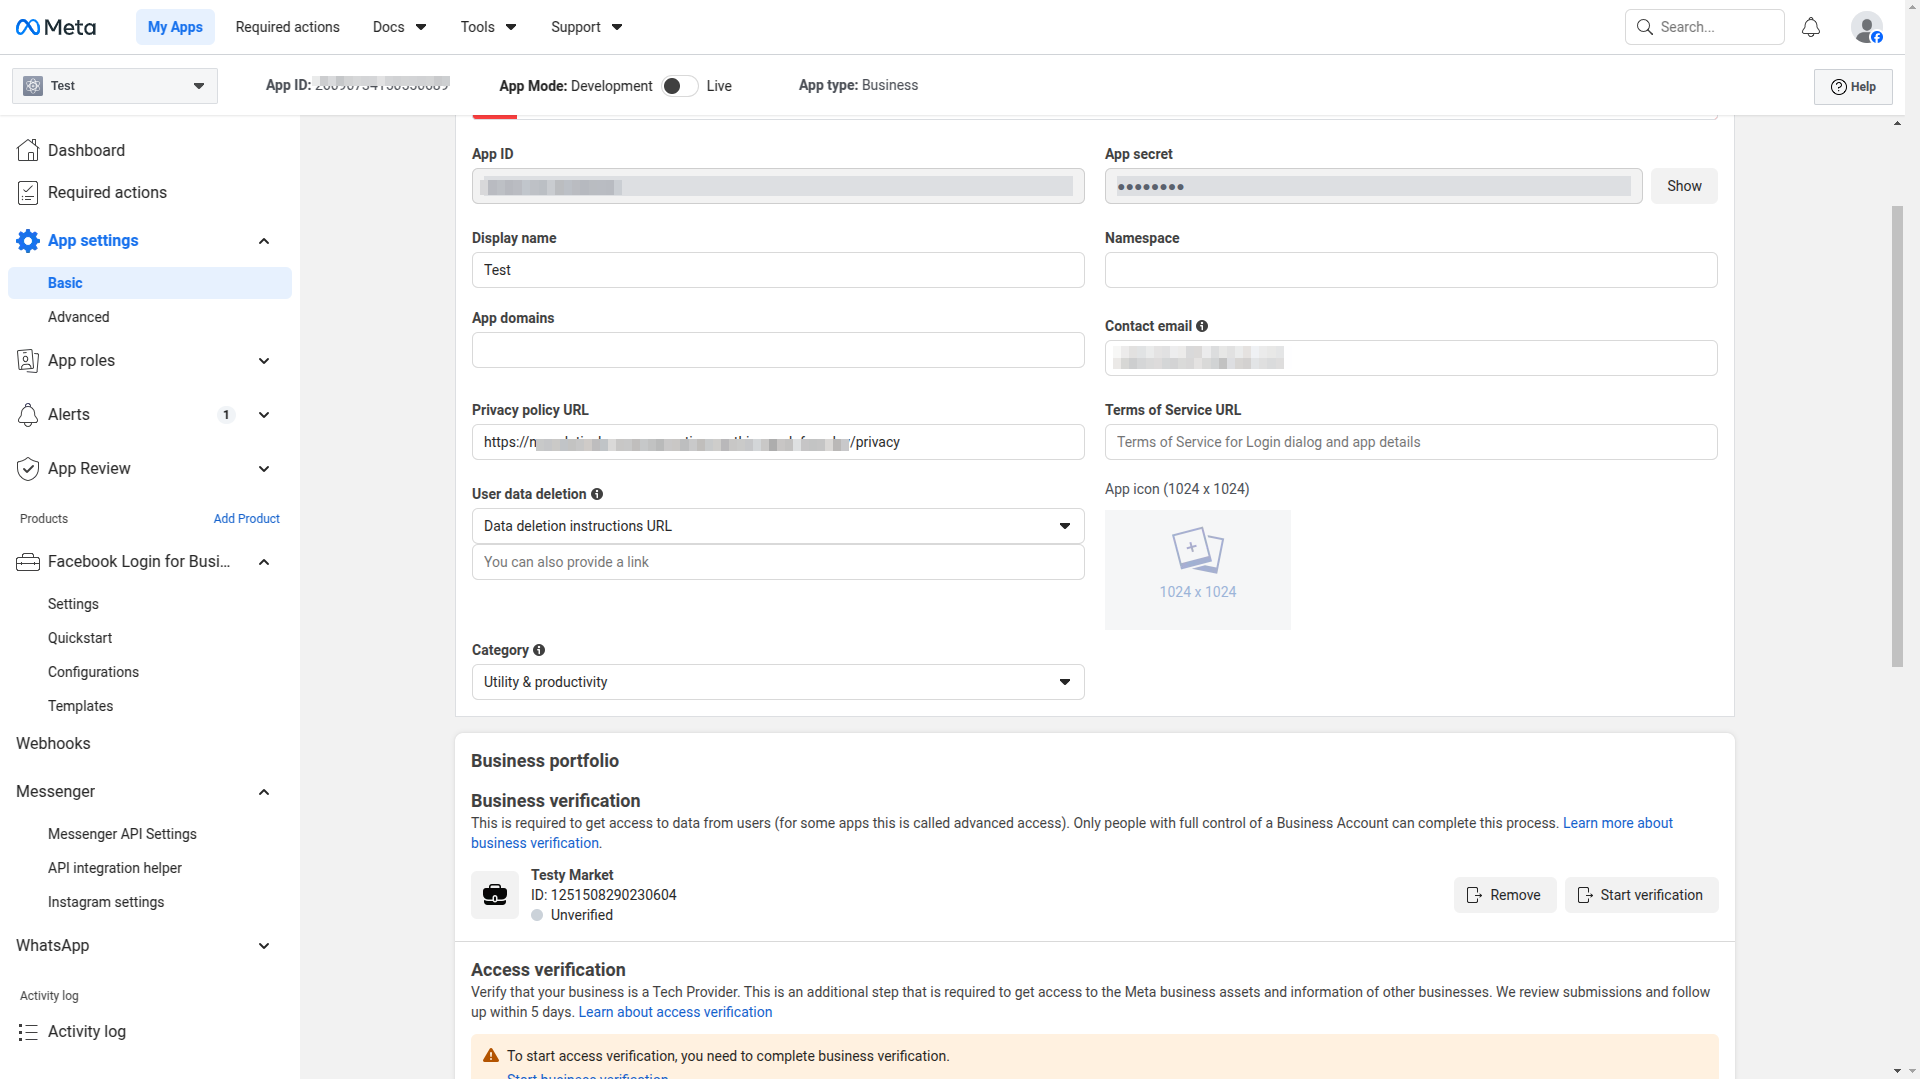
- Go to the “Settings” > “Basic” section in the left sidebar.
-
Fill in the highlighted parts as shown in the platform:
- Privacy Policy URL – Enter the URLs of the relevant policy pages of your site.
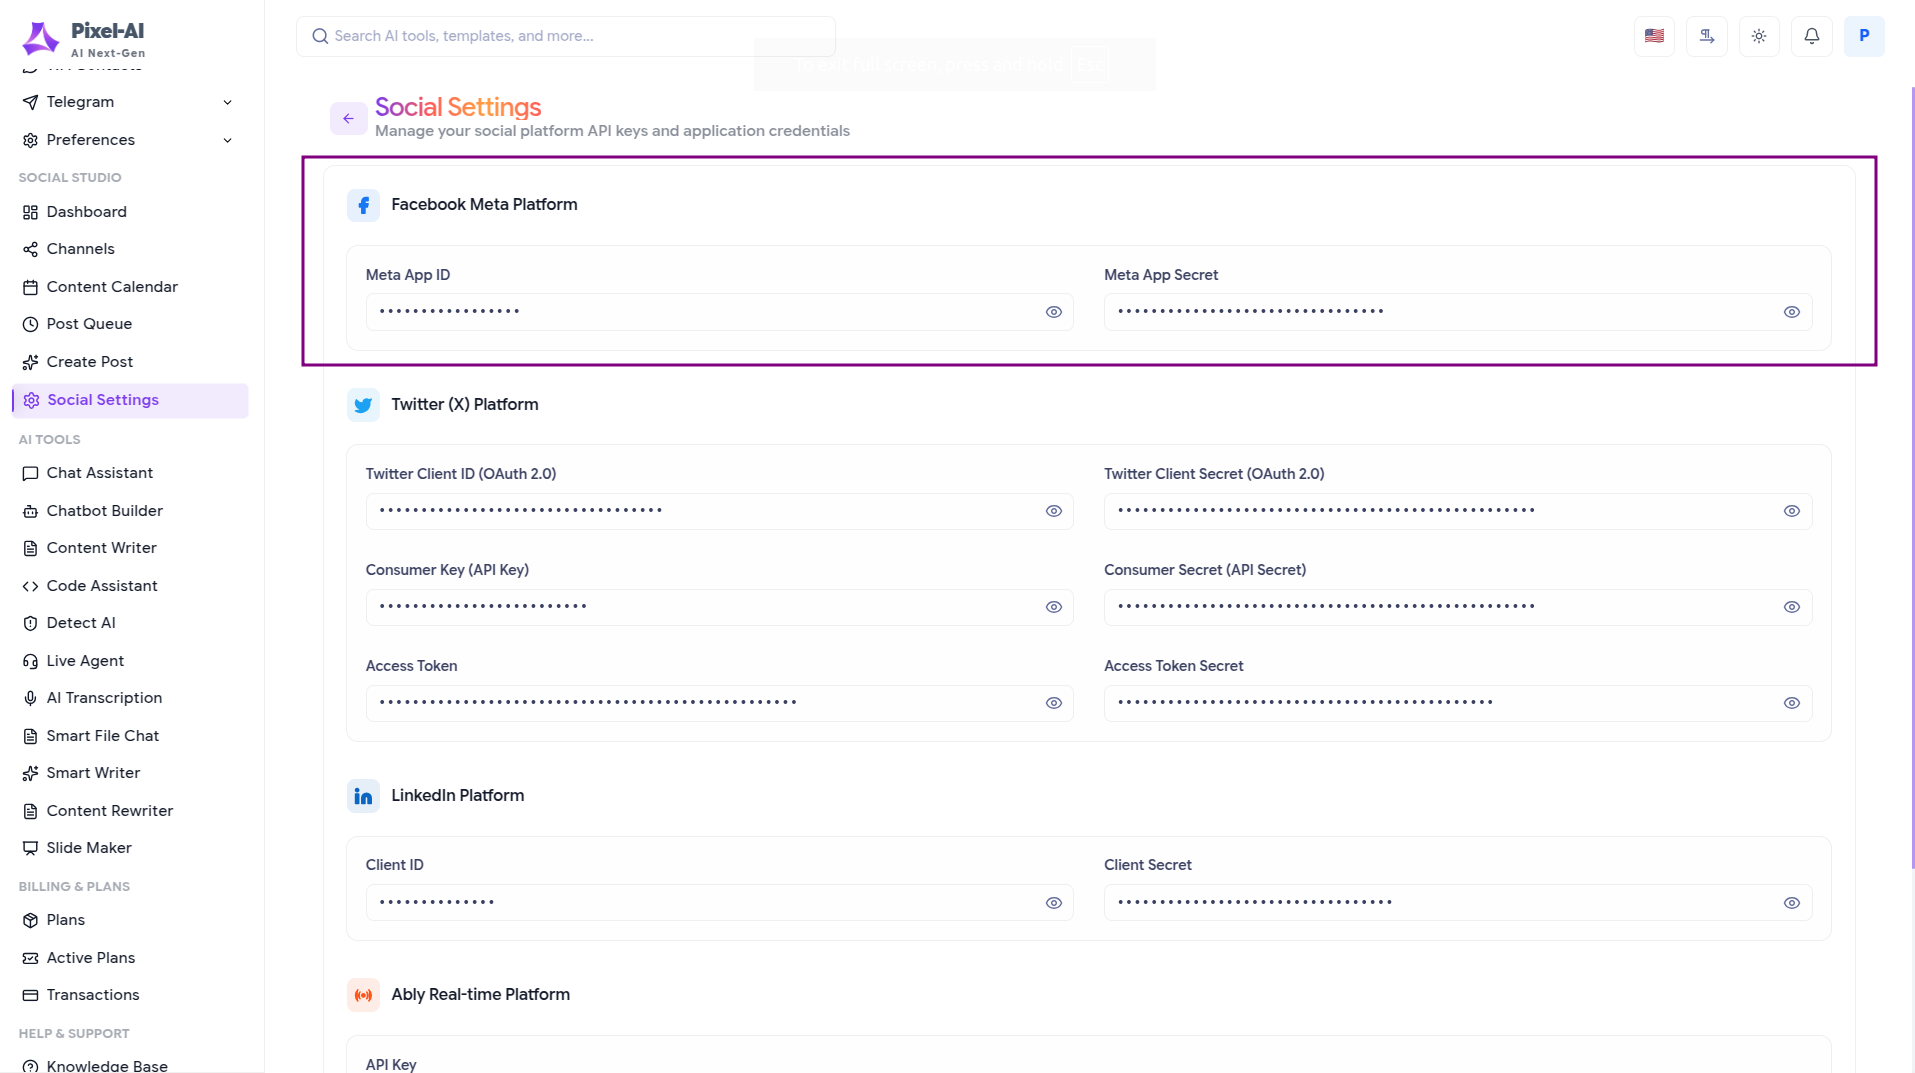
- Copy your App ID and App secret. Enter your App ID and App Secret to the appropriate field in the social configuration section.
4. Connect Your Facebook Page to Pixel-ai
After completing the Facebook configuration:
- From the user menu, go to Social Media Studio > Platforms.
- Click on Facebook and follow the steps in the pop-up window to connect your Facebook page.
- Once your page is connected, you should see your connected page.
That’s all! Now you can start posting.
Connecting to Instagram
1. Initial Setup
- Create a Meta App if you haven't already (follow the Facebook setup steps).
- Connect your Instagram account to your Facebook Business Page.
- Make sure you have a Business Instagram Account (Professional account).
2. Add Webhooks Product
- In your Meta App dashboard, add the Webhooks product.
- Select Instagram from the top dropdown menu.
- Add the Callback URL and Verify Token (which you configure in your
.envfile). - Click on Verify.
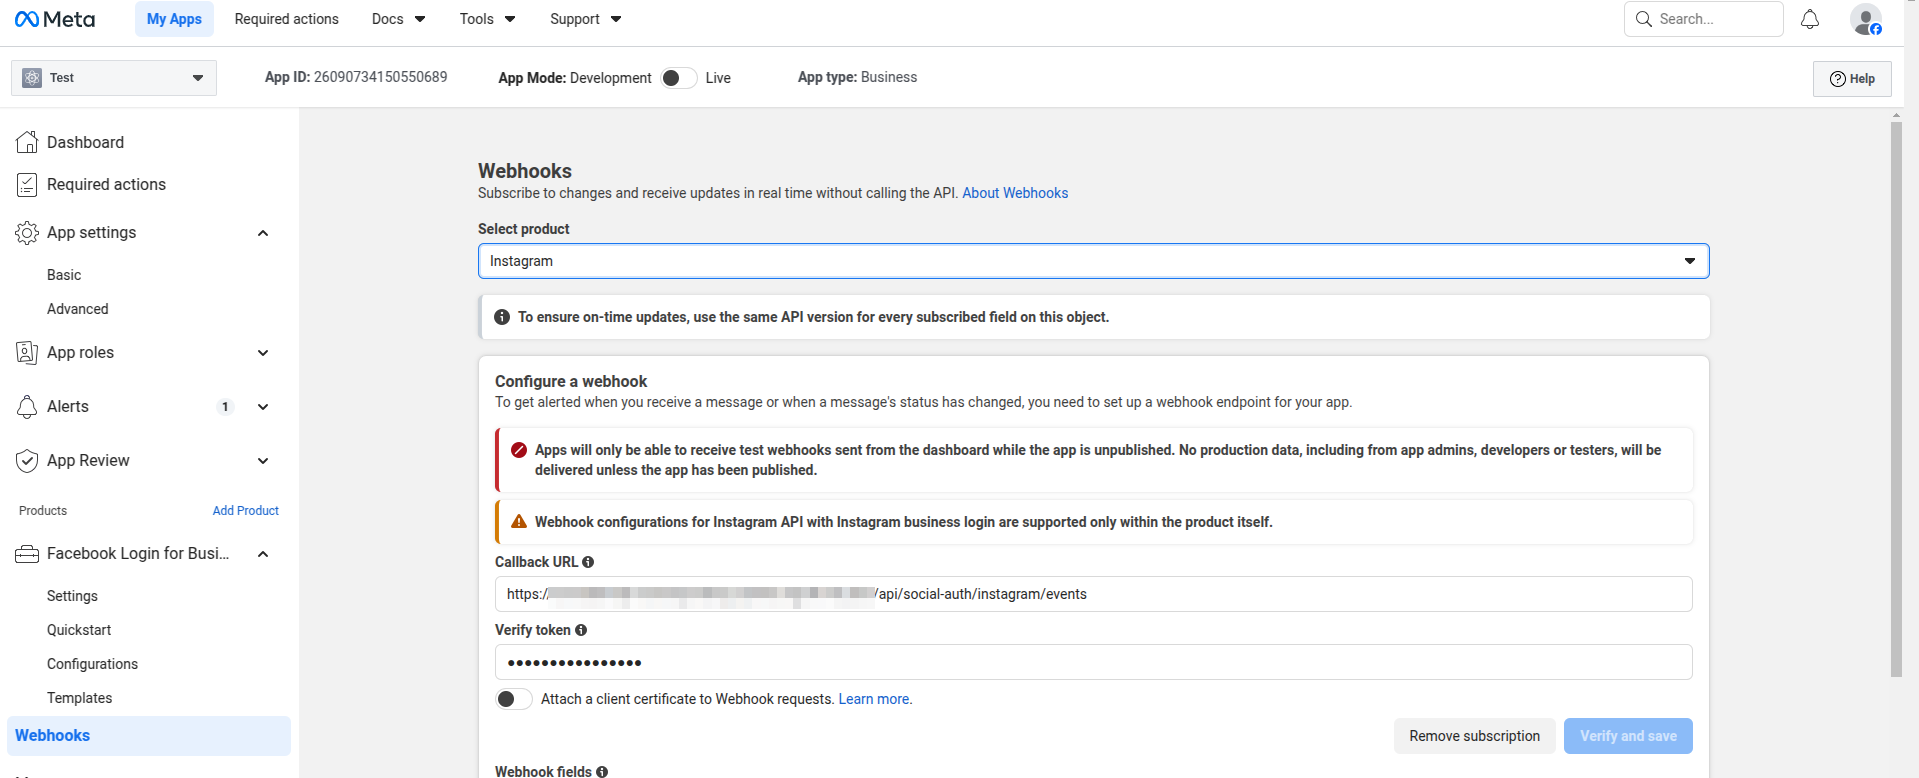
3. After successful verification, subscribe to the webhook fields as shown in the platform.
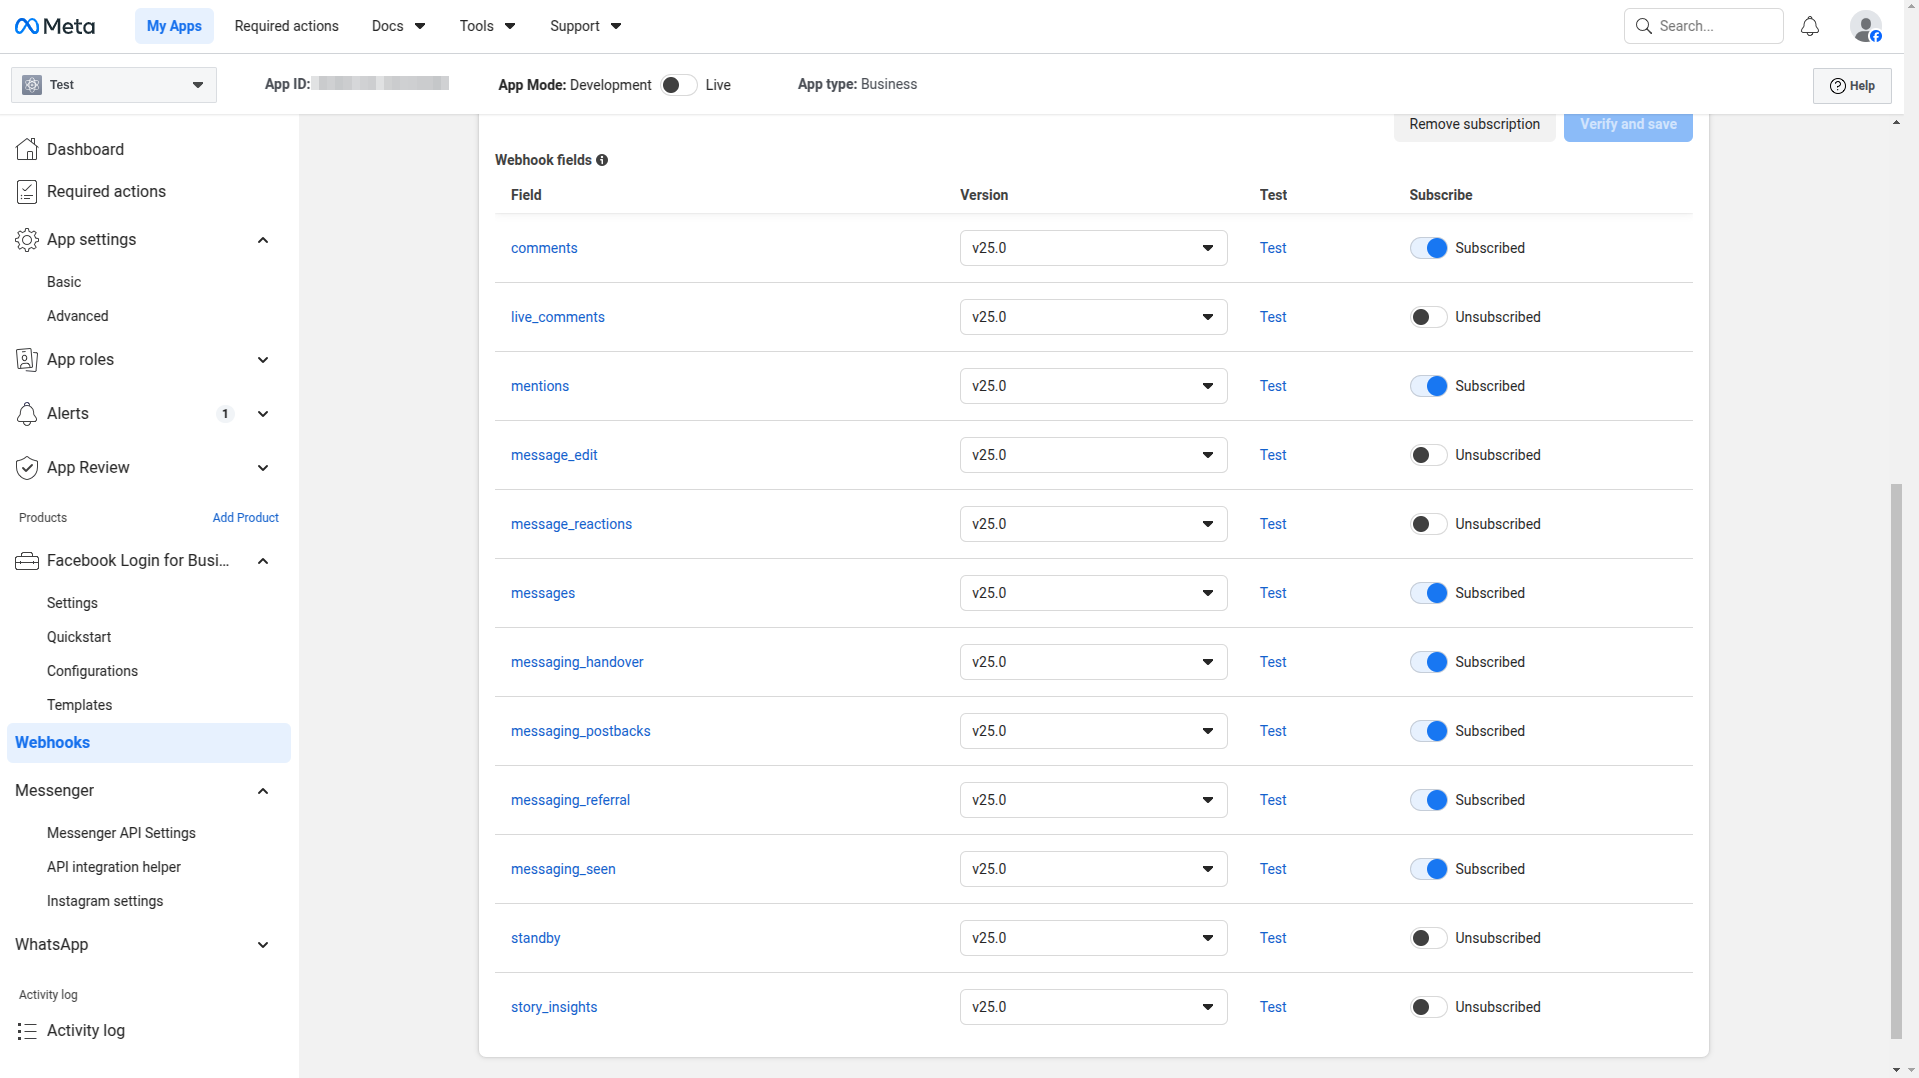
That's it! You have completed the Instagram setup. Now you can connect your Instagram profile in the Social Media Studio.
Connecting to LinkedIn
Step 1: Create a LinkedIn App
- Visit the LinkedIn Developer Portal.
- Click “Create App”.
-
Fill out the required details:
- App Name
- LinkedIn Page
- Business Email
- Company
-
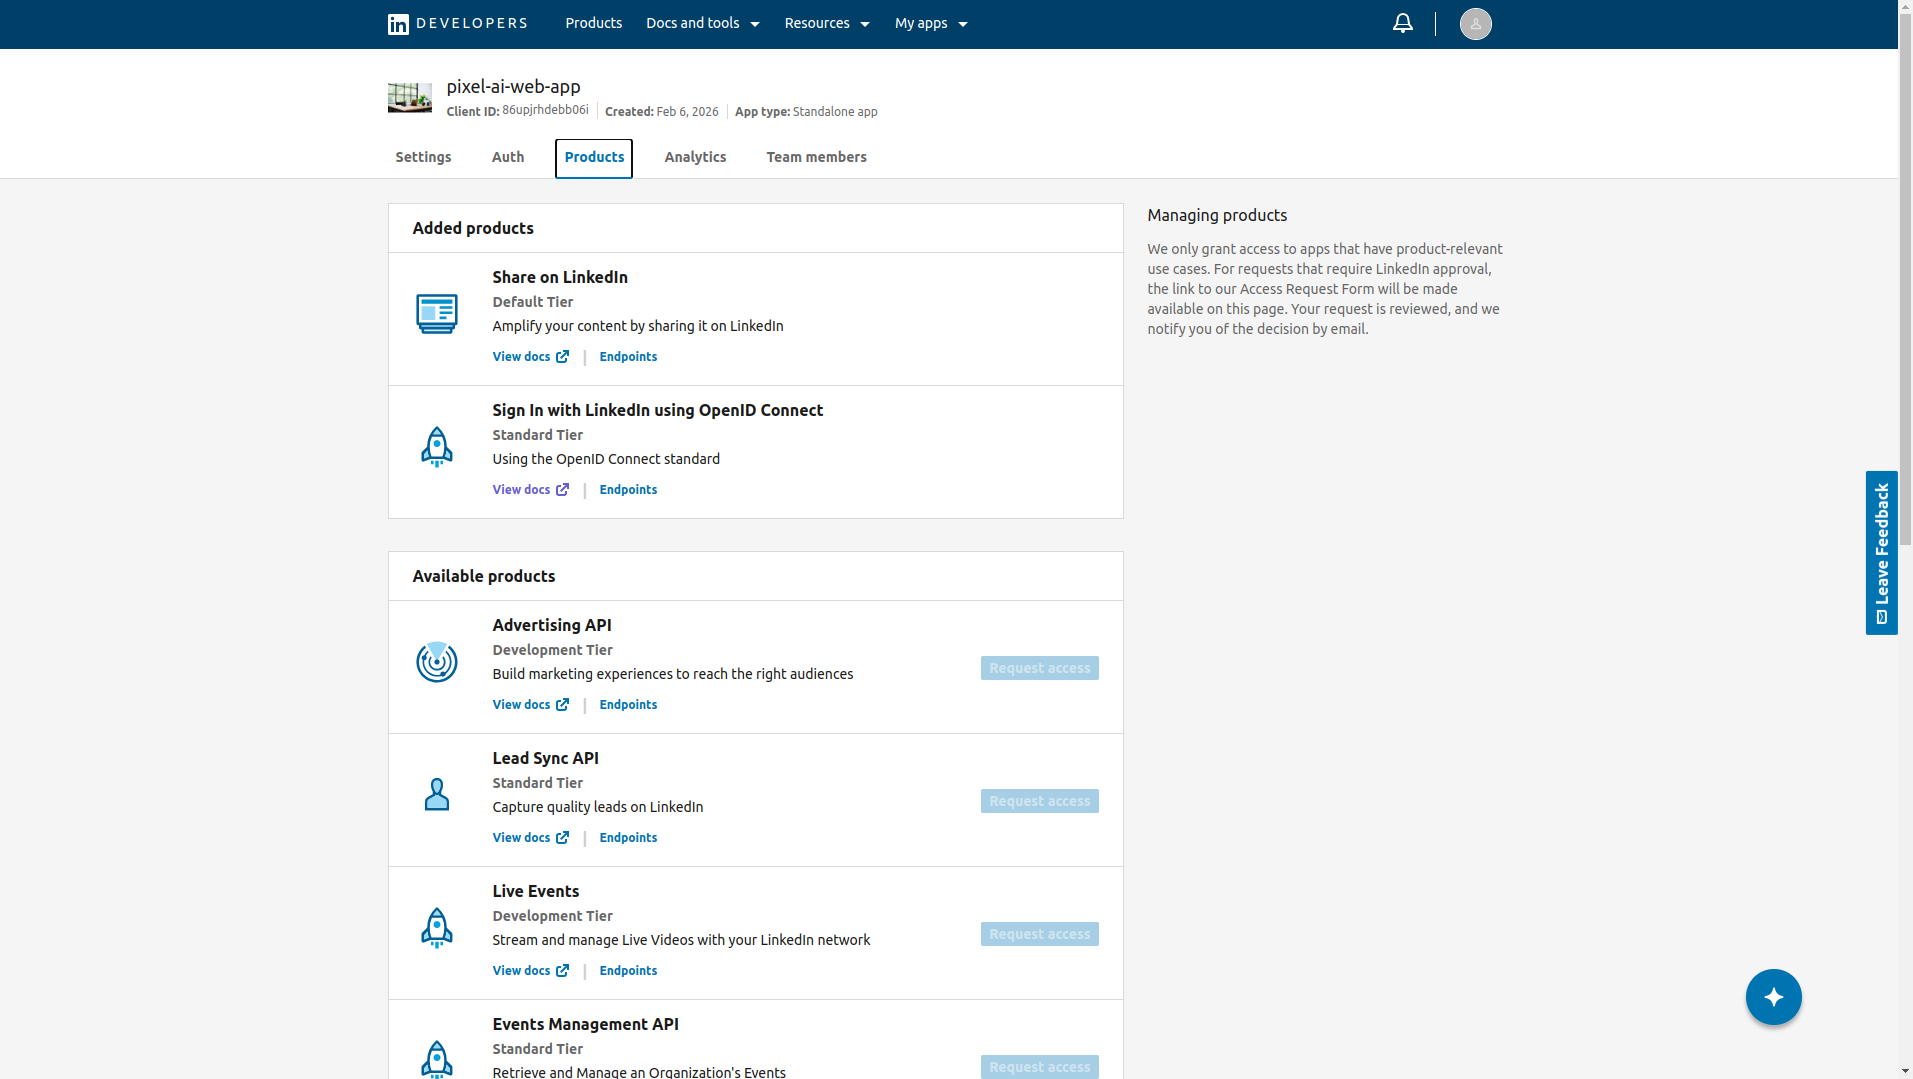
Once your app is created, go to the Products tab and add the following products:
- Sign In with LinkedIn using OpenID Connect
- Share on LinkedIn
Step 2: Set the Redirect URL in LinkedIn
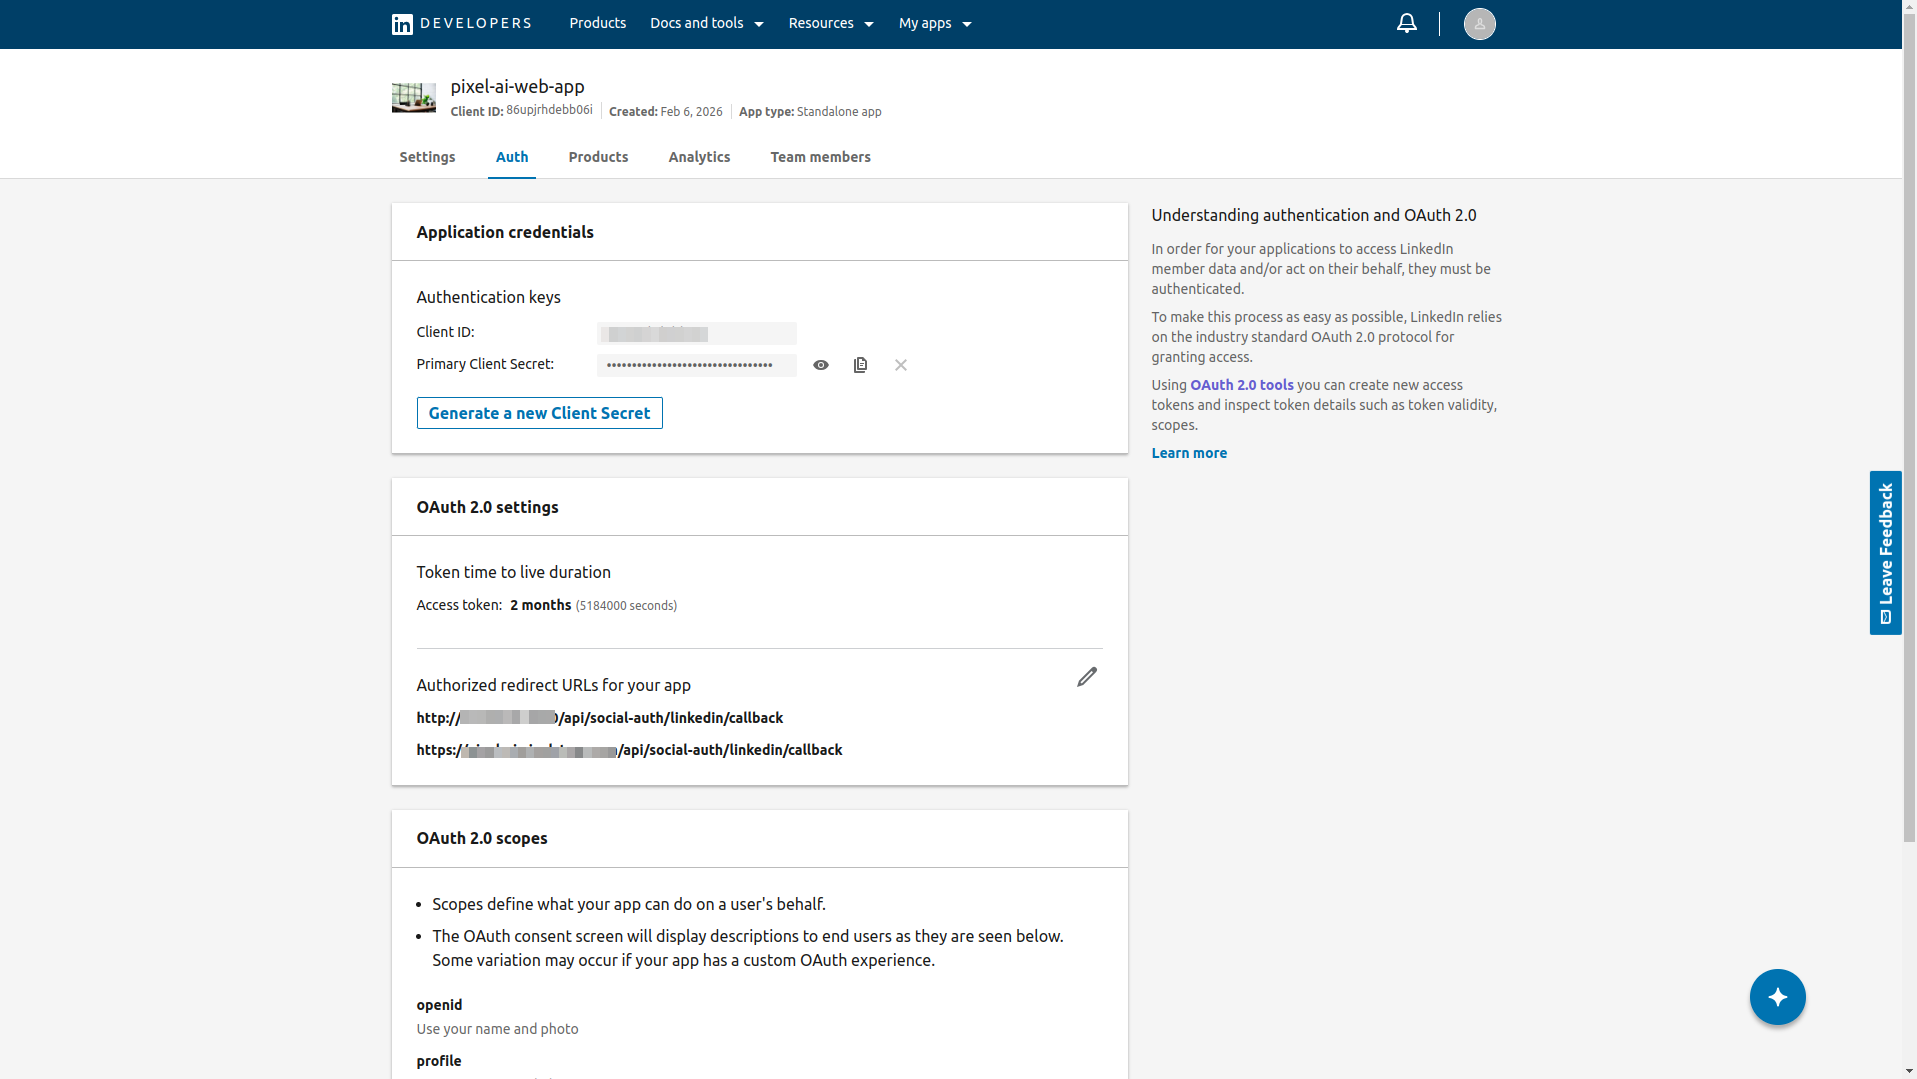
- Go to the Auth tab in your app settings to continue configuration.
- Under Redirect URLs, paste the Redirect URL provided in your Pixel-ai settings.
- Click Save to apply the changes.
Step 3: Get Your LinkedIn App Credentials
In your LinkedIn App’s Auth tab:
- Copy your Client ID (LinkedIn App ID)
- Copy your Client Secret (LinkedIn App Secret)
Step 4: Enter App Credentials in Pixel-ai
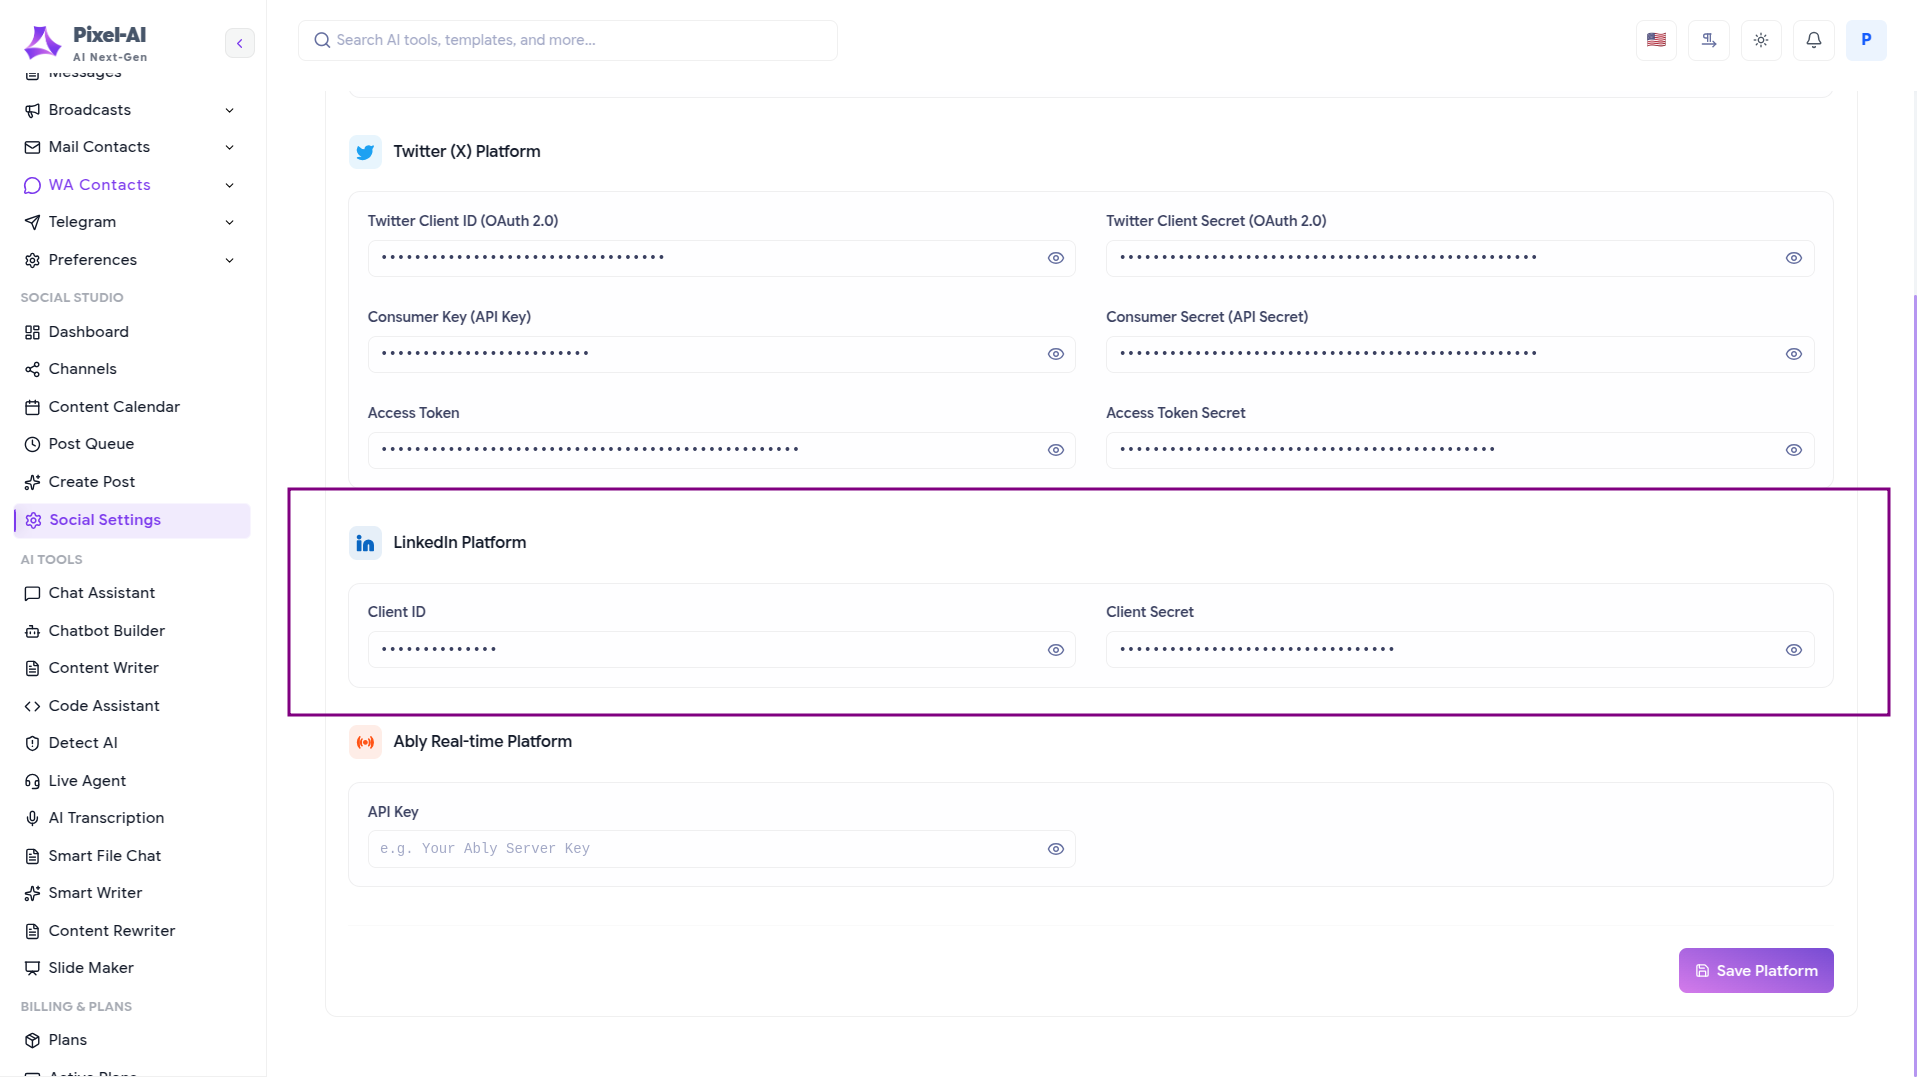
- In Pixel-ai, go to Social Media Studio > Social Configuration.
- Locate the LinkedIn section.
- Paste your App ID and App Secret into the appropriate fields.
- Click Save.
Connecting to Twitter (X)
Step 1: Create an App on Twitter Developer Console
- Visit the Twitter Developer Portal.
- Click “Create App” or "Add App" within a Project.
- Fill out the required details for your app.
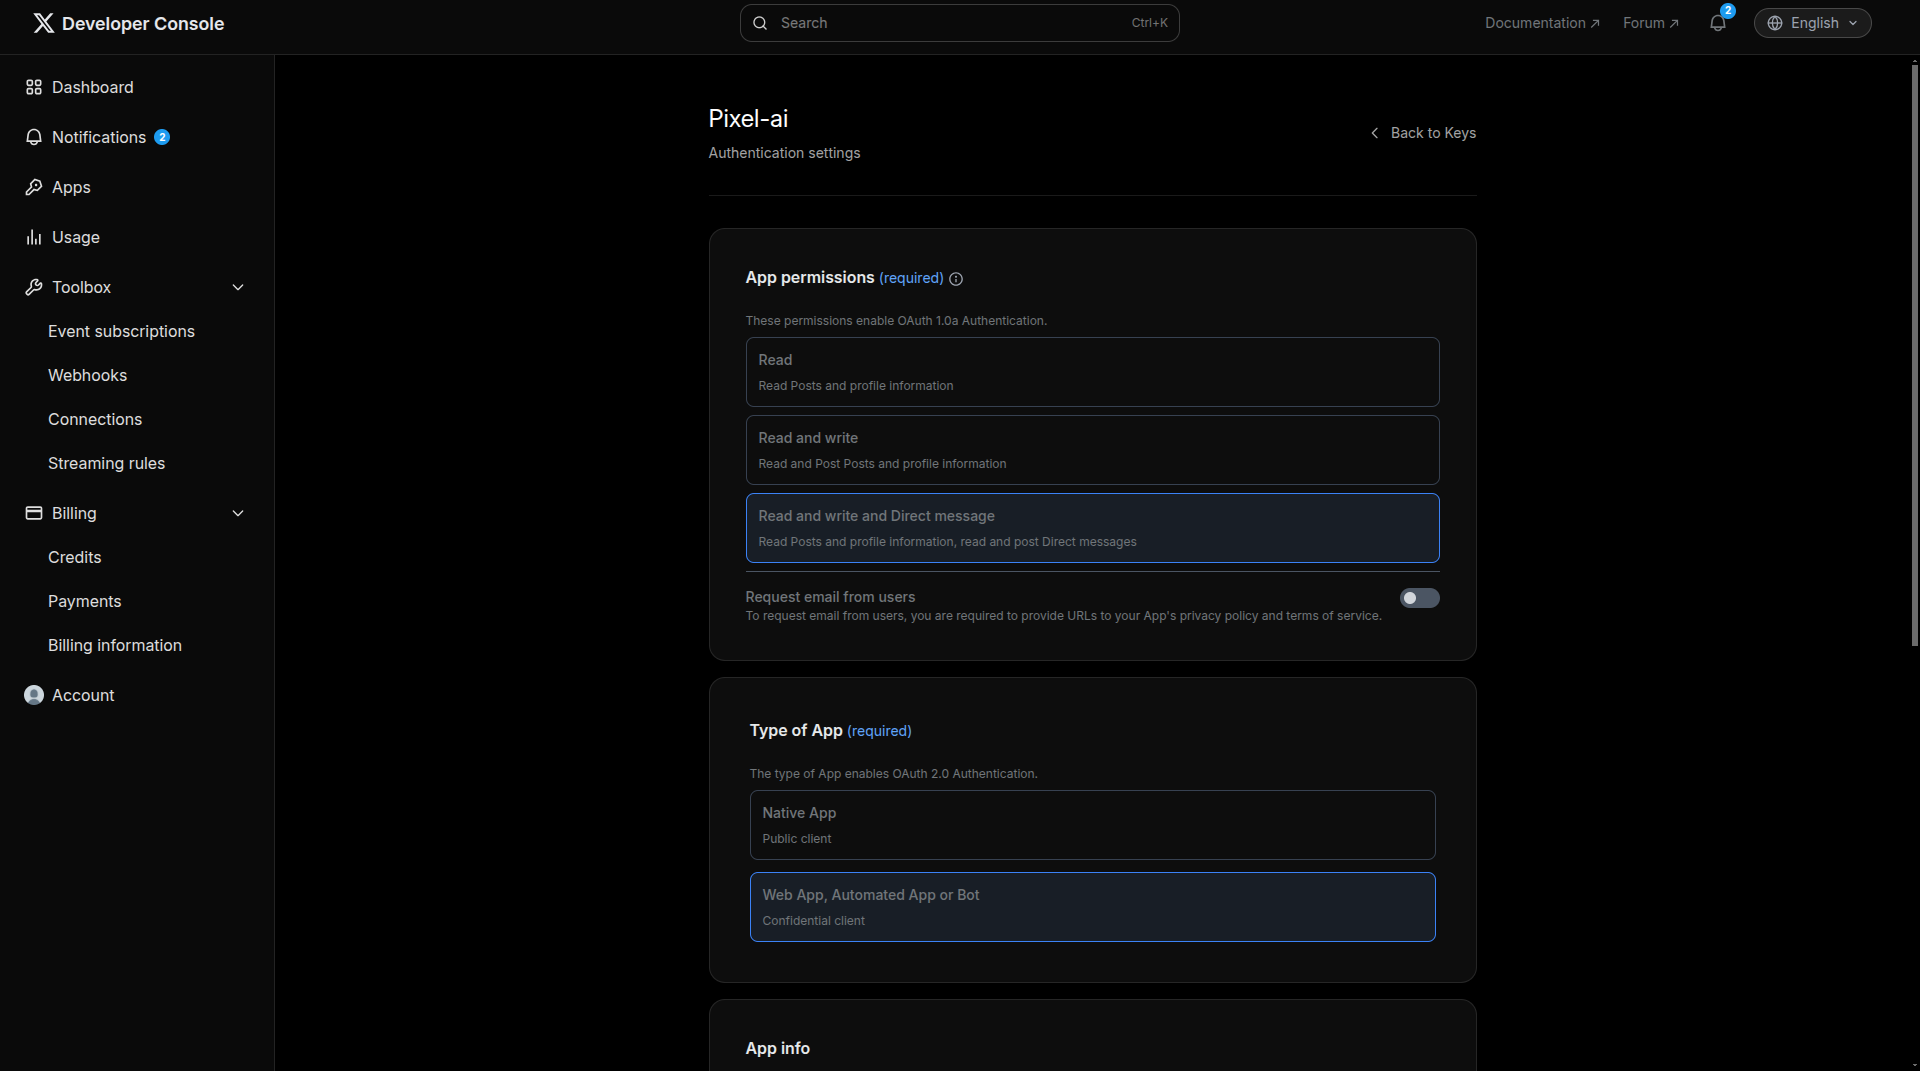
Step 2: Configure App Permissions & Type
- Go to the User authentication settings of your app.
- Set App permissions to: “Read and write and Direct message”.
- Set Type of app to: “Web App, Automated App or Bot”.
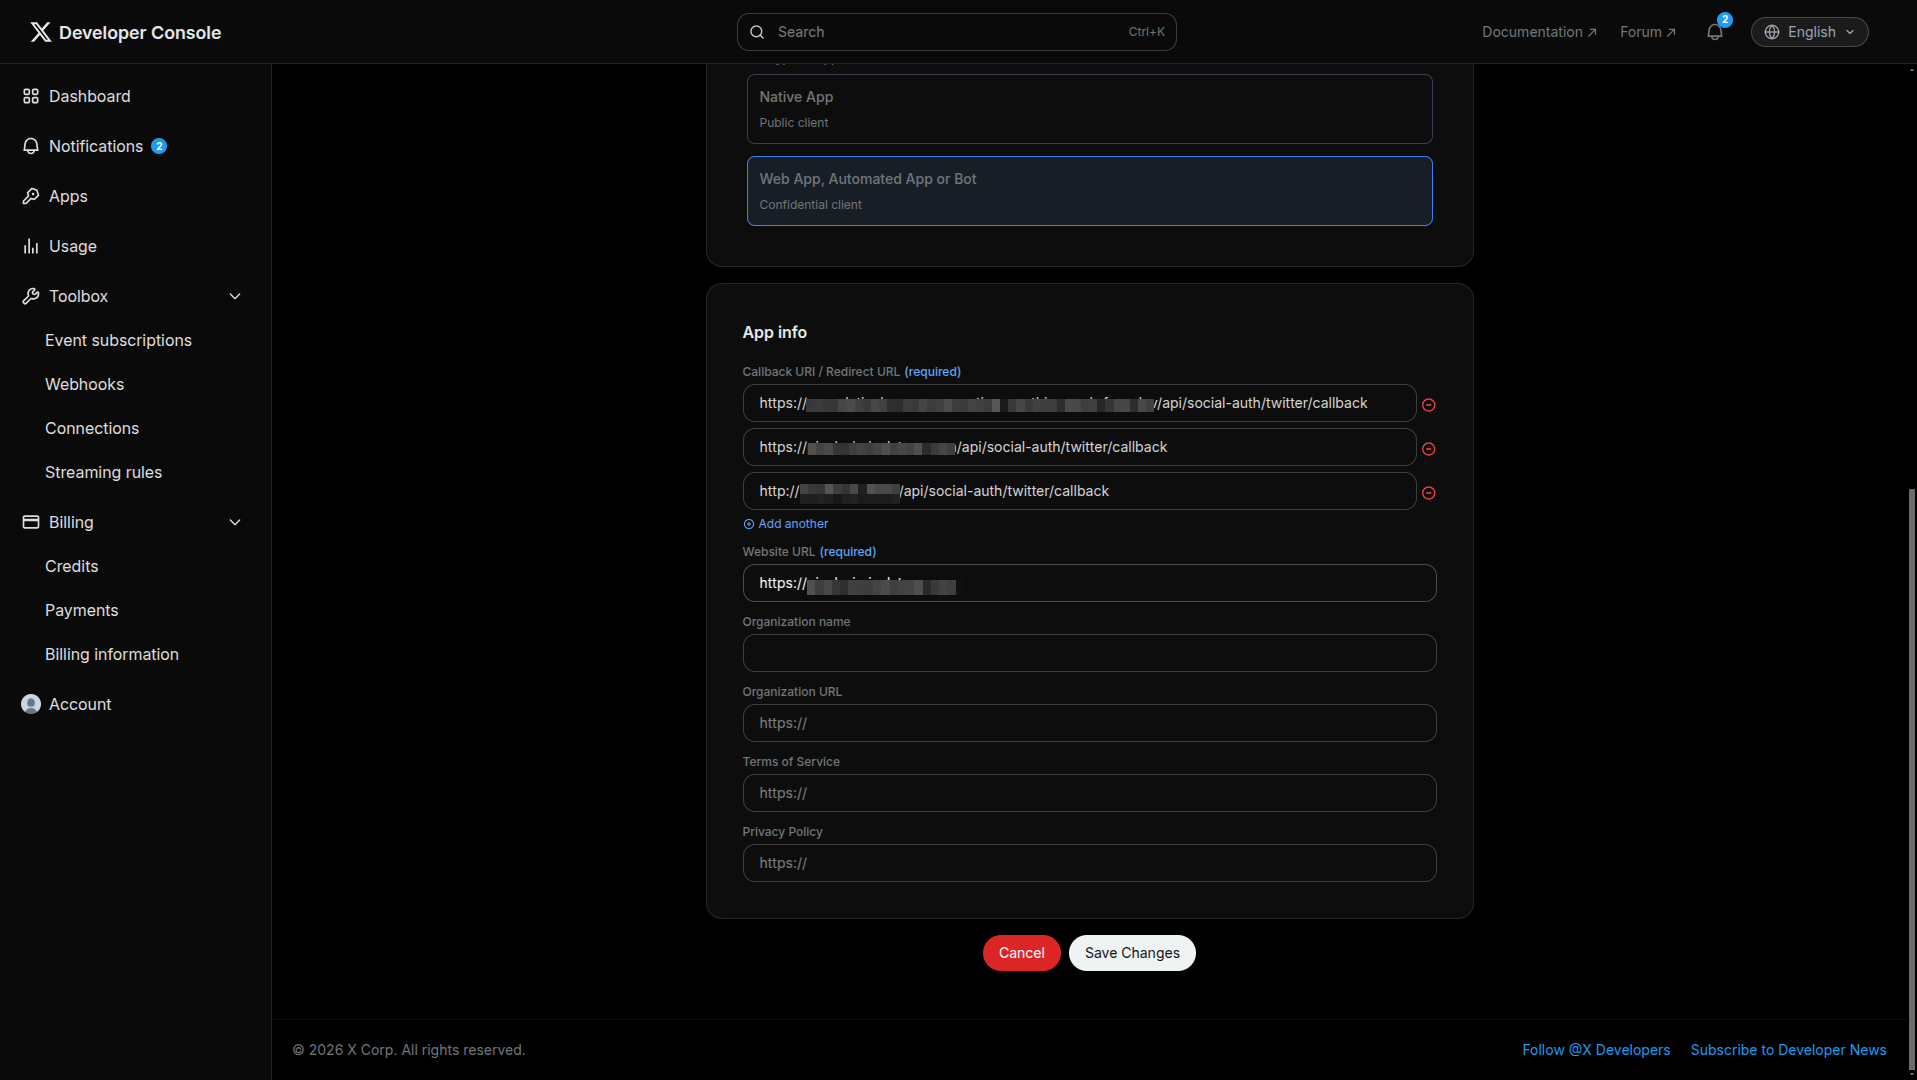
Step 3: App Setup Details
- Add your Callback URI / Redirect URL (required).
- Add your Website URL (required).
- Click Save.
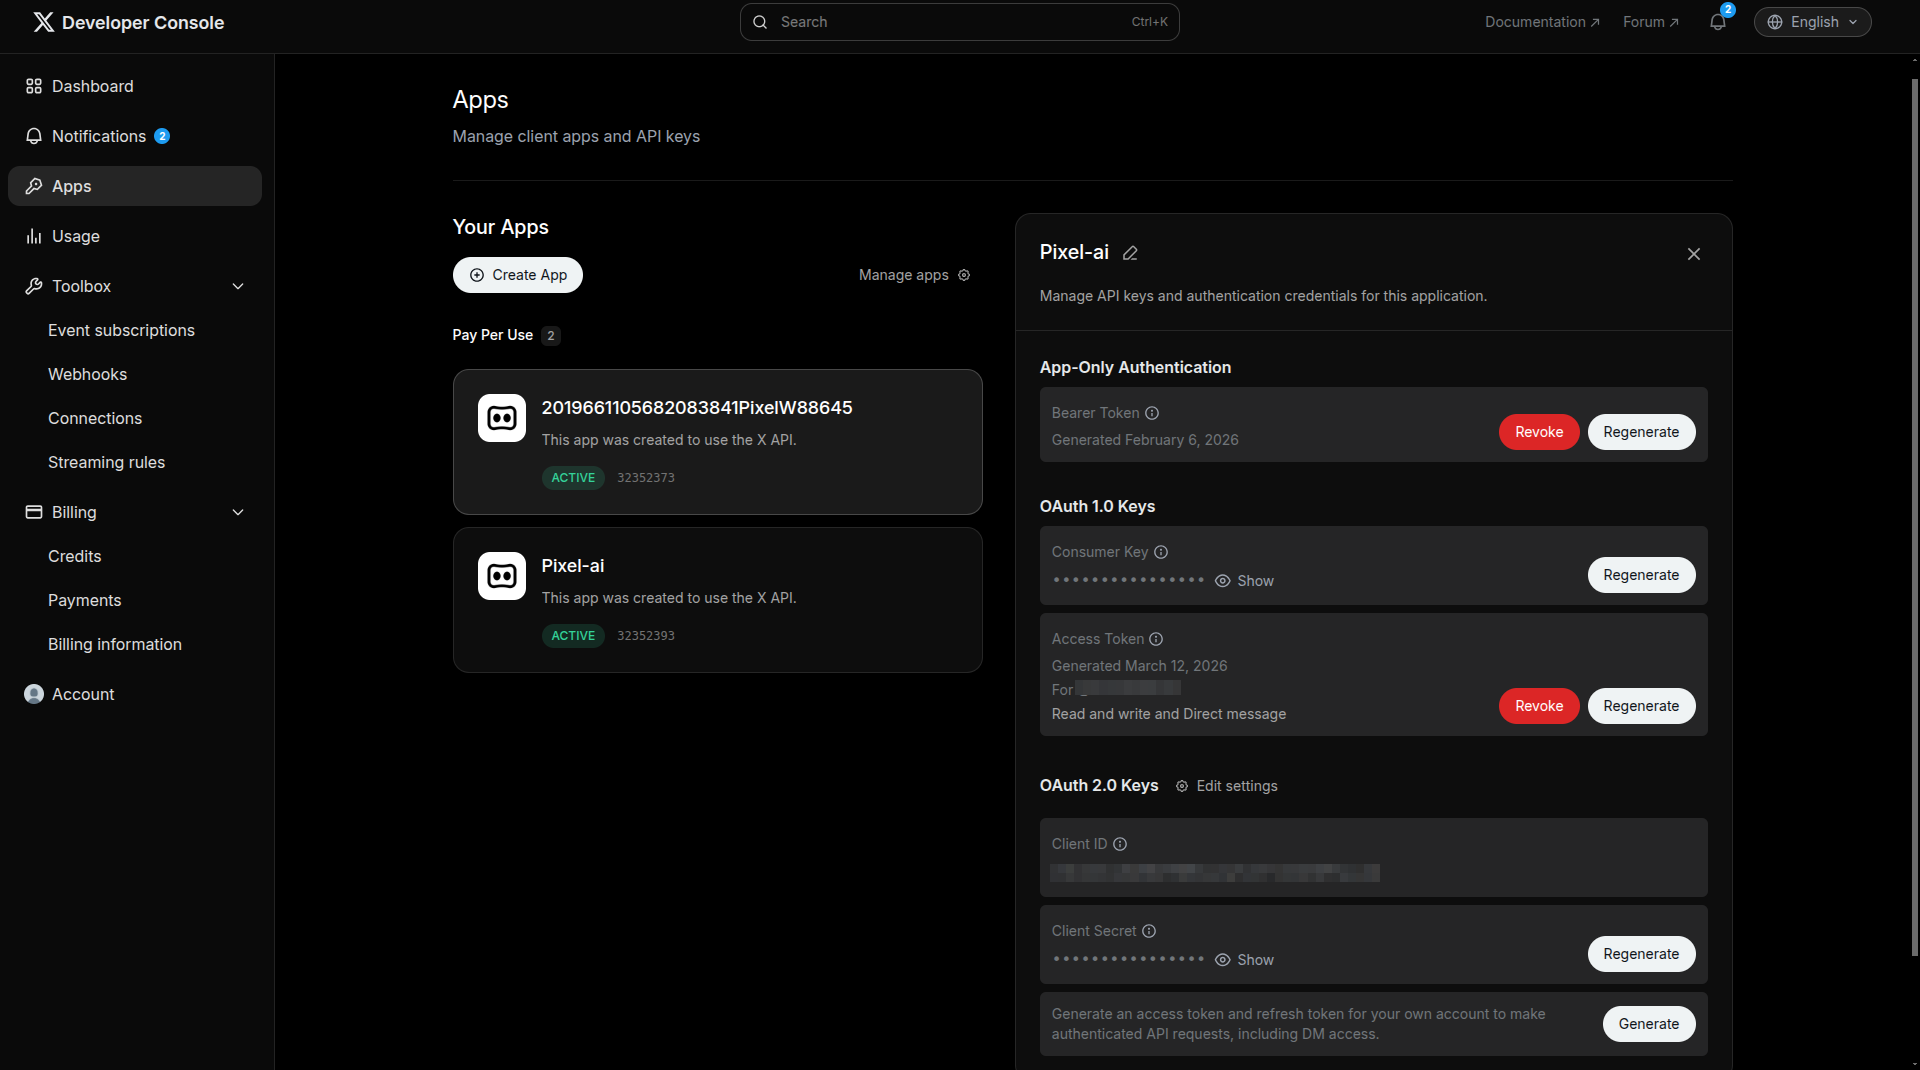
Step 4: Get Your Twitter App Credentials
In your Twitter App’s Keys and Tokens tab, copy the following credentials:
- Twitter Client ID (OAuth 2.0) and Twitter Client Secret (OAuth 2.0)
- Consumer Key (API Key) and Consumer Secret (API Secret)
- Access Token and Access Token Secret
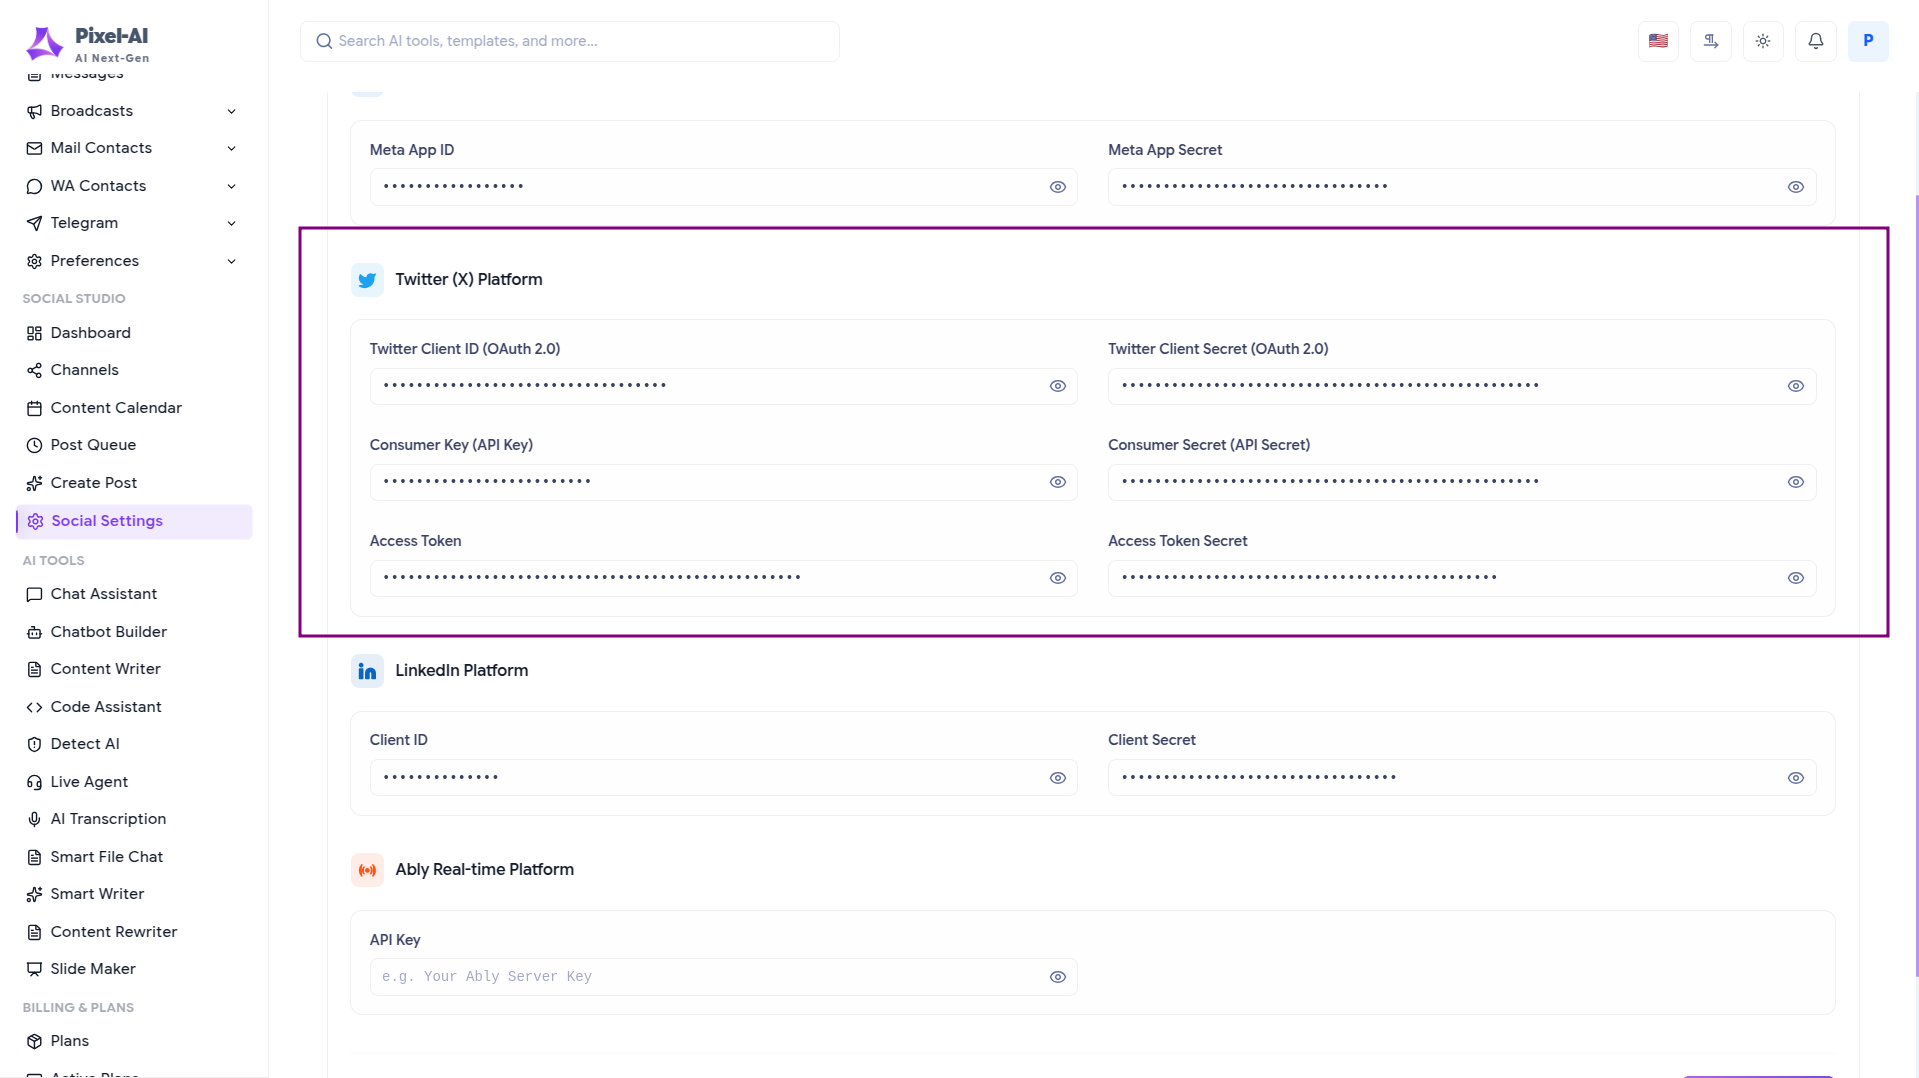
Step 5: Enter App Credentials in Pixel-ai
- In Pixel-ai, go to Social Media Studio > Social Configuration.
- Locate the Twitter (X) Platform section.
- Paste your credentials into the appropriate fields as shown in the platform.
- Click Save.
Next Steps
Continue exploring the Social Media Studio or manage your audience.


